Reasons for adjustment
For example, if the ignition is incorrectly configured, it will be difficult to start the engine; fuel consumption will also increase and loss of power will occur. In other cases, an incorrectly installed ignition led to engine overheating or detonation.
Therefore, adjustment is one of the components of routine car repairs. Currently, there are many ways to install ignitions on cars. Ignition for cars is installed either with or without a strobe light.
Sequence of adjusting the fuel injection advance angle
For high-quality adjustment:
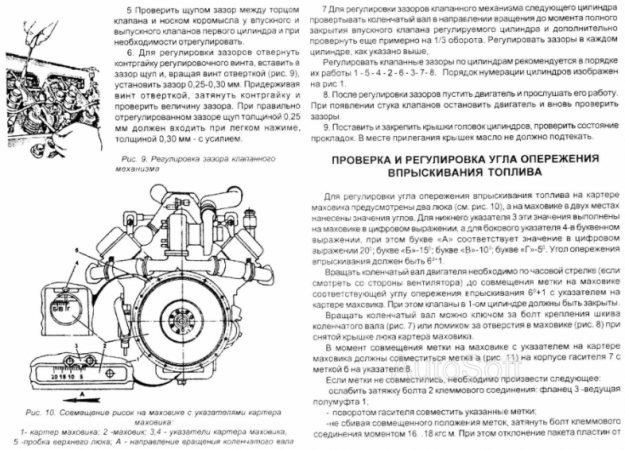
- checking the tight fit of the coupling half on the drive shaft and tightening the terminal bolt;
- unscrew the two bolts and the rotary advance clamping device using oval holes, align the marks “A” and “B” on the damper coupling flange;
- tightening the bolts on the drive;
- performing measurements near the places where the plates are attached (the permissible separation of the plate package from the plane level is ±1 mm);
- turn the crankshaft and check that the UOVT is set correctly (the permissible discrepancy between the marks is equal to one division or 1° of crankshaft rotation);
- checking the oil level in the OVT clamping device;
- checking the correct installation of the UOVT.
Read also: Filter for moped alpha
To check this, you should place the clamping device with the holes in the upper position and unscrew the plugs. If you slowly rotate the clamping device 70°, lubricant should begin to flow from one hole. After adding oil, you need to tighten the plugs.
Stages of work
Setting the ignition timing with a strobe light is quite simple. Necessary:
- Carefully read the instructions for safe operation of the device.
- Turn off the engine.
- Connect the device to the battery using special clamps, strictly observing the polarity.
- Attach the signal cable to the spark plug wire of the first cylinder to form a connection with the device.
- During operation, it is necessary to prevent wires from getting into rotating units.
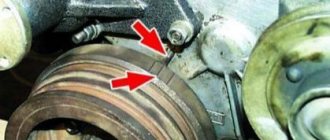
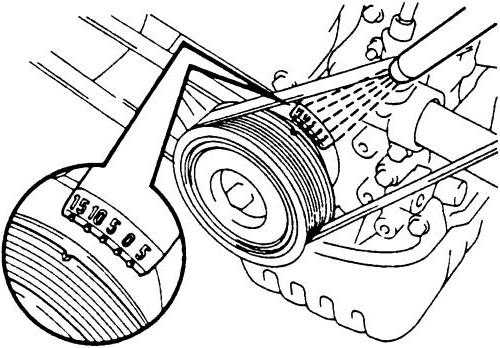
- Locate the white marks on the crankshaft pulley (or flywheel) and engine housing.
- Place the gearshift lever in neutral.
- Start the engine.
- Using dielectric gloves and waiting for the idle speed to stabilize, slightly loosen the bolt securing the distributor turns.
- Using a strobe lamp, highlight the previously found marks.
- Slowly rotate the distributor body until the marks coincide.
- Turn off the engine.
- Turn off the device.
- Having fixed the distributor body, you should test the vehicle.
Setting the advance angle
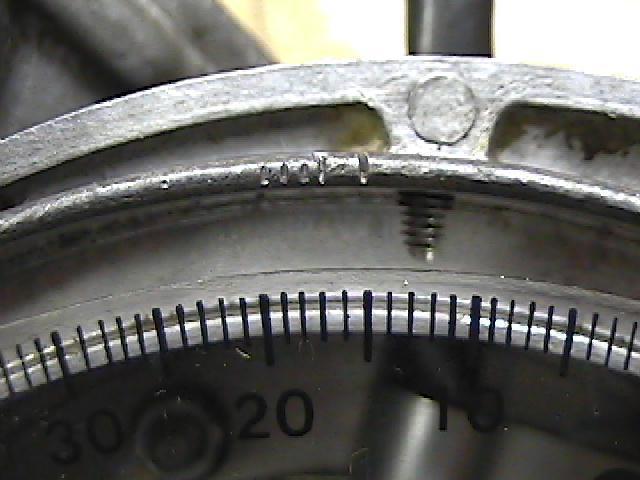
The required advance value is located next to the special mark. The YaMZ 236 fuel injection advance clutch is where this risk is applied. The normal value is 20 or 18 points. The angle of the fuel mass itself is determined by the primary cylinder.
Control is carried out using a conventional pump. So, they work on the power supply system of a car engine, without fail, first opening the valves through which air escapes from the engine. After the air masses have come out without any residue, the plugs are wrapped. Next, you should connect the momentoscope device to the fittings of the special section from the fuel pump. Before carrying out the procedure, it is necessary to remove the injection pump of the Yamz 236 cylinder.
Read also: Road accidents today
The advance is adjusted as follows:
- the bracket from the working power apparatus is transferred to the working state;
- drain all the fuel from the glass container until the volume of liquid reaches the mark in the middle part of the tube;
- carefully turn the crankshaft.
All movements must be made strictly in the direction of torsion. The current position of the meniscus in the tube must be constantly observed and monitored. Its sharp rise signals the start of fuel start-up by a certain section. The line marked on the pulley should be opposite the line with the number marks. The procedure for setting the angle requires special accuracy up to 1 value.
Strobe replacement device
Thanks to the use of this device, setting up the ignition is quite easy. But there are situations when it is necessary to adjust the lead angle without this device. Setting the ignition timing without a strobe is also possible. In this case, the driver should not despair, because you can use a regular neon lamp. True, you will have to carry out work in the darker hours of the day.
It is prohibited to carry out work on setting the ignition angle in a closed space. Exhaust gases can become a source of fatal poisoning. Additionally, when carrying out repairs, you will need a medium-sized flashlight in order to protect yourself from getting into working components of the car. The device that will replace the strobe should be made independently. To do this, you need to take a piece of 15 mm plastic pipe and attach a collecting lens to one side. A neon lamp of type TN-0.3 should be placed inside the tube. Another type can be used. The main thing is that it matches the brightness. It is necessary to bring out two wires from the lamp, one of which will be connected to the ground of the car, and the second will be wound on the high-voltage wire of the spark plug of the first cylinder. It is necessary to wind 10 turns over the insulation. The wires must have a thick insulation wall, and they are not screwed to the lamp, but soldered.
When working with a homemade device, you must not hold it in your hands, as a breakdown of the insulation of the high-voltage spark plug wire may occur and, as a result, you may receive serious injury. The device should be placed in a convenient place so that the light from the neon lamp, passing through the lens, hits the mark. In this way, the ignition timing on the engine is set.
Procedure for using a substitute
When working to set the advance angle, sparking must not be allowed in the engine compartment.
The ignition adjustment work depends on the engine brand. Setting the ignition timing without using a strobe is carried out according to the same principle as using it:
- You need to start the engine, first engaging neutral gear.
- Then, watching the displacement of the marks, slowly twist the distributor cap.
- When combining marks, the process should be stopped.
On a note. It must be remembered that the part illuminated by pulsed light appears static.
Checking ignition on diesel units
Diesel engines are almost no different from gasoline engines in some properties, but they are also demanding when setting the ignition. Setting the ignition timing of the Volkswagen T-4 will become the main example for considering repair work. Preliminary work will be carried out using a strobe and tachometer.
The adjustment is made immediately after installing the ignition distributor in the case when the ignition timing at idle does not meet the required values.
- If your car has air conditioning, you must turn it off. The engine, in turn, should be warmed up to average operating standards, that is, the coolant temperature should be 80 degrees.
- After warming up, you need to stop the engine.
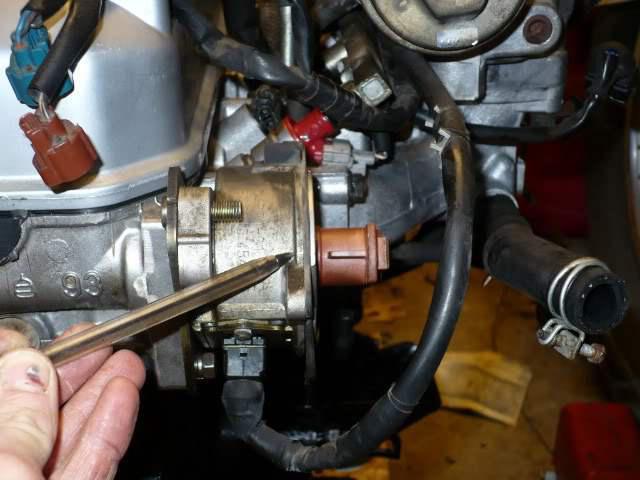
- Next, the tachometer is connected to the 1st and 15th terminals of the ignition coil. The ignition must be turned off at this moment.
- The strobe is connected according to the rules of polarity to the battery. A separate clamp is connected to the I/O wire of the first cylinder.
- Next, you need to remove the hose from the pressure control valve to ventilate the engine. The hose should be diverted so that only clean air ends up in it.
- Next, you need to start the engine, alternately letting it run both at idle and at higher speeds. As soon as the fan starts working, you need to leave only idle speed.
- Disconnect the 2-pole connector of the coolant temperature sensor. However, turning it off may cause the engine to stop. In this case, when restarting, the connector should be replaced. If this is not done, the ignition timing will be adjusted incorrectly.
- If the engine does not stop when you disconnect the sensor plug, you need to let it run at higher speeds.
- The strobe light should be directed into the crankcase. To avoid damage from the fan, it must first be turned off.
- If, during flashes, the torque corresponds to the mark, then there is no need to adjust the ignition.
Expert advice
It is best to make a torque scope yourself so that the device fits perfectly to the engine. You can create a device from several tubes. During operation, it is necessary to monitor the tightness of the tubes and prevent leaks.
Another important point is the process of pumping diesel fuel until the tube appears in sight. Inflating is done by rotating the shaft. A rise in the fuel mass will be noticeable when the shaft is rotated before directly approaching the elements of the first piston. It is important to rotate the shaft smoothly and very slowly.
With slippery fastenings of the YaMZ 236 m2 fuel injection pump, it is important to rotate it so that the injection of the fuel mass corresponds to the injection designation on the flywheel.
Turn the engine so that the flywheel pulley scale shows 20 degrees. At the same time, so that the mark on the fuel pump coupling is at the top; if the mark on the fuel pump pulley is not visible from above, then turn the engine another 360 degrees, again setting 20 degrees according to the mark on the crankshaft pulley.
Unscrew the two fastening bolts on the fuel pump coupling and turn the coupling to the maximum late ignition. This means that if you look at the pump from the radiator side, then counterclockwise.
Read also: Bmw e60 license plate illumination
Then unscrew the high-pressure fuel supply pipe to the first cylinder from the fuel pump. And the recess on the plunger, the place where the tube stood, should be drained of fuel by blowing or using a cloth.
Next, rotate the clutch clockwise in the direction of early ignition, very slowly, you can tap it with a mounting tool, since it is difficult to do this with your hands slowly and without jerking. Scroll until fuel appears slightly, slightly in the recess of the plunger, in the cone of the place where the high-pressure tube is screwed onto the first cylinder, on the pump. Fill this cone a third to a quarter full.
Owners of heavy-duty vehicles with diesel engines produced at the Yaroslavl engine plant are faced with problems adjusting the ignition of the high-pressure fuel pump (HPF). However, how to set the ignition of the YaMZ 238, adjust and check the fuel injection advance angle (FIA) can be found in this article.
Ignition adjustment on diesel units
In other cases, it may be necessary to adjust the ignition timing. To do this, just unscrew the locking screw a little and set the position of the distributor so that the mark coincides with the mark. The locking screws should then be tightened. They must be tightened using a torque wrench to control the tightening force. The tightening value should be 25 N/m.
After this, you need to connect the temperature sensor and sharply press the gas pedal three times. Then look again at the coincidence of the marks. If the circumstances are positive, the measuring instruments should be removed. Do not forget about the previously disabled fan drive.
Setting the ignition timing - carburetor
On VAZ cars, setting the ignition timing is very simple. Even a novice car enthusiast can handle the adjustment.
The engine, as in any case, should be turned off. Next, you need to set the position of the piston of the 1st cylinder to TDC, having first unscrewed and removed the spark plugs, and plugged the open holes with cotton wool. Next, the HF mark and the mark on the engine cover are combined. The alignment is done by turning the crankshaft 38 degrees clockwise using a special key. As soon as the cotton wool is pushed out of the holes, the shaft is rotated slowly until the marks align. It is worth remembering that on VAZ cars there are three marks that correspond to the ignition timing. For example, the first mark indicates a 10-degree ignition timing angle, the second is 50, and the third corresponds to zero degree.
A VAZ 2107 car with a carburetor engine can run on both 92 and 95 gasoline. Therefore, for these types of fuel, the ignition must be adjusted. To do this, you need to select an advanced angle of 5 degrees. After this, you need to install the candles in place.
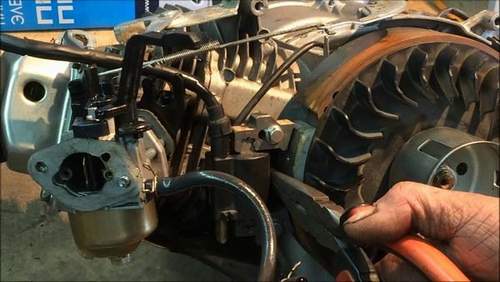
How to set the ignition on a Lifan walk-behind tractor
Without performing a high-quality installation of how to set the ignition, it is necessary to perform a certain set of actions. On different brands of cars, the ignition settings have several differences.
Spark plugs and wires “fly” infrequently. Usually, the matter is in adjusting the ignition, and often problems occur due to the fault of the car owners themselves, who want to “improve” something during the operation of the engine. But, as we know, there is no need to refine something that works well. Especially if you don’t have the proper qualifications. It will only get worse.
Fundamentally! Before removing the distributor, if such a need arises, simply use chalk to mark the position in which it was. This will make the job much easier later.
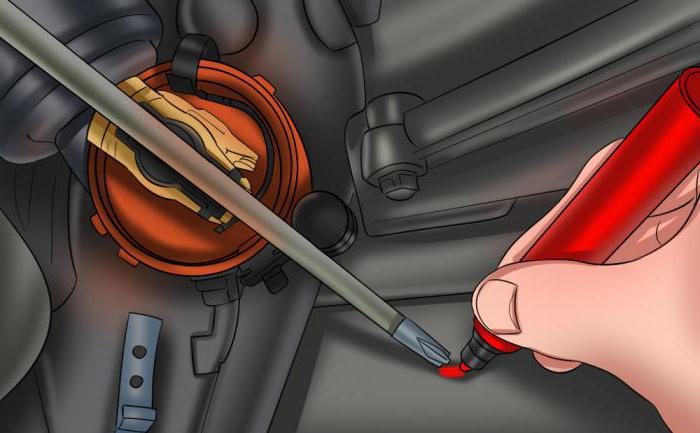
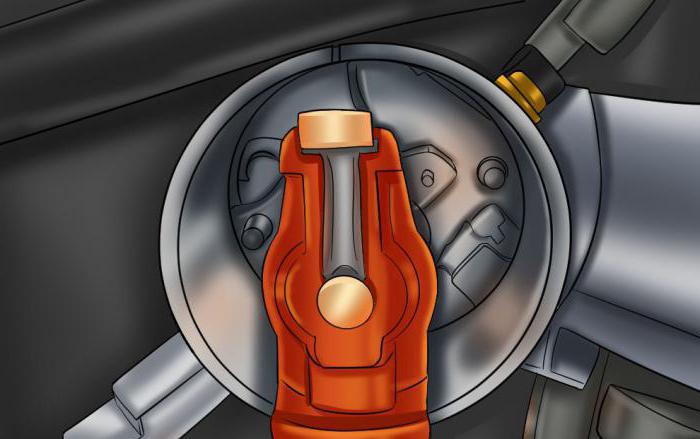
- Remove the distributor cover.
- The ignition should be set to the first or fourth cylinder. For this purpose, a 13 mm wrench, a voltammeter, and a spark plug wrench will be useful. Although the method for setting the ignition is similar for each cylinder, you still do this following the example of the first one.
- There are 3 marker strips on the timing cover: medium, short and long. The small one is advanced by 10°, the medium one is 5°, the long one is not advanced.
- Remove the spark plug from the first cylinder. Our client is left with no need to unscrew the spark plugs. One is enough. The hole should be plugged with a rubber stopper (or at least with your finger).
- Using a special wrench, turn the crankshaft until the compression stroke begins in the first cylinder. An indicator that the compression stroke has begun will be the ejected plug.
- Turn until the mark located on the crankshaft pulley aligns with the mark on the cover. For 92 or 95 gasoline, it is recommended to use a regular label; if 72 or lower, then it is recommended to use a long one.
- Release the latches and remove the distributor cover.
- Rotate the crankshaft so that the external contact of the distributor rotor corresponds to the first cylinder (sequence: 1-3-4-2).
- Return the distributor, but do not tighten the nut completely.
- Now, of course, we will deal specifically with the question of what, how to adjust the ignition.
- Using a voltmeter, we check the circuit: connect one end to the “low-voltage” terminal provided by the ignition coil, the other to ground. This is necessary, first of all, to make sure that there are no problems in the wires and that the ignition coil itself is working.
- Turn on the ignition. Slowly turn the distributor so that the voltage goes to zero. If it is zero, then nothing needs to be done.
- Later, we turn the distributor until a voltage of 12 V appears, and in this position we already tighten the nut. This can also be done using a 12-volt light bulb. Here the direction of the current does not matter.
- Turn off the ignition. Place the distributor cover.
READ How to Cut a Countertop for a Sink
Ignition Lifan and DM 1
Now we need to check the correctness:
- Start the engine and start driving in a straight line up to 45 km/h.
- Switch to fourth gear and sharply increase the gas. After 2-3 seconds, a “beat” appears in the form of pops, hum, etc. It will disappear during acceleration.
- If the “beats” do not go away, it means that the ignition is very “early”; if they do not appear at all, it means that the ignition is “later”. The ignition should be adjusted again. If the earlier passage is turned one-half of a notch clockwise, if later, then counterclockwise.
- An important point: when our client needs to adjust, stock up on paint (or at least chalk) to mark the adjusted best position.
- Do not turn the pulley with the distributor removed! This will lead to complete confusion of all marks, and you will have to “regulate” from scratch.
In Russian cars, at the base of the distributor, 4.5 crescent moon icons of various sizes should be noted: one small, the other long. They need to cooperate.
To facilitate adjustment, foreign cars use special hazards that simply need to be combined. In many cases, figuring out how to set the ignition is much easier.
READ How to Set the Ignition on a Diesel Motoblock
The fundamental difference between diesel engines and gasoline units is that there is no forced ignition of the fuel. There are simply no spark plugs. The fuel is ignited by compression in the cylinder. For this purpose, accurate injection operation is required, so that by the time of compression, fuel and oxygen are already in the cylinder with a good percentage.
This ignition adjustment takes place similarly, unfortunately, to the preparatory removal of a set of decompression accounting programs.
Today, it will be useful to remove the oil filler neck and the engine meter.
The lever is set to the last position. Using a torque scope, we check the presence of a jet when cranking the crankshaft. The injection timing must correctly correspond to the injection mark on the flywheel.
The cultivator is hitting the return line MTD T330t and why do you need a key 11
You should be aware that these are different units in their multifunctional capabilities. The difference between a walk-behind tractor and a walk-behind cultivator is that the latter is designed to work specifically with the ground (for example, plowing), while a walk-behind tractor is something universal. It works as a cultivator, but can also function as a pump, for example. A trimmer is a mower, then equipped with an internal combustion engine (usually electronic).
READ Remaking the Ignition of Motoblock Motoblock
But their motor design is virtually monotonous. Accordingly, you can regulate the ignition of a walk-behind tractor, a walk-behind cultivator (a cultivator with an internal combustion engine) and a trimmer, of course, according to the same scheme. Their motor is designed identically. When, the motor of gasoline electric stations is also designed in a similar way.
To adjust the ignition on a walk-behind tractor, you simply need to adjust the gap. We insert paper folded 4 times between the flywheel and the mounting of the module, which is responsible for igniting the walk-behind tractor (usually, the module is not dismountable), press a little and tighten the module mounting bolts. When the flywheel is rotated, a steady, powerful spark should appear on the removed spark plug. What remains for our client to do? Sometimes it may be necessary to select a gap with sheet thickness options. It is important that there is no friction after removing the sheet.
Source
What's next?
Setting the ignition timing (VAZ-2107 carburetor is no exception) does not end there.
Next, you need to take a 13-mm open-end wrench and slightly unscrew the ignition distributor nut. You can use a regular light bulb or take a voltmeter. One wire is connected to ground, the second to the low-voltage tap of the coil. After this, you need to turn on the car's ignition and slowly turn the lid until the lamp lights up or the voltmeter indicates voltage. Next you need to tighten the fastening nut. At this point, setting the ignition timing for cars with a carburetor is completed.