Setting the ignition timing of UAZ-3151
1. Disconnect the wire from the negative terminal of the battery.
2. Remove the distributor cap.
3. Rotate the crankshaft until the compression stroke begins.
To determine this moment, you need to unscrew the spark plug of the 1st cylinder and close the hole for the spark plug with your finger.
At the beginning of the compression stroke, air will begin to escape from under the finger.
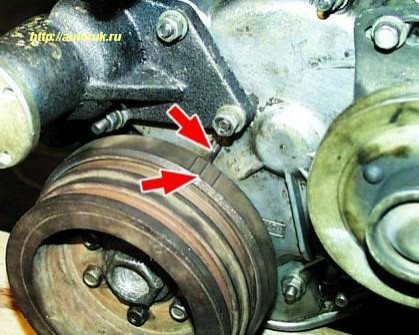
4. Carefully rotate the crankshaft until the second mark on the pulley coincides with the boss on the camshaft sprocket cover.
This mark corresponds to an ignition timing angle of 5° on an engine with an exhaust gas recirculation system (for engines without exhaust gas recirculation systems, install the pulley so that the middle of the pulley between the second and third marks is against the tide on the camshaft sprocket cover, which corresponds to an ignition timing angle of 2°) .
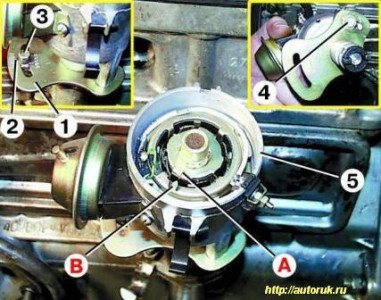
5. Loosen bolt 3 securing the distributor. Set pointer 2 of the octane corrector to the middle of scale 1 and tighten bolt 3.
Loosen bolt 4 securing the octane corrector plate to the distributor body.
Lightly press the slider with your finger against its rotation (clockwise) to select the gaps in the drive.
Holding the slider, slowly turn the distributor housing 5 until the red mark “ A”
on the rotor with arrow "
B"
on the stator.
Tighten bolt 4 securing the octane corrector plate to the distributor body.
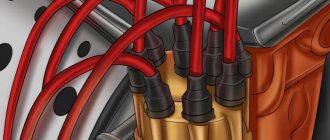
6. Install the distributor cap and connect the high-voltage wires in accordance with the operating order of cylinders 1-2-4-3.
7. Check the ignition timing setting. To do this, warm up the engine to a temperature of 80-90 °C and, moving on a flat road at a speed of 30-40 km/h, sharply press the accelerator pedal all the way.
In this case, detonation should be heard briefly.
If detonation is not heard, it means the ignition is late.
If the detonation is too strong, it means the ignition is too early.
When igniting early, turn the distributor body one scale division towards “+” (counterclockwise), and when igniting late, turn towards “-” (clockwise).
Then check the ignition timing again while the car is moving, as described above.
8. More precise setting of the ignition timing can be done using a strobe in accordance with the instructions included with the strobe.
UAZ 3962 › Logbook › Ignition
After replacing the high-voltage wires, the ignition did not give me peace.
I drove, and it seemed to me that it shouldn’t drive like that. Well, since there was nothing to compare with. I decided to double-check the ignition... Having read the Kama Sutra and the BZ of my comrades, I picked up the tool... and work began... The first thing I do is set the TDC. TDC
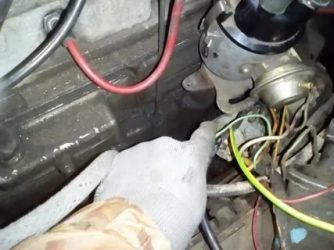
And I discover that the slider is looking in a different, abnormal direction for it.
slider
It was no longer possible to adjust the octane corrector to “-”; it was at the maximum “+”. And he ran into the engine.
stuck
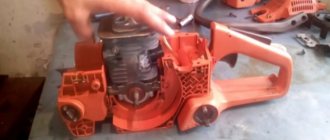
I remove the distributor and pull out the oil pump drive. To watch him live. There were no problems with removal. More on assembly later.
oil pump drive
Well, I think I took it all off and looked at it. We begin the assembly and configuration. Everything is like a textbook. (TDC - put in the drive - install the distributor - the slider looks at the first cylinder - the octane corrector is at “0”).
normal scheme
Using a control, I look for the moment of spark. But I see this kind of nonsense.
We clean the contacts and set the required gap.
gap 1
gap2
Let's Start...And! There is a knocking and grinding noise in the engine, in the oil drive area. I saw a similar problem in one of the Flight Logs. It turns out that the drive blade did not get into the pump bushing. 10 attempts to insert everything were unsuccessful. I also tried to put matches... The whole evening passed like in a cartoon about Winnie the Pooh. “It comes in and comes out...It comes out great.” Having abandoned everything, I go home to re-read the primers. And I find installation instructions.
installation
I do all these manipulations. Everything seems to be in place but does not reach its seat by 5 mm. Most likely the angle of the bushing is knocked off as in the diagram under the letter “c”. We are waiting for the weekend to continue the installation.
PS That's it, without waiting for the weekend I ran to the garage. I bought a long, wide screwdriver. And just like in a pharmacy. The bushing is 30 degrees, the drive is 45 degrees. and voila...everything is in place. I turned the crankshaft several times by hand... I listened and the blade didn't catch anything... I started it, warmed it up, everything was fine! All that remains is to check the accuracy of the ignition settings while driving.
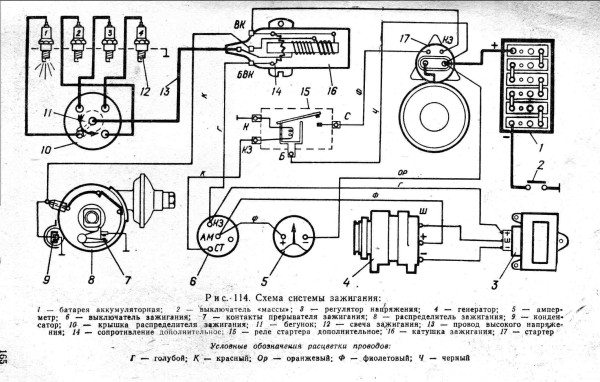
Ignition system UAZ 469
To start the engine of any vehicle, it is necessary that the combustible mixture ignites at the right moment in the combustion chamber. Effective operation of the piston system is achieved by correctly setting all parameters. The UAZ 469 ignition system allows you to operate the vehicle regardless of climate, temperature, humidity and other external factors.
The ignition of the UAZ 469 ensures that all elements are in good working order and flawlessly perform their assigned functions. For UAZ 469, the ignition circuit consists of the following components:
- ignition coil UAZ 469;
- distributor;
- tourniquets;
- switch;
- candles.
Each individual component of the electrical circuit must not allow breakdown to the car body and current leakage.
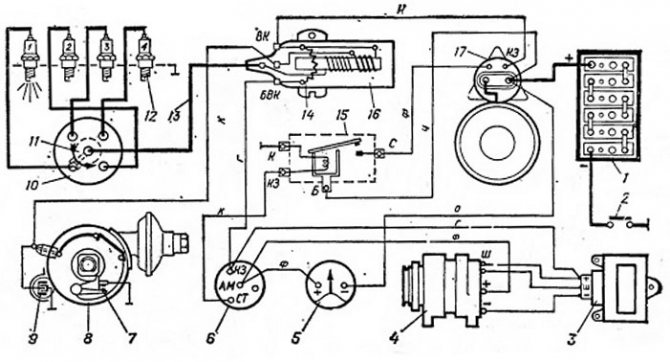
The ignition of a UAZ 469 car includes the following elements:
- battery;
- mass button;
- voltage regulator relay;
- generator;
- ammeter;
- ignition switch UAZ 469;
- breaker-distributor contacts;
- distributor;
- capacitor;
- ignition distributor-distributor cover;
- slider;
- spark plug;
- high voltage wire;
- additional resistance;
- additional starter relay;
- ignition coil;
- starter.
The ignition order of the UAZ 469 is strictly regulated; the spark occurs exactly in the specified sequence. An important point is not only the timeliness of the spark supply, but also its size. If the slightest interruption occurs, the entire chain is reconfigured.
A car battery is not designed to produce sufficient current and voltage required to ignite a combustible mixture. The charging current is only capable of spinning the engine flywheel for a short time. For stable operation of the engine, the entire ignition system of the vehicle must begin to fully function.
This important component of the machine is designed to significantly increase the power characteristics of the battery. Proper ignition, together with the battery, sends the spark plugs the sufficient volume and current required to reliably ignite the fuel mixture.
How to set the ignition correctly
In order to set the ignition on the UAZ 469, you must adhere to the following recommendations:
- Remove the distributor cover with the rotor. Check the size of the gap between the contacts. It can be adjusted. Between the contacts, separated as much as possible, there should be a gap of 0.35 - 0.45 mm. Adjustment is best done with a set of feeler gauges. Too small a gap produces a weak spark. If the gap is large, there may be no spark at all. Having made a normal gap, the rotor can be installed in its normal place.
- Using a spark plug wrench, unscrew the spark plug of the first cylinder. Close the candle hole with your finger. Using the starting handle, turn the crankshaft until the pin is pushed out by compressed air. This moment is called the beginning of the compression stroke of the first cylinder.
- Continue turning the crank until the hole on the pulley and the pin on the timing gear cover align. The rotor should be located opposite the internal contact of the cover, connected to the high-voltage wire from the spark plug of the first cylinder.
- Rotate the octane corrector plate together with the distributor so that the mark coincides with the middle mark on the scale of the plate.
- Lightly turn the timing mechanism housing counterclockwise. Scroll until the contacts of the distributor close.
- Connect the control light with socket. Connect one contact to the low voltage terminal of the distributor, the second to the ground of the machine. You can connect the warning lamp to the car body.
- Turn on the ignition and carefully turn the distributor clockwise. Rotate until the indicator light comes on, then stop rotating. It may be that the lamp does not light up. Repeat all steps from the very beginning.
- Tighten the distributor mounting bolt. Place the cover with the central wire in place. Check the adjustment starting from the first cylinder. The check is carried out counterclockwise.
Ignition circuit
The circuit depends on the type of ignition system of the UAZ-3151. In order to correctly set the contact, contactless, electronic or underwater ignition with your own hands, you need to use the repair instructions.
Contact
The contact system connection diagram includes the following elements:
- Lock. It is located on the steering column housing and is necessary to control the flow of current between the vehicle battery and the ignition.
- Battery. At the moment when the engine is turned off, the power source for all electrical equipment is the battery. It supplements the level of electricity produced by the generator set if it produces voltage below 12V.
- Switchgear. It directs high voltage current from the coil through the distributor handle in turn to each of the system's spark plugs.
- Capacitor. It is located on the switchgear housing and prevents the appearance of a spark between the open contacts of the system, protecting them from burning.
- Spark plug. A high voltage current moves along the central electrode of these mechanisms. A spark appears in the gap between the central and side electrodes, which ignites the fuel liquid in the cylindrical device.
- Drive unit. The distribution mechanism is equipped with a direct drive from the camshaft. The rotation speed of such equipment is 50% of the crankshaft speed.
- Centrifugal regulator. It is necessary to set the required ignition timing depending on engine speed. This mechanism includes weights that rotate and act on a plate with breaker contacts.
- Coil. Its design includes 2 insulated winding wires, which are wound on a core made of mild steel. The process of compression of the magnetic fields around the primary winding creates a high voltage current in the secondary winding, passing through the distributor to the spark plugs.
When the driver turns the ignition key, low voltage current from the battery passes to the primary winding of the coil. After this, it begins to form a magnetic field. Due to the rotation of the power unit from the starter, the contacts of the cam interrupter device open. At this moment, the magnetic field begins to disappear, and the power lines and turns of the windings form a high voltage current. The resulting impulse passes to the distributor housing cover, and the spark charge ignites the fuel-air mixture in the cylindrical engine device.
Contactless
In order to establish the contactless ignition timing on a UAZ, you need to prepare the following tools:
- set of wrenches;
- crosshead screwdriver;
- strobe;
- protective clothing in the form of glasses and masks;
- locking mechanisms for wheels.
Before you start connecting, you must put on protective clothing and place the vehicle on a flat surface and secure its wheels using special stoppers.
First you need to put a mark on the valve cover and align all the marks. After this, you should unscrew the spark plug of the first cylinder mechanism of the engine and remove the cover from the main distributor. If you pull out the spark plug of the first cylinder, you can track the stroke of the piston part of the engine.
Then you need to insert a long screwdriver into the spark plug well and turn the crankshaft clockwise by the ratchet, setting it to the highest dead center position. This will help push the screwdriver back out of the well. The mark on the pulley should be placed opposite the long mark on the power unit housing.
See » How to bleed the brakes on the UAZ “Bukhanka” and repair the main working units
After this, you need to loosen the lock nut that presses the distributor to the cylinder block. By rotating the housing, it is necessary to install one of the slots in the gap of the Hall sensor. At this time, the contact of the movable type of the slider must completely coincide with the side contact number 1 on the cover of the distributor, the body of which must be turned to a stable position and secured with a fastening nut.
Then you should tighten the nut securing the distributor and install the cover with the spark plugs in place.
When all the work is completed, you need to start the engine, warm it up to a temperature of +50...+60°C and adjust the non-contact ignition using a strobe light.
The strobe light must be connected to the distributor. It will provide simultaneous flashes with the formation of a spark in the cylinders. By pointing the lamp at the pulley, you can clearly see the position of the pulley mark and its change as the engine speed increases.
When the piston of the first cylindrical mechanism is in the highest dead center position, it is recommended to align the notch of the crankshaft pulley with the first long mark. This risk is located on the cover of the gas distribution mechanism assembly. This will help ensure the required advance angle of fuel injection at the second mark of 5°.
Electronic
In the electronic ignition system there is completely no mechanical movement of elements. The operation of this system is ensured by special sensors and a control unit. This makes it possible to increase the performance of the vehicle’s power unit and reduce the average fuel consumption.
In order to install electronic ignition, it is necessary to move the 4 cylinders of the engine part to the highest dead center position. To do this, you will need to turn the crankshaft ratchet until the marks align with the pulley.
After this, it is necessary to dismantle the distributor, spark plugs and coil, lay new wiring and install a high-voltage coil. Then you can attach the switch to the engine compartment shield and screw in new spark plugs.
High voltage wires must be connected in accordance with the operating order of the cylindrical mechanisms (1-3-4-2).
The brown wire should be connected to connector number 1. To connector number 2 - black. A white wire is connected to connector number 3, and a blue wire is connected to number 4.
In order to set the ignition correctly, you need to prepare a test lamp, a 13mm wrench and a special wrench for the crankshaft. Before starting work, you must turn off the engine and allow it to cool. After this, you need to disconnect the negative terminal of the motor.
Then you need to set the first cylinder to the ignition position. Align the mark on the pulley with the mark on the timing gear drive.
After setting the marks, you can proceed to dismantling the system key. After this, it is necessary to determine the ignition timing. To do this, you need to connect the negative terminal, using a wrench to loosen the fastening nut of the switchgear. Connect one wire of the lamp to the ground of the car, and the second to the low-voltage coil. Turn on the ignition and turn the switchgear housing clockwise until the warning lamp stops lighting.
Did you like the article? Follow our channel for new ideas of useful car tips. Subscribe to us in Yandex.Zen. Subscribe.
Electrical wiring of UAZ 452: reliable single-wire circuit
Why turn on the ignition?
With the ignition set correctly:
- The engine operates efficiently, steadily and stably in all modes. Otherwise, the engine functions intermittently, knocking, and popping. Unstable engine operation causes many problems and reduces vehicle dynamics and speed characteristics.
- After correct ignition adjustment, starting a cold power unit is significantly improved.
- When the ignition is misregulated, fuel consumption increases. After adjustment it decreases significantly.
- Engine power also increases noticeably in a car after proper ignition adjustment.
What are the ignition systems on the UAZ 469
Contact ignition on UAZ 469
. Now it is recognized as obsolete. However, domestic manufacturers continue to use it. The system launches a pulse of a certain power. This impulse comes from the ignition distributor. The contact ignition circuit of the UAZ 469 is simple and uncomplicated. This is its advantage. The driver can fix any malfunction and make adjustments with his own hands. The prices of components are low.
Transistor or contactless ignition of UAZ 469
. Contactless ignition systems are installed on many types of vehicles. It has a number of advantages over the contact design. The spark produced by such a device is much more powerful. This occurs due to an increased level of electrical voltage in the secondary winding of the ignition coil. The transistor ignition system is equipped with an electromagnetic mechanism. It ensures stable, constant operation of the entire system, uninterruptedly transferring energy to components, parts, and mechanisms. Correctly configured ignition with an efficient internal combustion engine guarantees high power and significant fuel savings. Long-term reliable performance is ensured by compliance with the frequency of maintenance of the distributor drive. It must be lubricated and adjusted every 10,000 km. The difficulty of repair is a disadvantage of the contactless ignition system. It cannot be repaired independently, since this requires special diagnostic equipment, available only in service centers and service stations.
Adjusting the UAZ ignition
Adjusting the ignition timing SEQUENCE OF ACTIONS
Using the starting handle (from the car tool kit), set the crankshaft to the position corresponding to the ignition timing angle of 5°.
For this…
...align the middle mark on the crankshaft pulley with the boss on the block cover at the end of the compression stroke in the first cylinder.
If the distributor sensor is not removed from the engine, then the compression stroke of the first cylinder is determined...
...by removing the distributor cap.
The slider should stand against the internal contact of the cover, connected by a wire to the spark plug of the first cylinder. Or we turn out the spark plug of the first cylinder. Closing the hole with a paper stopper, rotate the crankshaft. The moment the plug comes out corresponds to the beginning of the compression stroke.
Use a 10mm wrench to loosen the octane adjuster bolt...
...and set its scale to zero division (the middle of the scale).
Use a 10mm wrench to loosen the bolt securing the octane corrector plate...
...and, turning the housing of the sensor-distributor, we align the marks (the red line on the rotor and the arrow on the stator). Holding the sensor in this position, tighten the bolt.
Make sure that the slider is located against the contact of the cover of the first cylinder and check that the high-voltage wires of the remaining cylinders are connected correctly - counting counterclockwise from the first cylinder in the order 1-2-4-3. We recommend that you additionally check the correct ignition timing while the vehicle is moving. To do this, moving in fourth gear at a constant speed of 50–60 km/h, sharply press the gas pedal. If in this case detonation (the sound is similar to the knocking of valves) appears briefly - for 1-3 s, then the ignition timing is chosen correctly. Prolonged detonation indicates excessive ignition timing. We reduce it with an octane corrector by one division. The absence of detonation requires an increase in the ignition timing, after which the test must be repeated.
UAZ underwater ignition diagram
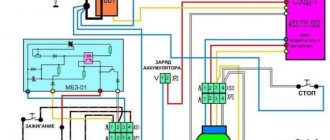
Or you can go further, throw out the standard harness, the EPH system and install a switch under the hood in place of the variator. The additional resistance terminal “to the starter relay” in some wiring options is connected to additional contacts on the ignition switch, and not to the starter relay. Coil - for contact ignition system! An interesting addition to the ignition system with an ATE-2 distributor and a Hall sensor will be the 962.3734 switch complete with a knock sensor (automatic octane corrector). The knock sensor is connected to the 7th leg of the switch, which is usually not used. The bottom line is that the figure-eight distributor on the figure-eight engine is located “from the ass” of the engine and is driven by the camshaft.
A pair of Hall sensors located at 90 degrees are placed in the distributor. relative to each other. A “butterfly” plate is put on the axis; when it moves in the Hall sensors, it alternately generates pulses. Any distributor will do, the main thing is that it matches the type of drive and is in good working order.
Recommendations for setting up the distributor Is it possible to install a distributor from Volga on a UAZ? Experience in operating a distributor with a Hall sensor (article) How to isolate the distributor from water? Converting contactless ignition to contact I easily converted all the electronic ignition on 31519 with a 3 l engine.1. The standard electronic ignition distributor is replaced with a mechanical one R 119-B;2. The standard ignition coil is replaced with a B-117 A;3. The standard switch and variator are simply removed;4. If the ignition system is contact, then the bearing in the ignition distributor may be worn out or the gap between the contacts may be incorrectly set. Using a crooked starter, you set the distributor slider to the first cylinder, and the middle mark on the KV pulley (ZMZ 402) or the first along the pulley (UMZ engines) opposite the pin. Designed for installation on GAZelle and Volga cars with a ZMZ-4026.10 carburetor engine instead of the standard ignition system.
STEP 4: Connect the wiring and install the switch. We insert the wires into the distributor.
Instructions for installing and configuring the ignition on a UAZ

Starting the engine of any car is possible due to the ignition of the combustible mixture in the cylinders of the power unit. To ensure normal operation of the engine, proper adjustment of the ignition system (IS) is necessary. In addition, all elements, including the coil, distributor of the UAZ vehicle and other components must always be in working order.
Description of SZ on UAZ
How is the ignition circuit installed, configured and adjusted on the AUZ 417 or any other? We will talk about this below. But first, let's understand the principle of operation of the node, as well as the types of SZ.
Operating principle of SZ
As already said, the ignition on an UAZ performs one of the main functions when starting the power unit. Thanks to this system, the procedure for igniting the air-fuel mixture in the cylinders of the power unit is carried out by supplying a spark. The spark is directly supplied to the spark plugs; one spark plug is installed on each cylinder. All of these safety devices operate in sequence mode, igniting the combustible mixture in the required period of time. It is also necessary to take into account that the ignition system on cars not only provides a spark, but also determines its strength.
Installation of the UAZ 417 distributor drive: order and ignition circuit, adjustment and configuration of the lock
The UAZ distributor is considered one of the important components of the ignition system in a vehicle. Correct adjustment of this mechanism ensures optimal operation of the power unit as a whole. You can learn more about the principle of operation of the ignition system and how to set it up correctly with your own hands from this material.
What is the connection diagram for electronic or contactless ignition on a UAZ 417, how to convert contact ignition to contactless? Why does the coil heat up and how to adjust and adjust the advance angle? First, let’s look at the main points regarding the action and types of SZ.
Operating principle of SZ
Contact system diagram
The ignition system, or rather its correct setting, plays a big role in the operation and starting of a car engine. With correct adjustment, the combustible mixture will burn correctly in the power unit as a result of the supply of charge through the spark plugs. A spark plug is placed on each cylinder of the UAZ engine, each of which is turned on in a certain order, in turn, delivering a discharge to the cylinder after a certain time. It must be taken into account that any SZ makes it possible not only to deliver the required discharge, but also determines its strength.
How to set it correctly?
After connection, how is the ignition installed for proper engine operation?
What is the procedure and how to correctly set the node settings, read below:
- To begin, the vehicle must be secured in place, and turn on the handbrake. The piston of the first cylinder must be installed at top dead center; note that the hole on the crankshaft pulley must coincide with the mark located on the timing gear cover.
- The cover must be removed from the switchgear. Having done this, you will see a slider located opposite input 1, inside the cover. If it is not there, then the crankshaft must be turned 180 degrees and the octane corrector set to 0. Using a wrench, screw the pointer to the distributor controller body so that it is aligned with the middle mark on the octane corrector. Loosen the screw securing the plastic to the distribution controller housing a little.
- Carefully turn the housing, holding the slider with your finger so that it does not rotate. This way you can eliminate gaps in the drive. The housing is rotated until the sharp part of the petal on the stator is aligned with the red mark on the rotor. Secure the plate with a screw to the controller body.
- The next step will be to install the controller cover in place and diagnose the high-voltage wires. They must be installed in accordance with the order of operation of the cylinders, that is, first, second, fourth, third. When the ignition timing is set, it is necessary to diagnose the correctness while driving.
- Start the power unit and warm it up for about ten minutes until the temperature is about 80 degrees. Moving on a flat and straight road at a speed of approximately 40 km/h, sharply press the gas pedal. If, when accelerating to 60 km/h, you feel or hear detonation, it should be short-lived, then everything has been done correctly. If the detonation is very strong, then the distribution controller must be turned half or one division counterclockwise. In the complete absence of detonation, the set advance angle should be increased, that is, the controller should be turned clockwise.
Review of SZ on famous UAZs
What is the connection diagram for electronic or contactless ignition on a UAZ 417, how to convert contact ignition to contactless? Why does the coil heat up and how to adjust and adjust the advance angle? First, let’s look at the main points regarding the action and types of SZ.
Operating principle of SZ
Contact system diagram
The ignition system, or rather its correct setting, plays a big role in the operation and starting of a car engine. With correct adjustment, the combustible mixture will burn correctly in the power unit as a result of the supply of charge through the spark plugs. A spark plug is placed on each cylinder of the UAZ engine, each of which is turned on in a certain order, in turn, delivering a discharge to the cylinder after a certain time. It must be taken into account that any SZ makes it possible not only to deliver the required discharge, but also determines its strength.
Due to its technical characteristics, the car’s battery cannot produce the voltage and current required to ignite the mixture. This is due to the fact that the battery can only produce a current of a certain strength. And thanks to the correct operation of the system, the current value increases significantly, which allows you to successfully ignite the air-fuel mixture.
The operating principle of the system consists of several stages:
- First, the driver inserts the key into the ignition and turns it, electrical energy is stored in a coil.
- Then the coil converts the low-voltage voltage in the on-board network of 12 volts into high-voltage. As a result, the voltage value increases to 30 thousand V.
- After this, the discharge is distributed and supplied to one or another spark plug.
- The candle itself produces a spark that ignites the mixture.
Diagram of the UAZ contactless system
What types of SZ are there?
Domestic UAZ vehicles can use one of three ignition systems; let’s look at each of them in detail:
- Contact view. This type of SZ is outdated, however, it is used on most machines. In such a system, the principle of operation is to issue a certain impulse that is formed in a distributor - a distribution device. The contact system is considered one of the simplest in terms of design, which is an advantage, since if a malfunction occurs, the car owner will be able to independently check and repair the system. In addition, prices for structural parts of the contact system are usually affordable, which is good news. The contact SZ includes a coil, a switchgear, a breaker, a capacitor and spark plugs.
- Non-contact type, also called transistor type. Compared to the contact system, the contactless system has more advantages. The resulting spark has a higher power, which is achieved due to the formation of high voltage in the secondary winding of the coil. Also, contactless systems are equipped with an electromagnetic device, which makes it possible to achieve more stable operation of the engine. Ultimately, if the UAZ power unit is configured correctly, then by using a contactless system you can not only increase its power, but also achieve fuel savings, albeit insignificant. Also, such systems are easier to maintain. One of the main nuances in terms of maintenance is the need to periodically lubricate the distributor drive - at least every 10 thousand kilometers. One of the main disadvantages is the difficulty of repair. In practice, repairing a contactless SZ will be problematic, since diagnosing the system will require equipment that is usually available at a service station.
- The ignition system can also be electronic. This option is currently considered one of the most progressive and expensive; it is installed mainly on new cars. Compared with contact and non-contact systems, the electronic system has a more complex structure. The main advantage of this system is that, if necessary, the process of adjusting the ignition angle will be much easier. In addition, there are no contacts in the electronic system that are susceptible to oxidation. It should also be noted that in practice, the combustible mixture in the cylinders of a power unit with an electronic system almost always burns completely. But despite all the advantages, electronic repair systems also have their disadvantages, which relate to device repair. It is almost impossible to repair such an SZ with your own hands, since to perform this task, again, you will need equipment (video published by Nail Poroshin).
So, how to set the advance angle yourself in order to achieve proper operation of the UAZ engine:
- First of all, you must lock your car in one place by pulling the parking brake lever. Rotate the crankshaft so that the piston of cylinder 1 reaches TDC (top point). In this case, you need to ensure that the hole on the crankshaft pulley coincides with the mark marked on the timing gear cover.
- After this, remove the cover from the distribution mechanism. After dismantling, you will be able to see the slider, which is located inside the cover itself, opposite the contact. If there is no slider, you should turn the crankshaft 180 degrees again, and then set the octane corrector to 0. Using a wrench, you will need to screw the pointer to the distribution mechanism housing so that it aligns with the middle mark. When these steps are completed, the fastening bolt with which the plates are attached to the distributor body must be loosened slightly.
- Then, holding the slider in one place with a finger to prevent it from rotating, you need to carefully rotate the housing itself, this will allow you to remove possible backlash in the drive. The housing must be rotated until you achieve alignment of the sharp end of the stator mechanism petal with the red mark located on the rotor device. After this, the plate itself must be secured to the body using the appropriate bolt.
- Once you have completed these steps, you need to replace the controller cover and check the high voltage cables. You need to make sure that these wires are installed in the correct sequence, taking into account the firing order of the cylinders. When you manage to correctly adjust the lead angle, you need to make sure that the entire procedure was performed correctly.
- To diagnose the correctness of the actions performed, you need to start the engine of your UAZ and wait about 5-10 minutes until the power unit warms up. The operating temperature of the engine is about 90 degrees; you can wait until the internal combustion engine warms up to 80 degrees. Then you need to drive onto a flat road and accelerate the car to 40 km/h, after which you should sharply press the gas. At this moment, the car will accelerate and if, when the speed increases to 60 km/h, a short-term detonation (metallic knock) is heard from under the hood, then this indicates that all actions were performed correctly. If the detonation is too long, the system will need to be adjusted. To do this, the housing of the distribution mechanism will need to be turned one notch or half, and it must be turned counterclockwise. If the diagnostics showed that there is no knocking of the “fingers” at all, then the advance angle should be increased. To do this, the mechanism should be turned in the opposite direction.