Flat cutters for a walk-behind tractor: advantages and disadvantages of using the device
Flat cutters can be safely called a kind of hybrid of a harrow and a knife. They are mounted parallel to the ground or at a slight angle. As a result, the device sinks into the soil to a shallow depth and cuts off the roots of weeds, thereby turning the soil itself, promoting better preservation of moisture and nutrients.
In addition to the above positive aspects, flat cutters:
- improve soil condition;
- destroy crusts and lumps formed after heavy rain;
- repel pests;
- prepare the soil for long-distance planting;
- perform inter-row cultivation of crops;
- saturate the top layer with oxygen.
Naturally, in some cases, owners purchase flat-cutters with a ripper for a walk-behind tractor, which not only perform the mentioned tasks, but also remove excess load from a person, are easy to operate, do not require lifting, and are characterized by excellent productivity. Such devices often have a fairly affordable price, but some craftsmen manage to create flat-cutting rippers for walk-behind tractors with their own hands.
Do-it-yourself flat cutter for a walk-behind tractor: a simple manufacturing method
If the walk-behind tractor has quite impressive characteristics, it is advisable to make several flat cutters and place them on the device. Thus, you will get an even more productive unit that will not only save time, but also energy.
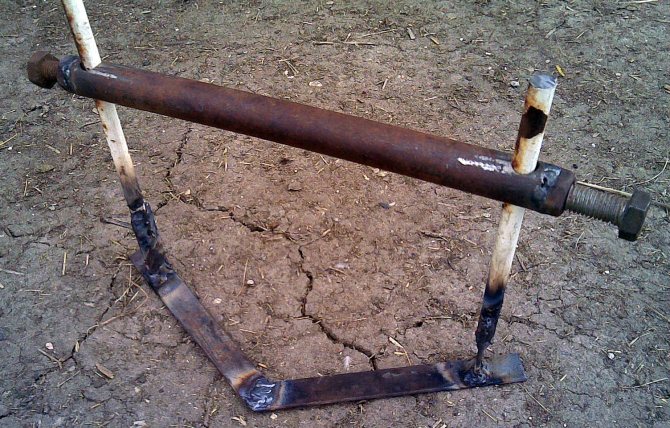
For excellent maneuverability of the created flat cutter, you need to take care of the appropriate wheels. Almost any materials are suitable for them. An iron tube would be an excellent choice for an axle.
Then, it is advisable to weld two circles on both sides of the concrete cutting. According to the diameter, you need to attach several wires (using a welding machine), the diameter of which does not exceed 8 mm.
On the inside of the axle, it is necessary to leave space for placing the bearing and further installation of a homemade plane cutter. Since the walk-behind tractor body is not always made of very durable material, the main emphasis is on the axle. After the bearing is attached, a plate should be welded to it.
Flat cutter blades can be created from separated mower parts. Their lightness and compactness make them ideal cutting element components. It is important to make sure that they are securely fastened, otherwise the structure will move from side to side and will not perform its task efficiently.
To limit the depth of immersion, small wheels are often used. A standard children's car can be an excellent “donor”.
The wheels themselves can be supplemented with iron parts so that the plastic does not deteriorate while driving. The immersion depth must be at least 5 cm.
To increase the weight on the flat cutter for the cultivator and increase the pressure for entering the soil, you can weld a weighting agent in the form of any part. If the necessary components are missing, you can use a basket of bricks, but such a solution is not convenient.
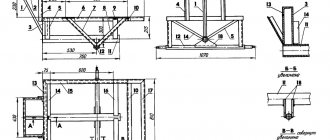
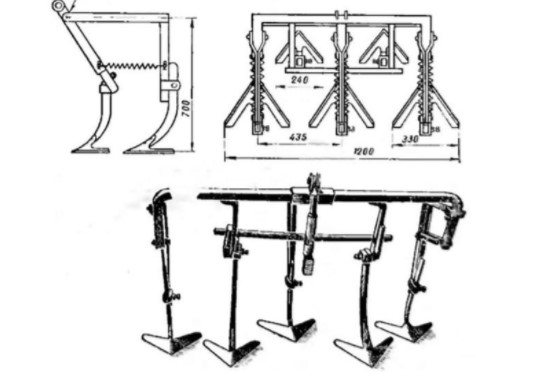
For a better understanding of the design features, it is suggested that you familiarize yourself with the drawings. The presented videos can also serve as a guide, because on these materials many craftsmen share their experience with users and reveal the secrets of creating truly durable and reliable attachments for walk-behind tractors.
It is worth noting that the created flat cutter is suitable for both Neva walk-behind tractors and equipment from the brands Centaur, Salyut and others. The versatility of the product allows you to create a truly excellent assistant at home and without any special financial costs!
Homemade products for walk-behind tractor
The question of where to start designing attachments for walk-behind tractors is quite reasonable. The fact is that almost all walk-behind tractors are equipped with factory-made trailers, designed for the use of standard types of equipment. It is necessary to clarify, however, that it is the standard equipment that does not satisfy the needs of buyers - trailed systems turn out to be too delicate and fragile when used in harsh operating conditions.
For domestic walk-behind tractors, trailers are mainly made of welded steel, but for mass Chinese production it is mainly cast iron or a metal alloy. It is clear that for one body plow even the most powerful cast iron adapter will not withstand.
Therefore, the first thing you need to create is a do-it-yourself plow towed to a walk-behind tractor. Here, it is better to take the standard design as the basis of the design - the adapter is a hinge with the ability to fix the plow in different positions, which is especially convenient for plowing small areas when a plow is used with both a left and right blade.
It is recommended that the adapter itself be made with the ability to be fixed not only in the vertical, but also in the horizontal planes using turnbuckles and bolted connections.
This option will help you use it for plowing, hilling, and for installing a seat adapter for a mower or a rake for turning hay in haymaking.
Universal trailer for walk-behind tractor
The presence of a trailer ensures mobility, because it is one thing to drive a walk-behind tractor with already installed units; it’s another thing when a plow, cutter or potato planter is simply loaded onto a trailer and transported by the walk-behind tractor itself.
You need to calculate the parameters of trailed equipment for a walk-behind tractor based on its power, the principle here is simple - 1 liter. With. means the ability to transport 100 kg of payload on a trolley. The simplest and most reliable design is a single-axle trailer with a load on the central axle. And although the carrying capacity of such a trailer is small, only up to 500 kg, this is quite enough to install a seat on the trailer and operate a walk-behind tractor while sitting on the trailer.
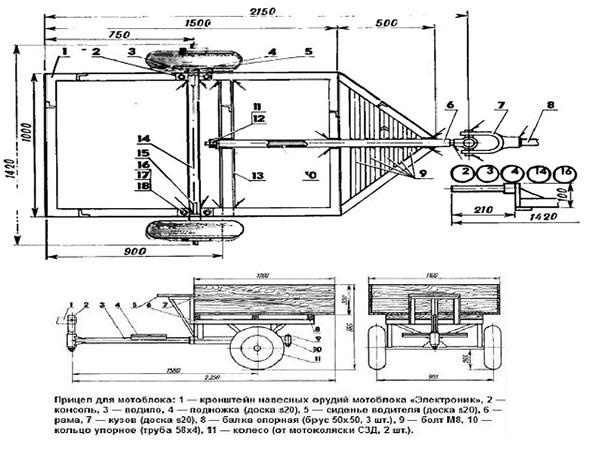
The most difficult thing here is to select the necessary components. It's easiest to use ready-made parts. For example, a do-it-yourself hub for a walk-behind tractor is made from an automobile hub for passenger cars. This allows you to use standard car wheels and tires for the equipment of the unit. On the other hand, a hub from a VAZ classic is perfect for making other useful homemade products - lugs, winches, wheel weights.
For the trailer, a structure made of a rectangular pipe is mainly used, but a channel and an I-beam can be used as a frame base. It is better to provide removable sides for the trailer. It is preferable to immediately provide for the possibility of installing several types of sides on the platform:
- wooden or metal for transportation of bulk cargo;
- light, mesh for harvesting green mass for animals;
- folding, with the possibility of increasing the usable area for transporting hay.
But in order to move comfortably on the roads, it is worth making wings on the walk-behind tractor. If possible, immediately install mudguards on them. After all, not all roads have asphalt and hard surfaces.
According to the law, a walk-behind tractor with a trailer cannot be called a vehicle today, but this does not mean that the trailer should not be equipped with light signaling devices.
Be sure to install at least 4 reflective elements on the trailer - 2 red at the back and 2 white at the front. This will help the car driver identify the cart in the dark.
Tillage tools - do-it-yourself plow and plow for a walk-behind tractor
Before attaching a walk-behind tractor to tillage, you should decide what is more important and set priorities in terms of technology for cultivating the site. For large areas used for planting potatoes, root crops, and grain crops, the best option would be a do-it-yourself plow for a walk-behind tractor. Make it simpler and easier. But for beds for vegetable crops, for processing strips between rows of the garden or final processing for planting, it is better to use a milling cutter. This will make further work much easier.
When the coupling to the walk-behind tractor is ready, the most difficult thing in making the plow is its shape. The body has a shape that is difficult to mold and therefore it is better to make a plow from several components. It is better to make a coulter for a walk-behind tractor with your own hands from steel. The large force that this element will experience should not lead to its deformation. Moreover, it is the coulter that is responsible for the depth of lowering of the plow.
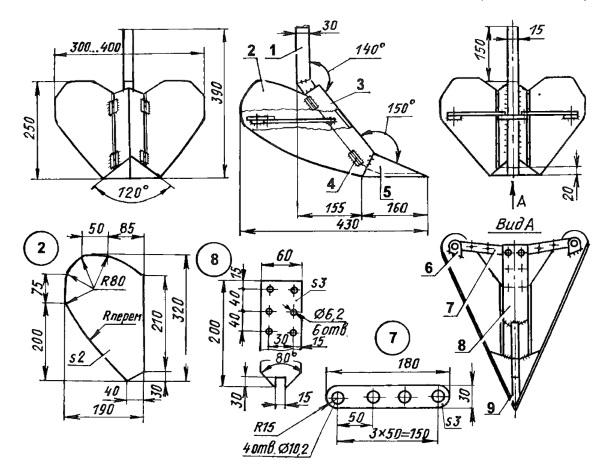
The plowshare should be made of the hardest possible metal. This is the part of the plow that cuts into the ground and cuts its layer. The strength and power of this element will allow you to work with the plow both in the conditions of cultivated arable land and to do preliminary processing of virgin soil. Despite the complexity of the blade design, it is quite simple to make. For a curved blade, it is better to take a ready-made round or oval-shaped workpiece. Make a dump out of it according to the drawing. For this, craftsmen usually use large pipes of 350 mm in diameter or gas cylinders. This results in an almost ideal blade shape.
One of the questions on how to make a plow for a walk-behind tractor will be the manufacture of a field board - a stabilizing element for the plow, which sets the direction of its movement when working on arable land.
A do-it-yourself plow for a walk-behind tractor, just like a plow, is assembled from several elements. True, to use a plow in soil cultivation, it is better to provide a blade made of reinforcement, so that during cultivation the soil is loosened as much as possible when the formation is turned. In the design of the plow, it is better to provide not a frontal blade, but a double-sided blade with reinforcing bars.
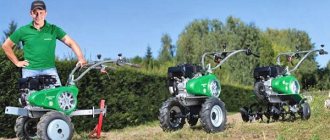
Do-it-yourself cutter for walk-behind tractor
Attachments for a walk-behind tractor in the form of a soil cutter can be used mainly for light and medium-sized units. For heavy models with a separate power take-off mechanism and transmission of torque to trailed units for a walk-behind tractor, cutters with a chain drive will be optimal.
On this topic:
How to choose a walk-behind tractor for dacha work
Review of Centaur walk-behind tractors
Walk-behind tractor attachments for harvesting
Design and use of a hiller for a walk-behind tractor at a dacha...
BACK FORWARD 1 of 3
The simplest cutters for loosening the soil can be four segmented reciprocating cutters. Structurally, such a cutter is a pipe on which reciprocating cutters are rigidly mounted. For medium and light units, the axle shafts for the walk-behind tractor are made collapsible. This way you can adjust the width and speed of tillage. If two segments are installed on each side of the gearbox, then the processing speed is significantly higher. True, the width in this case will be small. For axle shafts consisting of two or even four elements, the working width can be increased to 1.5 meters.
Do-it-yourself attachments for a walk-behind tractor are made from a profile pipe. The profile is easier to install on the wheel gearbox. Yes, and connecting them when building up is much simpler and easier.
Simply insert them into each other and secure with pins. Do-it-yourself axle shafts for a walk-behind tractor are made from a square or hexagonal pipe with thick walls. For 1 set of cutters you will need:
- pipes for the axle housing with a wall thickness of 2.5-3 mm and a length of 50-80 cm;
- for connecting pipe segments of smaller diameter 50-60 cm long;
- 8 saber elements for the working body;
- clamps on the axle shafts - 4 pieces;
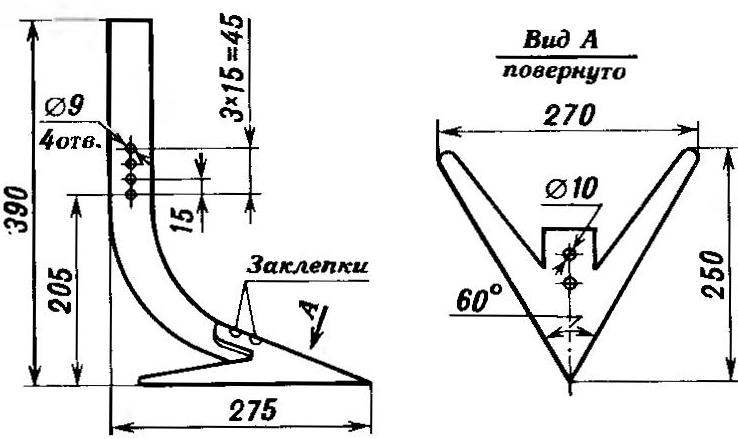
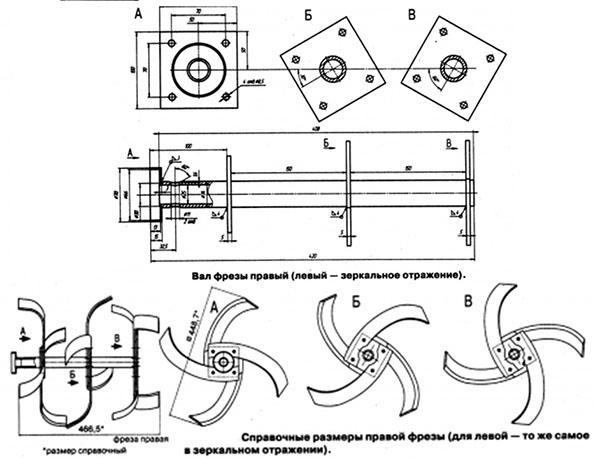
It is recommended to make the cutters themselves from a steel strip with a thickness of 5 mm or more. The best solution for making cutters is to use forged metal. In this case, the strength is higher and there is no need to sharpen the tool frequently. When developing the shape of a cutter for a walk-behind tractor with your own hands, it is recommended to use drawings of the most successful models - a saber cutter, a curved cutter, or a cutter with a triangular pointed element.
Disc cultivator for walk-behind tractor
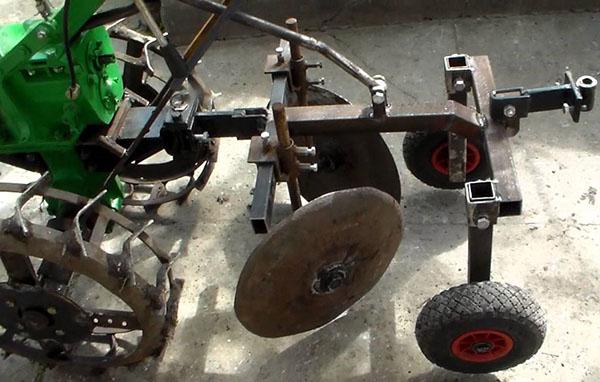
One of the most popular types of attachments for a walk-behind tractor during the summer plant care period is a cultivator. You can make a weeder for a walk-behind tractor with your own hands:
- following the example of a classic cultivator in the form of a trailed ripper;
- in the form of disk hillers used for processing root crops.
The processing technology involves passing a walk-behind tractor between two rows of crops or when using a multi-hull cultivator of three or even four rows.
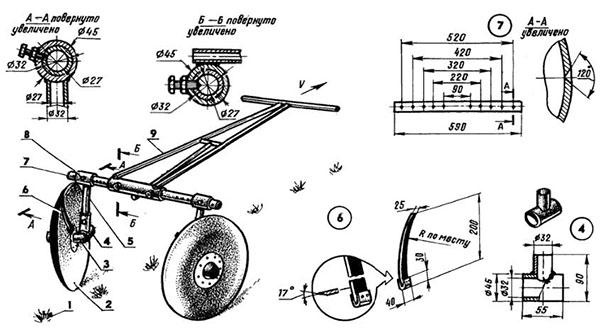
The hiller ripper can have several types of tools installed in one housing:
- ripper;
- two double-moldboard flat-cutting plows;
- 2 disc harrows for forming beds;
- two disks for plant protection.
Do-it-yourself plant protection discs for walk-behind tractors are usually made of sheet steel. Depending on the purpose of the device to which they will be applied, their diameter is calculated. For cutters, the diameter is usually 5-7 cm smaller than the cutters, and for a cultivator they should be 30-35 cm in diameter. It’s just that when milling an area, the plants usually have a small height. But cultivation is carried out when the plants reach significant growth, and their breakdown at this stage can result in the death of the vegetable crop.
Medium-sized disks can also be universal, with a diameter of 20-25 cm. In this case, it is necessary to provide a universal type of fastening to each type of attachment.
Types of cultivators
Let's look at the types of cultivators. The main parameters that you need to pay attention to are the weight of the mechanism and its power.
Heavy
Heavy mechanisms weigh up to 60 kg, and power reaches 6 hp. Such cultivators are equipped with their own engine, or are attached to a walk-behind tractor.
For more information about the operation of a heavy cultivator, watch the video:
Average
Medium mechanisms are the most common type in private households. Their weight is 45-60 kg, power is from 4 to 6 hp. The soil is cultivated to a depth of 25-28 cm.
Lungs
Lightweight mechanisms – characterized by reduced weight (up to 40 kg). They cultivate the soil to a shallower depth - up to 18 cm.
Medium and light mechanisms can be assembled with your own hands using minimal technical knowledge.
Preparing the walk-behind tractor for cultivating the site
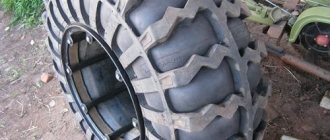
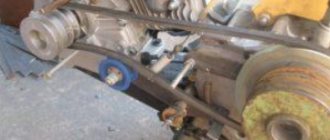
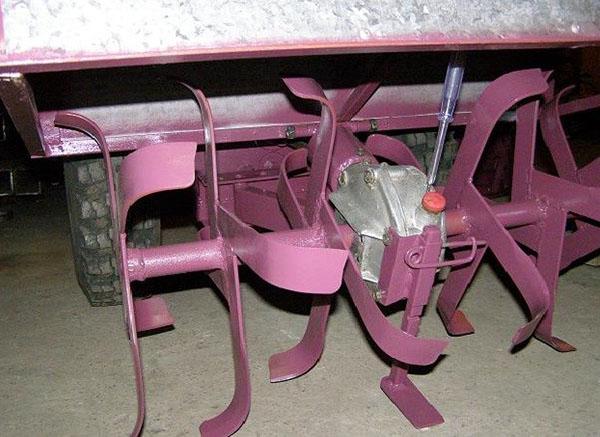
Step one. Installation of cutters
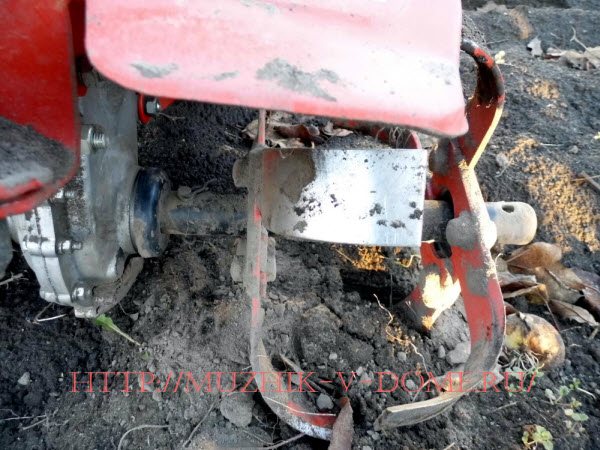
Photo 2
To cultivate the soil, instead of transport wheels, you must install a set of cutters on the walk-behind tractor on the left and right sides, as shown in photo 2 (cutters are installed on the right side). One set of cutters includes eight knives. This number and arrangement of knives on the axis gives the most effective result of tillage.
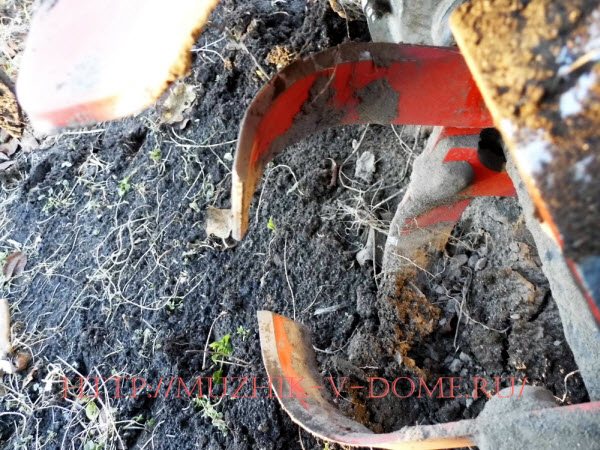
Photo 3
Please note that when installing knives, the cutting part should be directed forward, in the direction of movement of the walk-behind tractor. Please note that the working part of the knife should not be sharp, since in this case the walk-behind tractor will not move forward, but will constantly bury itself in the ground, since the cutters will not loosen the ground, ensuring engagement with the soil, but will simply cut it.
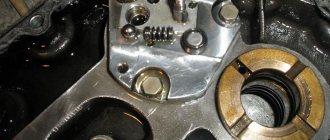
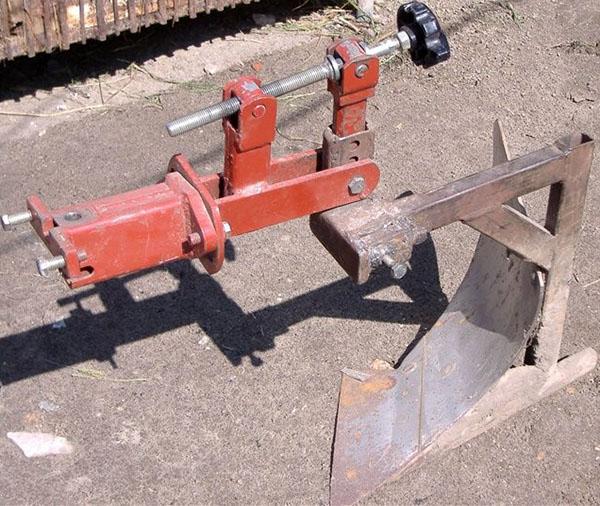
Step two. Installing the opener
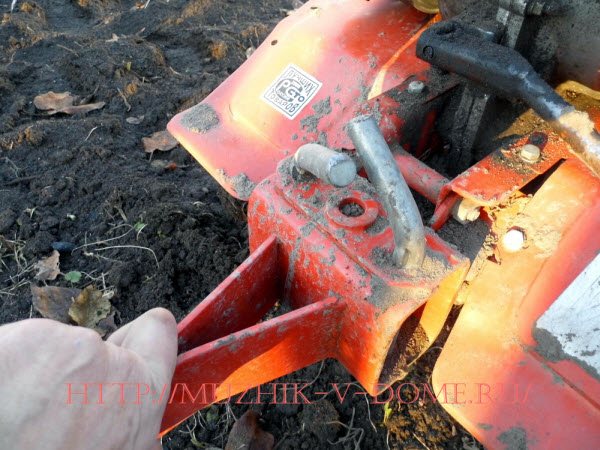
Photo 4
Photo 4 shows how an earring is installed on the walk-behind tractor, to which the opener is attached.
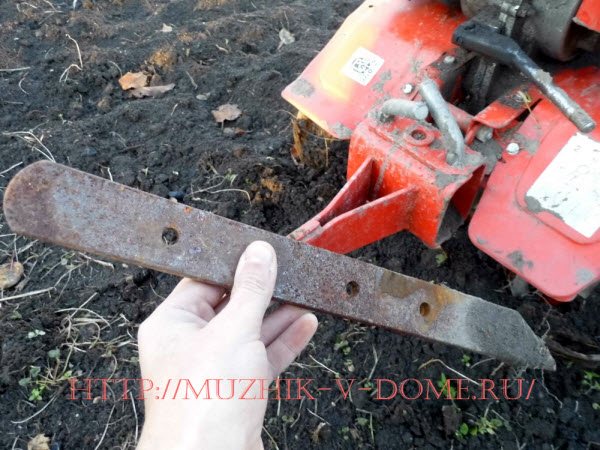
Photo 5
Photo 5 shows the opener. What is it and what is it for? The coulter is a bar with vertically located holes, with the help of which we can adjust the depth of the tillers of the walk-behind tractor during the cultivation of the land.
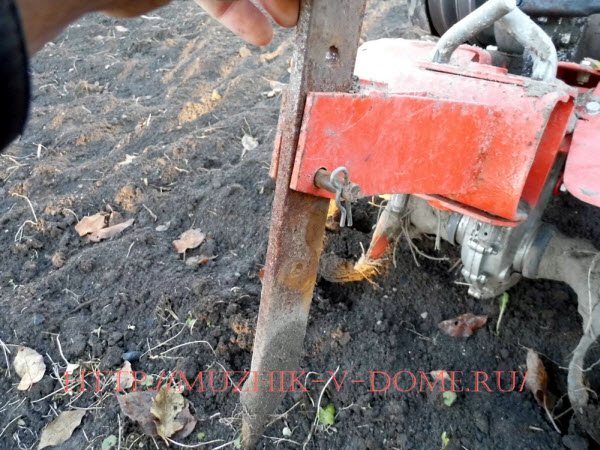
Photo 6
We install the opener into the shackle and fasten it using a bushing and cotter pins into the second hole (counting from the bottom of the opener). When installing the coulter in this way, the depth of the tillers of the walk-behind tractor into the soil will be approximately 20 cm. This depth is quite sufficient for high-quality tillage of the soil for subsequent planting of cultivated plants on the land plot.
We suggest you read How to Preserve Peeled Potatoes
To change the depth of tillage, the coulter can be attached to the shackle as follows:
- To increase the depth of tillage, we lower the coulter down and attach it to the shackle through the upper holes.
- To reduce the depth of tillage, raise the coulter upward and attach it to the shackle through the holes located below.
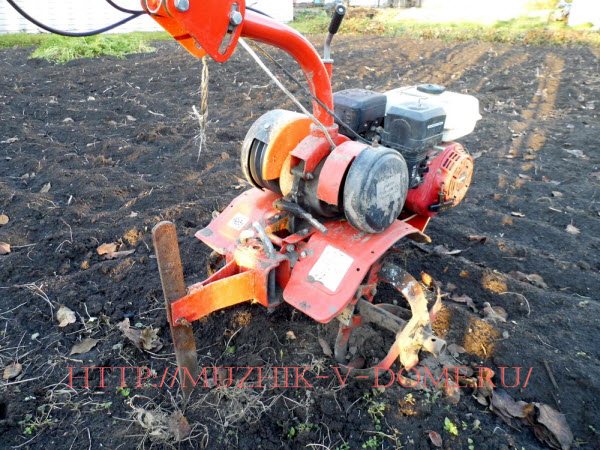
Photo 7
The cutters and coulter are installed and the walk-behind tractor is ready for work. To determine the quality of adjustment of the depth of the cutters, it is necessary to perform a control run of the walk-behind tractor over the land plot and make sure that the walk-behind tractor operates without load during cultivation and the depth of tillage meets our requirements.
Device
Select the power of the cultivator. Power is perhaps the most important parameter. The larger it is, the higher the speed of work and the greater the depth of plowing. But along with power, the weight of the unit and its price also increase.
A lot depends on the material for the knives. The better the material, the longer the service life, the better the quality of work.
Hand cultivators are used in subsidiary farming ; they are the easiest to make, as well as repair or replace. For their manufacture, parts and materials from other failed mechanisms are often used, which allows saving on materials.
The cultivator can be used not only by itself, but also in conjunction with a walk-behind tractor - then the cultivator is used as a replaceable attachment.
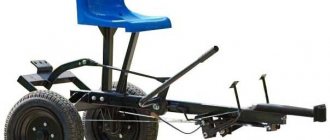
Homemade trailer for walk-behind tractor
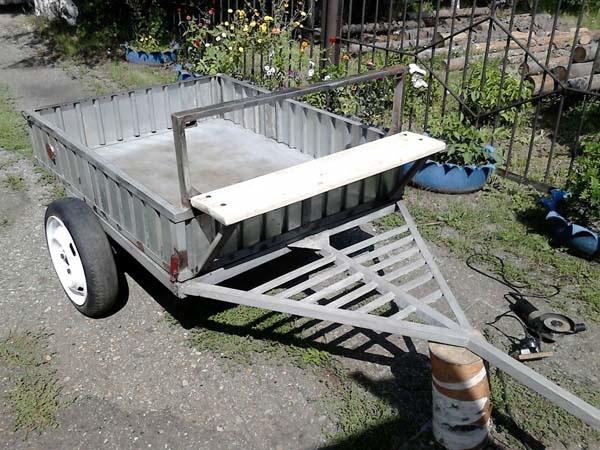
Now let’s look at the design and capabilities of a homemade trailer for a walk-behind tractor. Sometimes manufacturers themselves do not make them for the walk-behind tractor they sell, or they make them of poor quality; they often bend when transporting cargo, where the trailer connects to the wheels. The best thing is a homemade trailer for a walk-behind tractor; it will be 2-3 times cheaper and, accordingly, more reliable.
First, we make the body of the future trailer. To do this, we take steel pipes with a rectangular cross-section or we can use corners as in the case of lugs.
We need to use a grinder to cut the pipes at right angles and then we can sheathe the body with wood or metal. We attach a driver's seat to the front.
This way you can operate a walk-behind tractor with a trolley while sitting and holding it by the walk-behind tractor control handles.
We invite you to familiarize yourself with the different types of horses
When our body is ready, it’s time to think about how our cart will ride. We need to make a wheel axle by taking the rear axle from a passenger car and removing the gearbox from it. You can also use a metal rod turned around the edges as an axle so that you can put on the wheels for the cart.
When the trailer is ready, you still need to attach it to the walk-behind tractor. Hitch the trailer to the walk-behind tractor using a swivel unit. To make it, we take a pipe with a rectangular cross-section and weld it to the lower edge of the cart so that a regular triangle is formed, and the edge of the body is the base of this triangle.
We also mentioned the manufacture of a rotating unit. It is a cylinder with a console on two bearings. This design of the device allows the wheels of the cart and walk-behind tractor to move independently of each other.
Below you can see drawings of a standard trolley for a walk-behind tractor
How to do it yourself?
Before making a cultivator, treat metal parts against corrosion. If this treatment is not carried out, metal parts will quickly rust from frequent contact with the soil. If you treat it with a special anti-corrosion compound, then the device will last you much longer.
To make the working part, square steel plates are taken. The size may be different, for a walk-behind tractor it is 150*150 mm. For cutters, plates of 25*4 cm are taken.
Drill a hole in each plate. Connect both plates (square and rectangular) together in pairs so that they look like a cutter. Bolts are used for fastening. If you use welding, the product will not be as reliable.
Once you have connected the plates, make another hole and secure them to the steel pipe. We will need two pipes fastened together with cutters. After this, the pipe can be attached to the walk-behind tractor shaft .
Simple models of cultivators can be made without a drawing, especially if you have engineering and technical experience. It is advisable to assemble more complex models of cultivators for a walk-behind tractor with your own hands according to drawings indicating all the required dimensions.
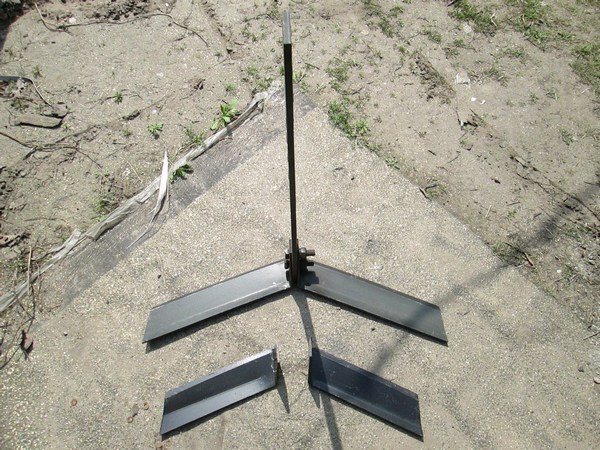
Weeding
A do-it-yourself weeding cultivator for a walk-behind tractor is used not only for loosening, but also for weeding. The design of the weeding cultivator has some unique features.
A hanging frame is used as a base. On one side the frame is attached to the walk-behind tractor, and on the other side it rests on one or more wheels. Special paws are installed on the frame, which cut weeds at the root, and can also loosen the soil to a shallow depth.
Auxiliary equipment for walk-behind tractor
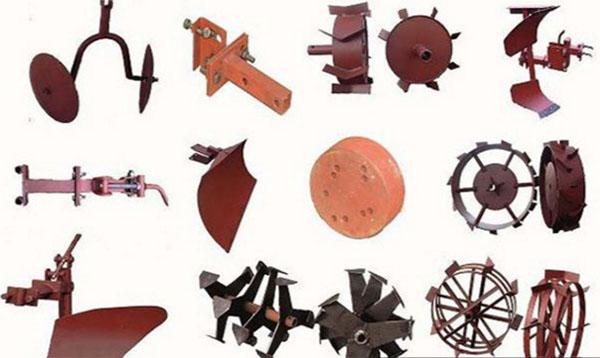
Among the necessary improvements to the walk-behind tractor in the form of attachments, it is recommended to make, in addition to all of the above, the following elements:
- wheels with lugs for working on loose soil;
- lift;
- mounted bucket-blade for snow removal.

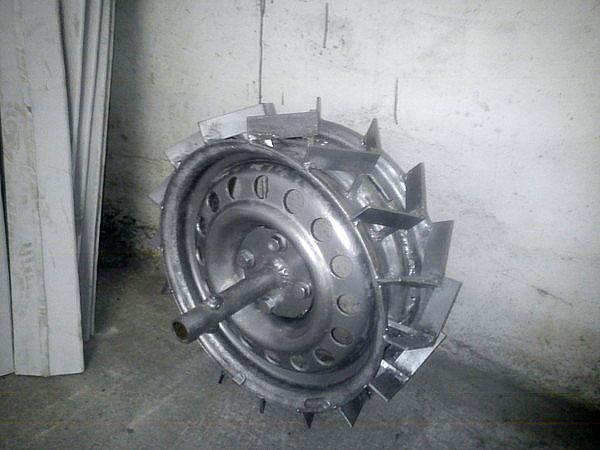
For wheel designs used as movers for walk-behind tractors on arable land, wheels with rubber tires are used. Experience and ability to work with ready-made structures, for example, steel rims from car wheels, will tell you how to make wheels for a walk-behind tractor with lugs yourself.
To do this you need:
- 2 steel wheels from a car;
- corners 25x25 cm;
- electric welding;
- Bulgarian;
- tape measure and pencil.
The corner is cut into segments of 35-40 cm. The rims of the disk are marked into equal segments. It is best if there are 8 or 10 of them. Marks are made and corners are welded at the marks.
It is better to make a do-it-yourself lift for a walk-behind tractor from a piece of pipe with a diameter of 100 mm. The lift itself is made in the form of a roller on a bracket. If necessary, it changes its position and makes it possible to lift the walk-behind tractor onto a support. In its normal position, the lift shaft is located in front of the unit and is used as a support roller when overcoming ditches and ruts.
https://www.youtube.com/watch?v=JhPvReKfbI0
It is recommended to assemble a bucket for a walk-behind tractor with your own hands if you plan to use it as a snowblower.
The ladle can be made:
- made of sheet metal 1.5-2 mm thick;
- hard plastic with a knife at the bottom made of a metal strip;
- from plywood 8-10 mm thick or OSB board 10-12 mm.
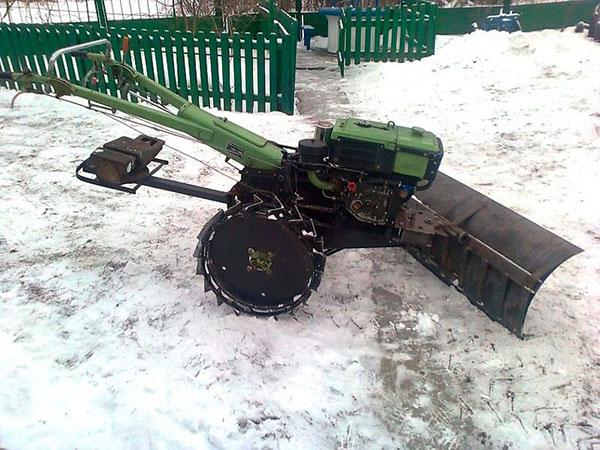
The bucket is rigidly fixed to the walk-behind tractor frame. To make work easier, you can make a rotating device to change the angle of inclination of the cutting plane to the road surface.
In order for the bucket to work for a long time, a support ski is placed in front on a bracket. This will make cleaning safer. The cutting surface will be at a certain height above the ground and will not touch the ground.
You can improve your home motorcycle equipment to suit your requirements without high costs. After all, you can assemble attachments for a walk-behind tractor yourself, doing everything yourself.