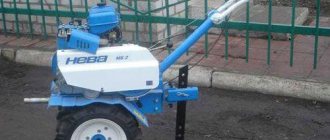
A walk-behind tractor is an indispensable thing for farmers. Increasing the power of the walk-behind tractor allows you to increase the productivity of equipment and speed up agricultural work. You can improve your equipment either with your own hands or by purchasing the necessary equipment.
On this topic:
Making a front adapter for a walk-behind tractor with your own hands
Mar 30, 2019
How to choose a walk-behind tractor for the garden
Aug 14, 2018
Attachments for walk-behind tractors - improvement and…
Jun 27, 2018
Comparison of walk-behind tractors from Motor Sich and Forte
Aug 21, 2017
BACK FORWARD 1 of 4
Homemade car from a walk-behind tractor
A homemade car with 4x4 all-wheel drive, made from a walk-behind tractor.
Greetings to all lovers of homemade auto-moto equipment! In front of you is another homemade product made from a walk-behind tractor - a two-seater all-wheel drive mini car.
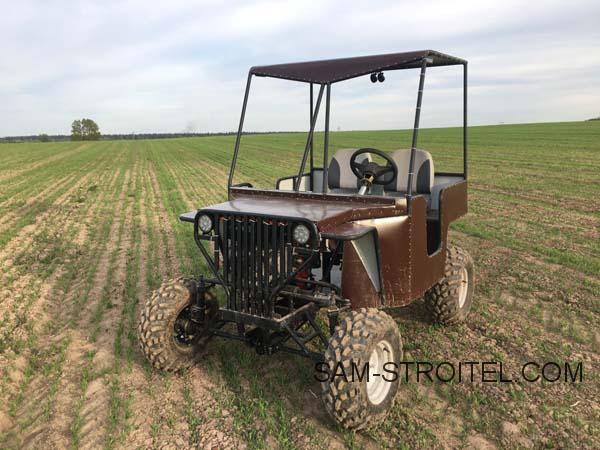
The homemade car is built on the basis of a walk-behind tractor; more precisely, the engine and gearbox are borrowed from the walk-behind tractor.
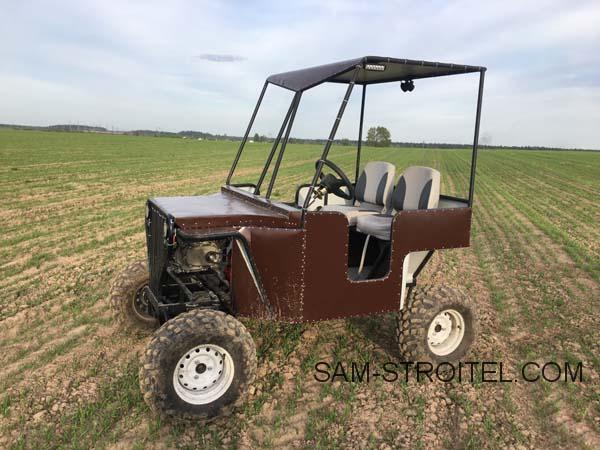
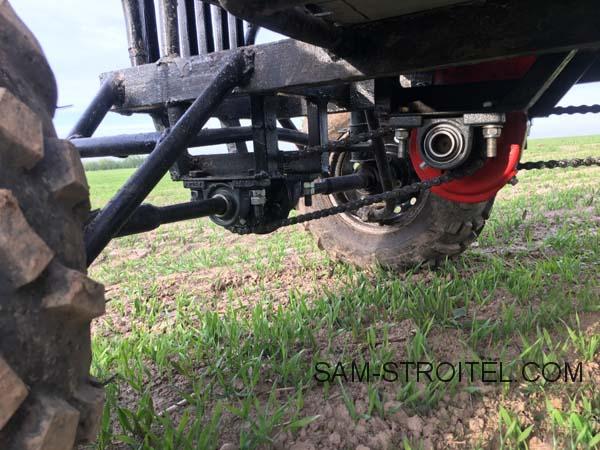
A homemade frame is made from profile and round pipes, there is no suspension, the front and rear axles are mounted on housing bearings.
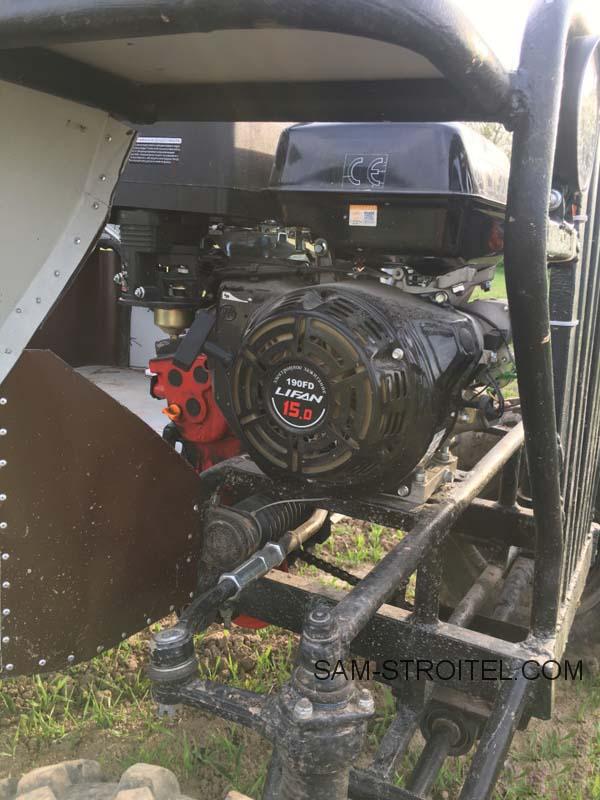
The Lifan power unit has a power of 15 hp, an additional centrifugal clutch and a reduction gearbox from a walk-behind tractor are installed.
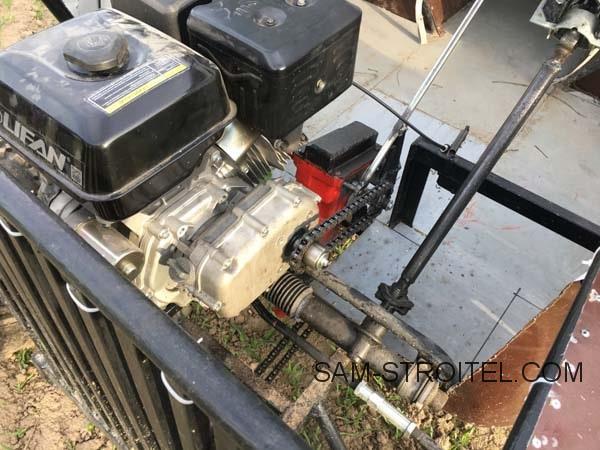
The transmission looks like this: torque is transmitted from the engine to the reduction gearbox, then through a chain drive to the front and rear axles. The car has all-wheel drive.
The photo shows a reduction gearbox from a walk-behind tractor and a chain drive.
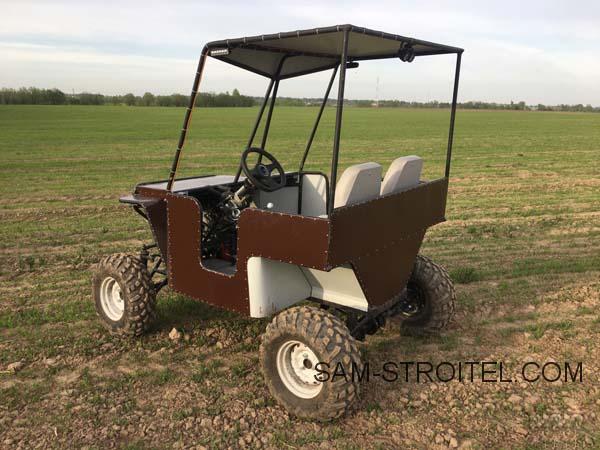
The steering wheel is taken from a VAZ car.
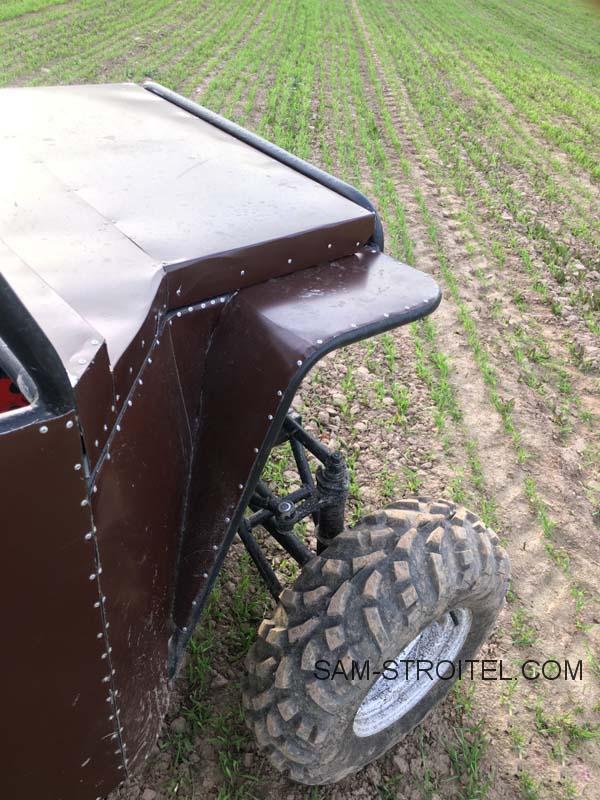
The homemade product has wheels from an ATV.
The homemade car has a top speed of about 30 km/h. The car can travel off-road, mud, snow and ice. This mini car can be made from a regular walk-behind tractor.
Control device
The operation of a homemade walk-behind tractor or cultivator, like any machine, needs to be controlled. The control devices for such homemade products are usually handles - they are attached directly to the frame frame. They are made from two thick-walled pipes, which are bent to give a convenient shape (the video demonstrates this well).
At their ends, gas handles and clutches are installed, removed, for example, from an old moped.
There are no problems with a homemade gearbox. The best gearbox and kickstarter levers for a motor cultivator are made from a metal rod with a diameter of 10 mm. The homemade Kickstarter is brought back, closer to the operator, thereby making it easier to start the diesel engine. The brake and gear shift levers are also secured in a convenient place. Gears depend on the design of the gearbox.
In a self-propelled walk-behind tractor, you can make a convenient steering adapter instead of handles. A car steering column with a bipod or removed from a tractor is ideal for this. In such a mechanism, the bipod acts as a hitch, combining the cart with the homemade product. A ball joint is used in the assembly of the steering adapter - it allows you to make the coupling independent. The entire process of preparing a homemade hitch is best viewed in the video.
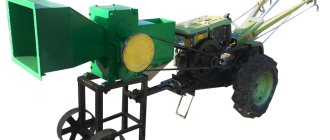
Multifunctional homemade products from a walk-behind tractor engine
People whose budget is modest and does not allow them to purchase branded canopies and attachments like to come up with various homemade products from a walk-behind tractor with their own hands. In the basic configuration, this equipment has limited capabilities. But even the simplest unit is an internal combustion engine, which can be used as a source of energy for many mobile devices. On the basis of a walk-behind tractor, you can also assemble stationary installations, such as a water pump, an electric generator and a mulcher. By connecting an electric motor to the unit, you can make a universal machine for processing wood. A homemade sawmill in your yard will be an excellent help on the farm.
Installing a starter on a walk-behind tractor
There are different designs of starters:
The most common is a manual starter for a walk-behind tractor, since this device is very easy to install on a walk-behind tractor, and its repair is easy to do yourself. If such a device is operated correctly, its durability is several years.
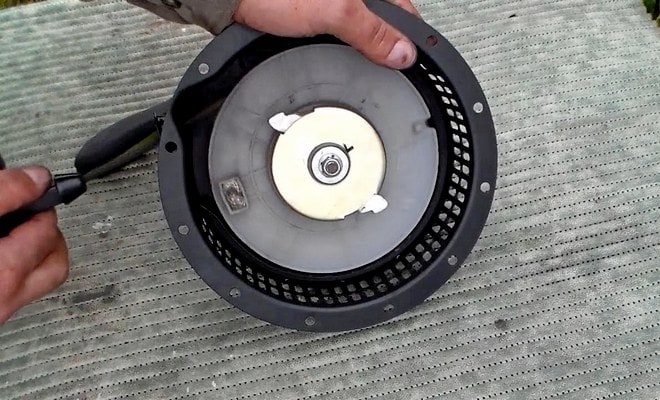
Let's look at what elements a starter for a walk-behind tractor consists of:
- a drum-shaped body;
- springs: large and small;
- washers;
- coil;
- cord;
- reeds;
- fastening parts.
In the center of the drum there is a reel on which the cord is attached. A large spring is located in the housing around an axis and is designed to return the reel to its original position after scrolling.
The mechanism of this device is quite simple; you can assemble it yourself.
The operation of a walk-behind tractor with a manual starter is carried out as follows. The driver starts the mechanism by pulling the handle of the device. At the same time, the device begins to work and starts the engine. In order for the device to successfully transfer the initial rotation to the motor, the handle of the device must be pulled twice.
But despite the fact that a manual starter on a walk-behind tractor is considered a reliable device, it also sometimes fails. If the structure breaks down, you can repair it yourself.
Vehicle Upgrades
If your old bicycle, scooter or motorcycle breaks down, you should not sell the equipment for scrap. There is also no need to rush into buying a new motor. It can be replaced with a power unit from a light motor cultivator. There is only one restriction: such a car cannot be driven on public roads. But the Ant scooter with a walk-behind tractor engine can be used in the country for trips to a field or river. 5-6 hp engine quite enough to accelerate the moped to a speed of 50-60 km/h. Before installing the engine on a bicycle, it is necessary to install reinforced wheels on this vehicle that can withstand a weight of up to 100 kg.
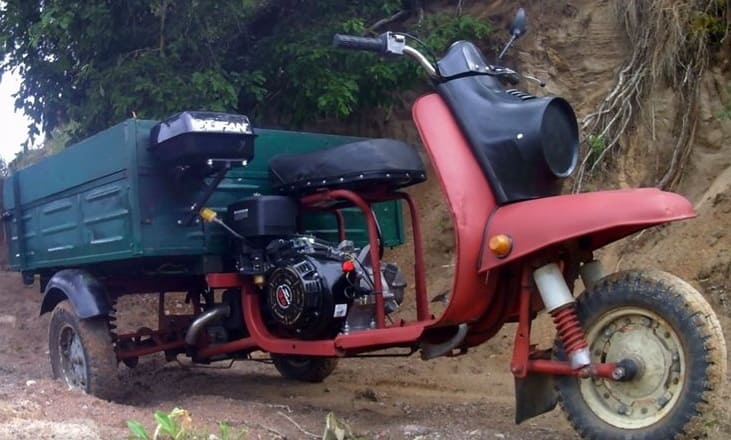
In order to assemble a scooter with a walk-behind tractor engine, you will need the following tools and materials:
- welding machine;
- grinder with metal discs;
- electric drill;
- wrench;
- screwdriver;
- pliers;
- level;
- hammer;
- dye.
In order to install the power unit on the Ant, you will need to create a frame for it.

This is done in the following sequence:
- Drawings are drawn up, precise calculations of the frame configuration and attachment points are made. It is recommended to check the calculations on soft aluminum strips.
- The mounting bracket is welded. It is treated with anti-corrosion agents and holes are drilled for the bolts.
- The engine is carefully placed on the bracket and secured with bolts. The installation accuracy is checked and the position is adjusted.
- The motor is connected to the vehicle's chassis using a belt or chain. Gear shift cables and control levers are secured.
- Checking the functionality of the vehicle. The created homemade product needs to be run in so that all the parts get used to each other. You need to spend 6-8 hours on this with the engine running at medium speed.
If you have experience in handling household tools and knowledge in electrical engineering, you can assemble an electric excavator with your own hands. This will require channels, hinges, cables and a working electric motor. The bucket is made of sheet steel, which can be purchased inexpensively at scrap metal collection points.
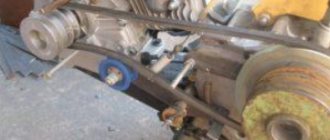
Tractor from a walk-behind tractor
Few people will like the process of walking around the field for many hours behind the machine. It is much easier to mow the grass, plow or hill up the soil while sitting on a comfortable chair attached to a trailed cart. There are many branded adapters, trailers and carts available at retail outlets. But they have a considerable cost, which many cannot afford. You can make a mini-tractor from a Neva walk-behind tractor almost free of charge, using the tools and materials that you have at hand.
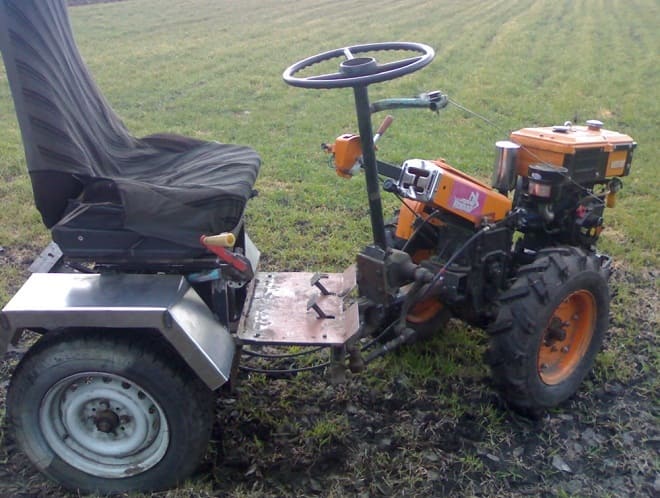
The following devices and materials are needed:
- differential from a passenger car;
- wheels from a small car;
- sprockets and chains from a motorcycle;
- hexagonal solid steel profile;
- steel corners 50 mm;
- tin for making wings.
The first difficulty that arises when making a homemade tractor with your own hands is a high center of gravity. It is impossible to lower it for purely technical reasons. The only way to increase the stability of a tractor is to expand its wheelbase. For this, a hexagonal profile is used, which is attached to the hubs with cotter pins. When the track expands to 120 cm, the walk-behind tractor will gain normal stability. Installing a differential will allow the unit to corner easily.
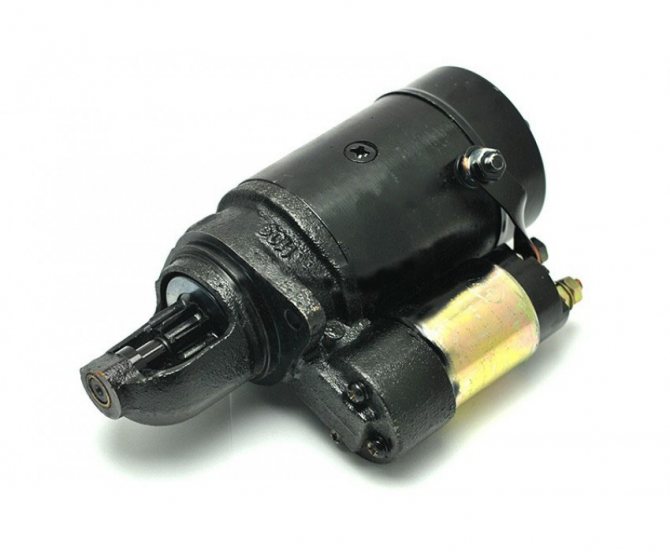
How to install a starter on a walk-behind tractor - the correct procedure
Even a beginner can remove the electric starter from the walk-behind tractor in order to further repair the broken mechanism. However, many novice farmers usually have problems installing the starter back onto the unit with their own hands. Due to improper installation, the starter does not start the walk-behind tractor engine even after several strong jerks. To avoid common mistakes, you should study the algorithm for installing a starter on a walk-behind tractor in more detail.
Installation of the starter should be done in this order:
- First you need to remove the flywheel - this will be required to install and fix the crown on it. To dismantle the flywheel, you need to dismantle the air filter, which will give free access directly to the internal structure of the walk-behind tractor on the farm;
- Then you will need to remove the protective casing and unscrew the screws that secure the starter mechanism basket, flywheel and its nut. Removing the flywheel, as a rule, causes certain difficulties, and therefore many experts advise purchasing a removable key immediately before repairing the walk-behind tractor. As soon as the flywheel is dismantled, you should unscrew the key, which is located immediately behind the flywheel;
- After this, the generator should be installed. The wiring in it must be inserted into a hole located in the metal wall of the engine. The generator will then need to be secured in place on the motor wall;
- Next, generator magnets must be installed inside the existing flywheel. In this case, all existing holes in the flywheel and generator must match. Both elements will need to be connected with fasteners, after which the crown of the walk-behind tractor used will be installed. Immediately before installing the crown, it must be heated using a spray burner;
- The assembled mechanism must be installed on the motor of the walk-behind tractor, simultaneously screwing in the nut and key of the flywheel;
- Next, you need to screw in the starter basket, fix the casing and firmly install the standard air purification filter in its regular place;
- Then you will need to remove the plug and install the starter itself on the engine;
- Next, you will need to connect the generator wiring to the charging relay;
- At the final stage, the starter terminals must be connected to the walk-behind tractor battery and the unit must be started.
Installing a starter on an existing walk-behind tractor is not as difficult as it seems at first glance. The most important thing is to be as careful as possible and adhere to the correct assembly algorithm.
All of the listed methods for repairing a starter are suitable for owners of Neva, Cascade and Agro walk-behind tractors. The procedure for removing and reassembling the mechanism will be similar for agricultural machines of all listed equipment manufacturers.
Snowmobile from a walk-behind tractor
In winter, moving around the terrain becomes much more difficult, and buying even a used snowmobile involves significant financial costs. The solution to the problem is to convert the walk-behind tractor into a snowmobile. Everything you need for this can be found at the nearest landfill or scrap metal collection point. If you have enough money, modular tracks are purchased, installed instead of wheels on the axle shaft.
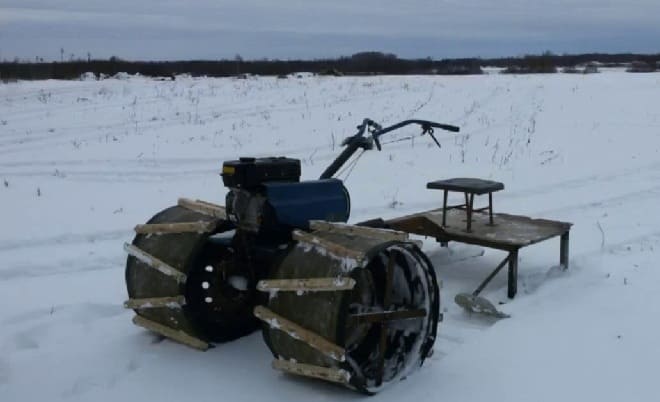
If we take an already manufactured tractor as a basis, then for work you will need:
- old wide wheels from an SUV;
- sheet steel with a width of at least 40 cm;
- conveyor belt with a cord base.
You can make a snowmobile in different ways. The choice depends on the skill of the vehicle owners and the availability of available materials.
Rework can be carried out in the following areas:
- Replacing standard wheels with wider ones that exert minimal pressure on the snow. If necessary, devices are attached to the wheels to increase traction (chains, ropes).
- Securing the wheels in wide and light lugs. Air is first released from the chambers. The rims are put on the wheels, which are inflated to the limit.
- Installing the conveyor belt on the wheels. To prevent the tape from flying off, aluminum strips are secured to its edges using rivets.
A homemade snowmobile made from a walk-behind tractor will not set a speed record. But for a trip to the forest for firewood or for winter fishing, its capabilities will be quite sufficient.
Inexpensive device with great functionality
A homemade machine is an economical and very useful motor unit. It is capable of performing all kinds of agricultural operations, thereby freeing a person from tedious physical labor. Even walk-behind rakes can be connected to it. In the video below you can see all the functionality of this miracle machine.
Such homemade products are applicable not only as an assistant in agricultural work. They are successfully used when cleaning the local area, and in winter - for clearing snow. If you make a high-quality homemade walk-behind tractor or motor-cultivator, then the operational parameters of the homemade product will be no worse than those of an expensive Chinese or domestic factory analogue. If you are missing parts, you can always purchase new ones. Don't forget to garage your equipment and perform maintenance to ensure it lasts longer.
Multifunctional homemade products from a walk-behind tractor engine
People whose budget is modest and does not allow them to purchase branded canopies and attachments like to come up with various homemade products from a walk-behind tractor with their own hands. In the basic configuration, this equipment has limited capabilities. But even the simplest unit is an internal combustion engine, which can be used as a source of energy for many mobile devices. On the basis of a walk-behind tractor, you can also assemble stationary installations, such as a water pump, an electric generator and a mulcher. By connecting an electric motor to the unit, you can make a universal machine for processing wood. A homemade sawmill in your yard will be an excellent help on the farm.
Algorithm of actions: how to install a starter on a walk-behind tractor
Even novice operators can dismantle, disassemble and install the recoil starter.
But assembling and installing an electric starter is more difficult. If the repair procedures are performed incorrectly, the engine will not start. To install the starter on a walk-behind tractor with your own hands, you should follow these steps:
- To mount and secure the crown of the unit, the flywheel is removed. The air filter is removed from the unit to gain unhindered access to the external parts of the walk-behind tractor;
- The protective casing is removed, the screws that hold the recoil starter basket are unscrewed, and the flywheel is also completely dismantled. To avoid problems when removing the latter, it is worth acquiring a special removable key. After the flywheel is removed, you must unscrew the key located near it;
- The next step is to install the generator. The wires are pushed into the hole through the steel wall of the engine, the generator itself is installed in a specially designated place;
- Generator magnets are installed inside the flywheel; it is important that the holes on both parts match. The elements are connected with screws. Afterwards, the crown is installed, which is preheated with a special canister burner;
- The assembled system is reinstalled on the motor, and the keys are screwed in;
- The recoil starter basket is screwed in, the casing is secured and the air filter is mounted back;
- The starter mounting plug is removed and the starter itself is installed to the walk-behind tractor;
- The generator wire is connected to the charging station;
- The starter terminals are connected to the battery. Now you can start the walk-behind tractor.
Vehicle Upgrades
If your old bicycle, scooter or motorcycle breaks down, you should not sell the equipment for scrap. There is also no need to rush into buying a new motor. It can be replaced with a power unit from a light motor cultivator. There is only one restriction: such a car cannot be driven on public roads. But the Ant scooter with a walk-behind tractor engine can be used in the country for trips to a field or river. 5-6 hp engine quite enough to accelerate the moped to a speed of 50-60 km/h. Before installing the engine on a bicycle, it is necessary to install reinforced wheels on this vehicle that can withstand a weight of up to 100 kg.
In order to assemble a scooter with a walk-behind tractor engine, you will need the following tools and materials:
- welding machine;
- grinder with metal discs;
- electric drill;
- wrench;
- screwdriver;
- pliers;
- level;
- hammer;
- dye.
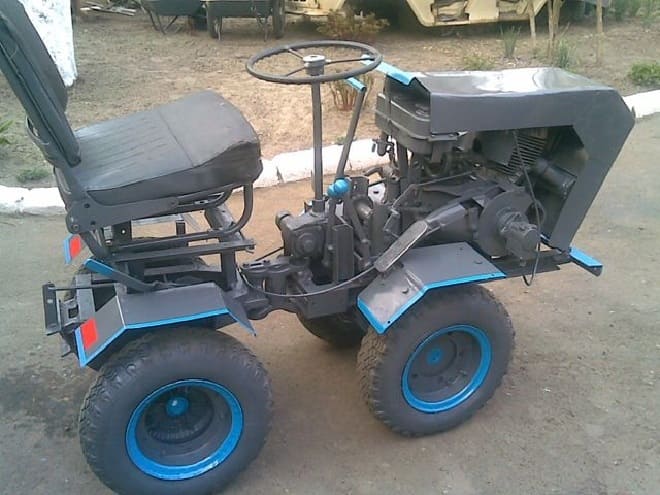
Tractor from a walk-behind tractor
Few people will like the process of walking around the field for many hours behind the machine. It is much easier to mow the grass, plow or hill up the soil while sitting on a comfortable chair attached to a trailed cart. There are many branded adapters, trailers and carts available at retail outlets. But they have a considerable cost, which many cannot afford. You can make a mini-tractor from a Neva walk-behind tractor almost free of charge, using the tools and materials that you have at hand.
The following devices and materials are needed:
- differential from a passenger car;
- wheels from a small car;
- sprockets and chains from a motorcycle;
- hexagonal solid steel profile;
- steel corners 50 mm;
- tin for making wings.
The first difficulty that arises when making a homemade tractor with your own hands is a high center of gravity. It is impossible to lower it for purely technical reasons. The only way to increase the stability of a tractor is to expand its wheelbase. For this, a hexagonal profile is used, which is attached to the hubs with cotter pins. When the track expands to 120 cm, the walk-behind tractor will gain normal stability. Installing a differential will allow the unit to corner easily.
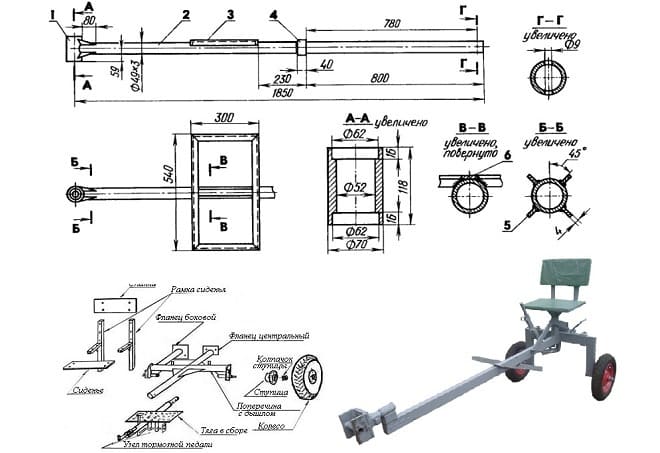
The mini-tractor is assembled in the following sequence:
- Welding the frame of the trailer part. Attaching the drawbar to the flange, making holes in it for the bolts (the connection must be made collapsible in order to be able to transport the walk-behind tractor in the trunk or trailer).
- Manufacturing of chassis. Wheels are installed on the trolley. To make all-wheel drive on both axles, sprockets are welded onto the axle shaft, and a tensioning mechanism and chains are installed.
- Assembly of body and seat. If necessary, a canopy is installed over the driver. The controls are being configured and adjusted.
- Electrification of the created machine. A tractor generator or battery is used as an energy source. For ease of driving, it is advisable to install 2 headlights - front and rear (for reversing).
During sea trials, the stability and maneuverability of the homemade product are checked. If the drive wheels lose traction with the ground, then they or the walk-behind tractor body are loaded with weights.
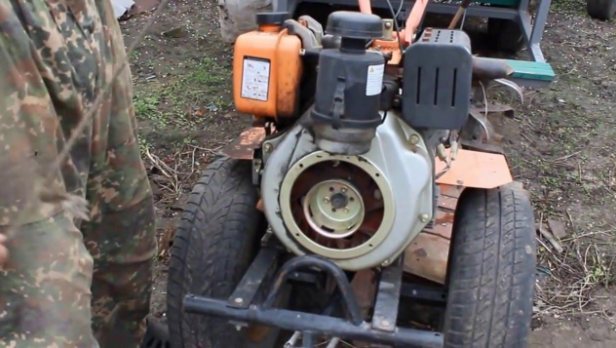
Chassis
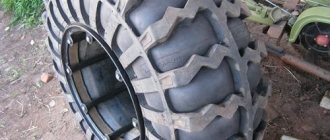
Pneumatic wheels with a diameter of up to 10 inches, taken from decommissioned agricultural machines and motorcycle strollers, are best suited to a diesel walk-behind tractor with a creeper made by yourself. Sometimes they take it from passenger cars if you need to increase the cross-country ability of homemade equipment. And when using a walk-behind tractor on heavy soils, they are replaced with iron ones (you can see how they perform in practice in the video). But the choice of wheels is yours, based on the type of work you will be doing.
When creating a homemade motor cultivator, a rototiller is installed instead of wheels to allow digging and loosening the soil. Thanks to the use of such a soil improver, compaction of the soil over which the motor cultivator has recently passed does not occur.
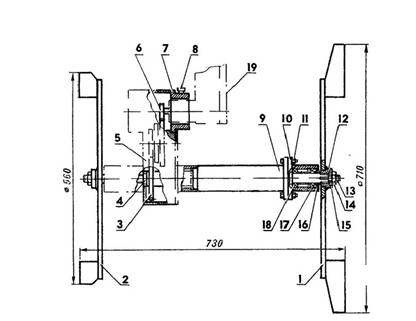
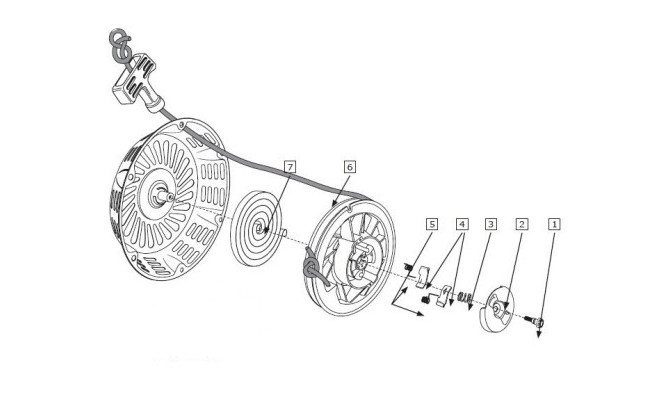
Fig.3.
Chassis of the cultivator 1 and 2 wheels; 3 – gear; 4 – drive shaft; 5 – gearbox; 6 – drive gear; 7 – bushing; 8 – locking screw; 9 – drive shaft housing; 10 – axle box flange; 11 – nut and bolt M-8; 12 – splined bushing; 13 – shaft; 14 – nuts M-14; 15 – washer; 16 – oil seal; 17 and 18 — wheel bearings; 19 – motor.
When making a homemade cultivator axis, it is recommended to use a monolithic piece of steel. A welded pipe will not work, as it may not withstand the load.