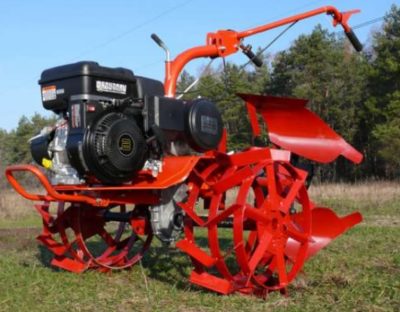
Making a homemade plow for a walk-behind tractor
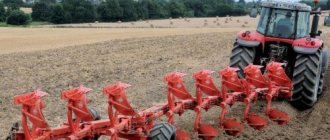
With the help of a walk-behind tractor, a wide variety of agricultural work is performed, such as: plowing, mowing, planting various crops, hilling, transporting goods, etc. But for each type of work you will need special attachments. In this material, we will talk about a plow, and the question arises of what to do: buy a plow, or make a plow for a walk-behind tractor with your own hands.
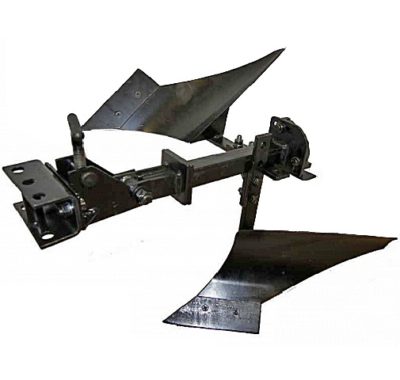
Plows are divided into several types, differing from each other in design. Today, single-body plows, reversible, and rotary plows are used for plowing with walk-behind tractors.
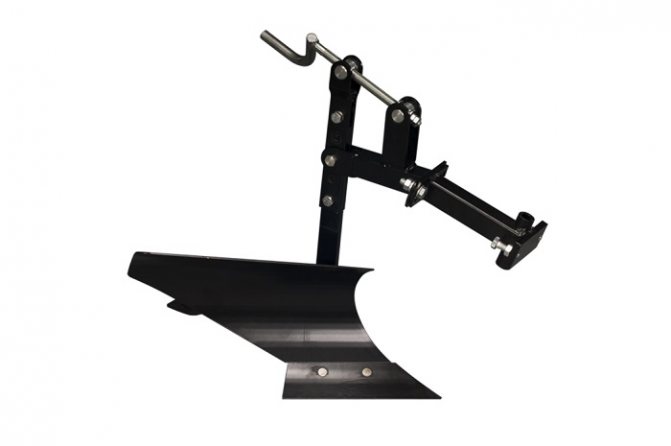
Single body plow
This plow is structurally very simple, and finding its drawings and diagrams is not a problem. Because of this simplicity, making such a plow yourself will be optimal, especially for those owners of walk-behind tractors who do not have special skills.
Making a homemade single-body plow for a walk-behind tractor will not be difficult. After all, almost everyone in their household has unnecessary pieces of metal and improvised tools.
Reversible plow
The agricultural plow has been modified many times during its existence (which dates back thousands of years). Man sought to give this most important tool an ever more advanced appearance, to make it more effective, simpler and easier to use, and economical. Today, like thousands of years ago, a plow remains a plow, but more than one generation of engineers have worked on its properties.
One can, of course, consider attempts to “reinvent the wheel” ridiculous, but the plow, a design that, at first glance, is even less complex, has been invented again and again hundreds of times. And as a result, we have received design options for plows that are ideal for a wide variety of soil types, applicable for cultivating various crops, universal and specific. One of the types of plows that are popular among farmers today is the reversible plow. In this article we will take a closer look at its features and scope of application.
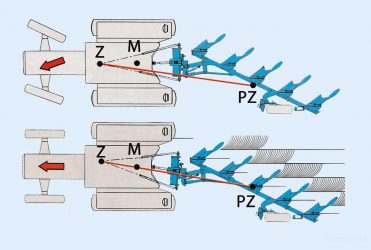
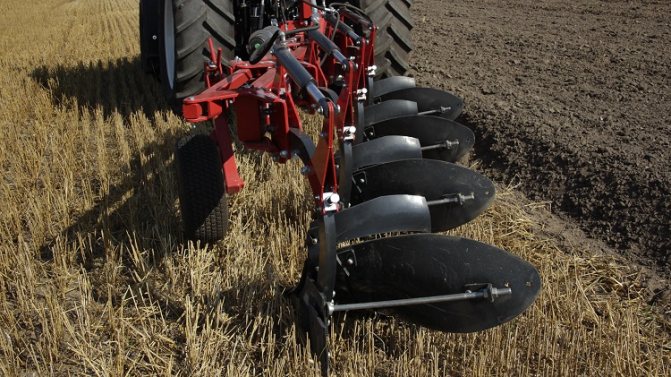
Reversible plow device
The main advantage of this type of plow is that it can significantly reduce the costs associated with operating equipment, as well as increase field productivity. The design features of the reversible plow eliminate any unnecessary operations with the soil layer. Each subsequent pass of the plow across the field is carried out close to the previous one.
This effect is achieved due to the presence of two sets of plowshares, a mirror design, which are fixed to a fixed frame. During one pass of the plow across the field, only one set of plowshares is used to cultivate the land.
When the strip is passed, the unit turns around, and the set of shares that was previously “resting” becomes active. It turns out that the reversible plow plows strip by strip, swapping sets of plowshares alternately with each turn. This method of soil cultivation makes it possible to obtain particularly smooth plowing, devoid of furrows and ridges.
Operating a reversible plow
It is no secret that the future harvest directly depends on the quality of plowing the field. The popularity of the reversible plow is largely explained by the high quality of plowing provided by this unit. The reversible plow is intended for basic soil cultivation and is used for this purpose in agriculture. Plowing the soil with this plow can be done for the purpose of subsequent sowing or to improve the quality of the soil by adding fertilizers to the soil.
A plow of this type demonstrates excellent performance in both cases, thanks to the deep and high-quality cultivation of the land obtained with its help. If it is necessary to plow using the shuttle method, it is the reversible plow that will be most appropriate for use. If, when plowing with a conventional plow, the ridges of half the paddock will be on the right, and the other half will be on the left, then a reversible plow will help to avoid this drawback - after it all the ridges will be in one direction.
Tools for smooth plowing: mounted and semi-mounted reversible plows
There are models of plows that work with both full-size tractors and mini tractors or walk-behind tractors. Most often, the reversible plow is attached to the tractor using a special three-point hitch. However, it is worth noting that there are mounted and semi-mounted reversible tillage units.
Basically, there are plows with 2-5 moldboards. However, semi-mounted models sometimes have up to 18 blades. A reversible plow is not only efficient, but also quite economical, as it eliminates the need to waste energy on turning around at the end of each pass.
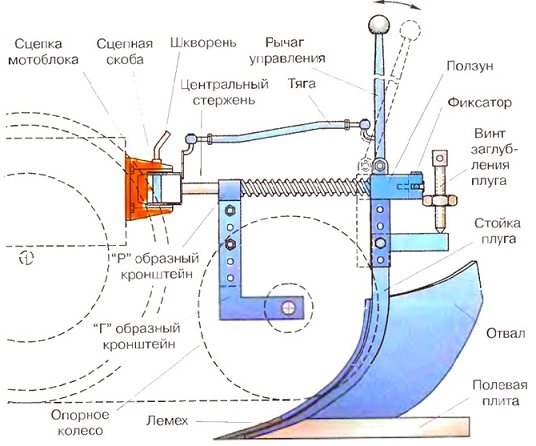
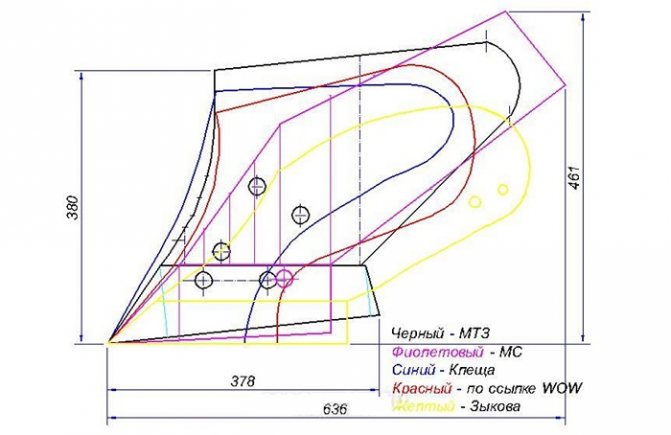
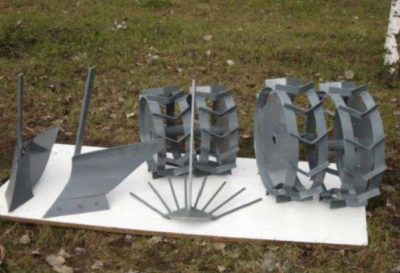
Drawings of a plow for a walk-behind tractor
Using the experience of craftsmen who made a plow for a walk-behind tractor with their own hands and left drawings, the ploughshare should be made in such a way that it can be removed, this will make it easier to sharpen it before plowing.
Suitable steel grade 45, when hardened, brought to a hardness of HRC 50-55. If you only have ordinary steel on hand, say carbon St5ps, which is not subject to heat treatment, then by beating the cutting edge on an anvil and sharpening it, it is quite suitable for cultivating the soil.
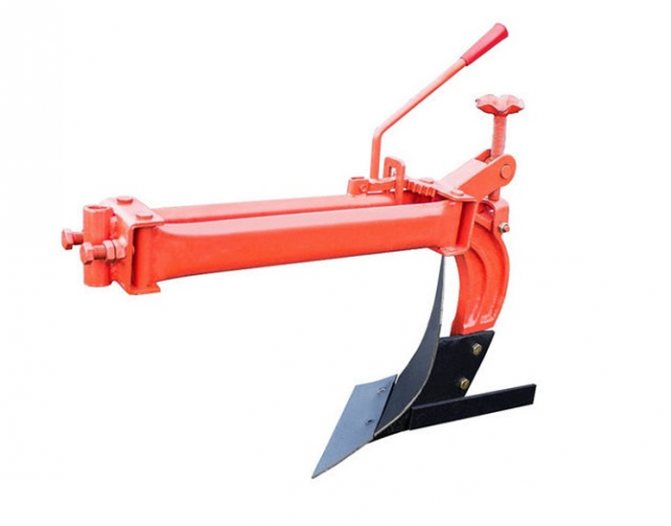
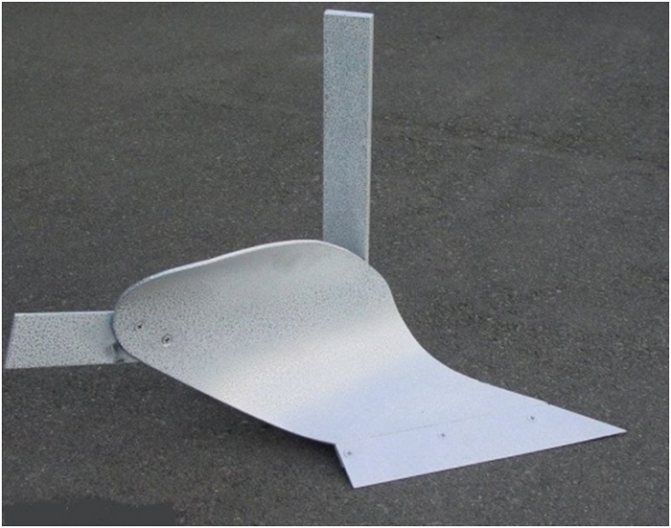
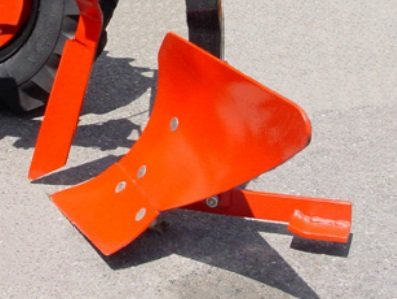
Plow blade for walk-behind tractor
The moldboard of the plow is the part that takes the earth to the side.
The first method of making a blade:
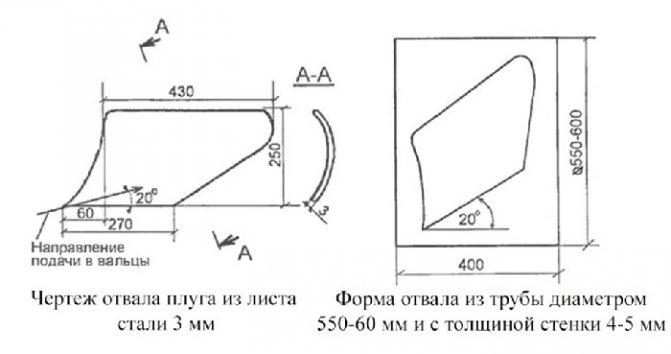
The working surface of the blade must be given a curved shape. If you have a metal bending machine or sheet bending rollers, then giving the workpiece the desired shape will not be difficult.
A metal blank with a thickness of 3-5 mm is required, the rollers are directed at an angle of 20-22 degrees, as shown in the drawing, and the desired bend is given.
Here, prepared. A pipe with a diameter of 600-650 mm can serve (this is the diameter that will require less labor, since the bend of the pipe will maximally repeat the desired bend of the future dump) and a thickness of 3-5 mm. We make a template from cardboard and apply it to the pipe, not forgetting the angle of 20-22 degrees, as shown in the drawing below.
We outline the template with a pencil or chalk and cut it out using gas. welding, if necessary, grind the workpiece and bring it to the desired condition.
Probably the most difficult method of making a moldboard is when the workpiece is heated and, using a matrix, given the desired shape, which can be a moldboard from another plow.
The material of the plow body is steel sheet grade St3 - St10 with a thickness of 3 mm.
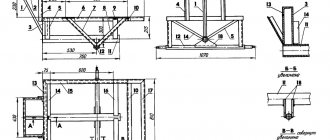
Drawing of plow parts for walk-behind tractor
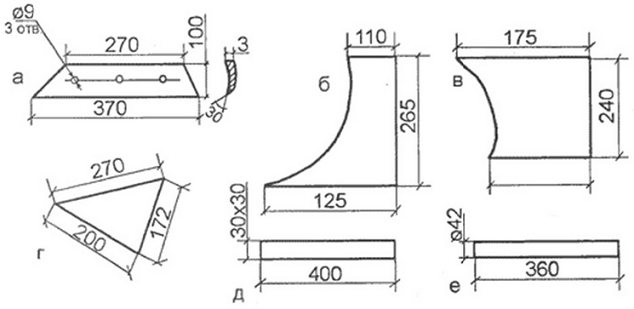
a — ploughshare made of alloy steel;
b — side shield of the rack, St3;
c — spacer plate, St3;
g — plow base plate, St3;
d - field board, corner 30x30 mm;
e - stand, pipe with a diameter of 42 mm
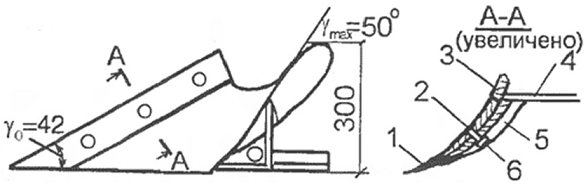
We advise you to first make the plow parts from cardboard and attach them to each other at the required angles. Thus, the values of the angle α on different parts of the plow body will be from 25° to 130°, the values of the angle γ - from 42° to 50°. If the homemade model of a cardboard plow suits you in all respects, you can move on to working with metal.
When the metal parts of the plow are ready, you need to find an additional sheet of steel 3 mm thick, 600x600 mm in size, it will be needed to assemble the plow, and a welding machine (preferably an inverter). On this sheet we retreat 40 mm from the edges and measure the angle γ0.
Plow assembly
2 — side shield of the rack;
3 - additional sheet 2-3 mm
Using wedges with an angle α0=25 degrees and an angle γ0=42 degrees, a ploughshare is installed on the additional sheet and tacked to the sheet by welding, pointwise on both sides.
The side shield of the rack is connected to the ploughshare vertically so that its edge extends beyond the ploughshare by 4-7 mm, while the raised shield should be higher than the blade of the ploughshare (that is, higher than the additional sheet) by 6-8 mm, so as not to interfere with the ploughshare, cut the ground. The shield is also attached to the ploughshare and to the additional sheet.
Next, the blade is attached to the ploughshare very tightly, without leaving a gap, so that their surfaces are one whole. The angle between the upper edge of the blade and the ploughshare blade is equal to (γmax − γ0) = 6-8°.
Mounting the plow share
— countersunk head screw M8;
— corner 30x30x90 mm;
If it is found that the corners and/or surfaces do not correspond, the blade is adjusted using a hammer. After fitting the blade to the ploughshare, it is welded from the back to the ploughshare and to the side shield. Then the side shield is welded to the spacer bar and the base plate; the thrust corners for the ploughshare are attached to the latter by welding.
Followed by. Inspect the finished plow again, and if everything is clearly welded completely. Add. the sheet is separated from the body with a chisel or LNA. All welds are ground.
Plow parts
19th century hand plow
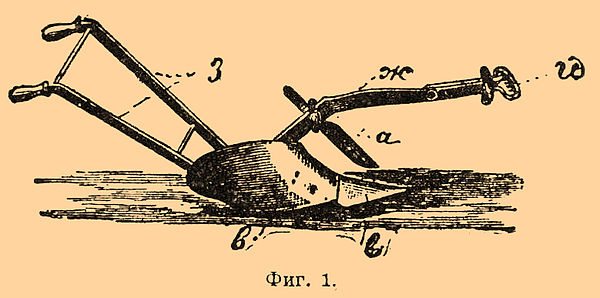
Hand plow from the 19th century
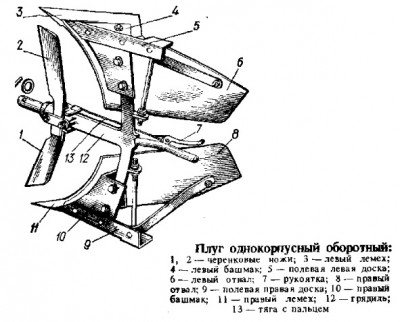
Separately, the main parts of the plow (picture on the right) perform the following work. Knife _
) - cuts off the layer in a vertical plane.
The ploughshare ( b
) is horizontal, wraps and loosens the formation - dump (
c
).
They are also joined by a field board ( g
), which gives the plow support in the vertical plane, a sole (
d
), which serves as a support for the plow from below and takes on the weight of the plow and the layer lying on it during operation;
one or two racks ( e
), to which the above-mentioned parts are attached on one side, and on the other - a beam (
w
i
is attached
h
) from the rear . The last two parts serve to control the plow. Each plow is also accompanied by a wrench for unscrewing and securing the nuts, a hammer for riveting, and either a plow shoe, which is put on the ploughshare, or a plow skid, which is used to transport the plow from one place to another.
Varieties of plows in Russia in the 13th–20th centuries.
Siberian saban (“wheel”) of the late 19th century
In the European part of Russia, at least from the 10th century[10], the traditional “Great Russian” plow was most widespread, until its gradual replacement by an iron plow at the turn of the 19th-20th centuries[11] . In the Volga region, in the Urals and in most regions of Siberia, wheeled varieties of plows were widespread, such as the Little Russian wooden “share” plow and the “wheeled” saban [12].
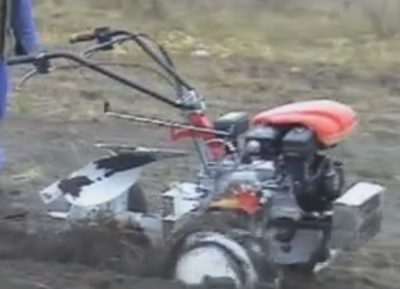
How to install a plow on a walk-behind tractor
Before you begin setting up and installing the plow, you need to prepare the walk-behind tractor itself. The installation begins with the installation of the walk-behind tractor at the work site, the wheels are dismantled and the lugs are installed. (See Do-it-yourself lug lugs for a walk-behind tractor). The lugs give the walk-behind tractor better grip on the soil, eliminating slipping.
Next, we begin the installation; it is recommended not to tighten the nuts too much, for further adjustment if necessary. Then he fixes the hitch to the mounting system of the walk-behind tractor with two steel pins. After completing these manipulations, you can begin adjusting the plow.
Adjusting the plow on a walk-behind tractor
Adjustment of the plow on the walk-behind tractor is carried out with maximum adherence to the instructions, because the quality of further work depends on this. This is done in stages:
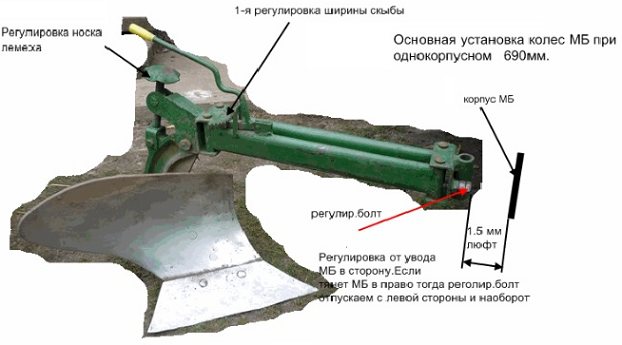
To balance, place the walk-behind tractor on wheels on a flat surface. Adjusting the stands determines the depth of penetration of the plow into the ground, so you need to plow frozen soil no deeper than 15-20 mm, and spring soil, 20-23 mm.
Next, the angle of attack of the plow is set with bolts so that its “sole” is parallel to the surface of the ground.
To check the correct adjustment of the plow, test plowing is carried out, measuring the depth of the furrows and the correctness of the soil dump to the side; if necessary, adjustments are made.
Working parts of the plow
The working parts of plows are cutting or disk knives, skimmers and main bodies.
A disc blade is a disc that rotates on two ball bearings. It is usually installed in front of the rear body, used on general-purpose plows, as well as for soils not clogged with tree roots and stones on bush-marsh plows. A cutting knife is a handle that goes into a knife and is a dihedral wedge. These are used when plowing stone-clogged, soddy soils.
Special plows, including shrub-marsh ones, are equipped with cutting knives. When working, the plow uses knives to separate the layer of soil vertically, creating an even wall, while also creating the bottom of the furrow. This helps maintain a given plowing depth, because usually the support wheels of a tractor or plow run along the bottom of the furrow.
The skimmer is the part of the plow that removes the top layer of soil, placing it at the bottom of the furrow.
Housings are divided into cultural, screw and semi-screw types. Types of housings are semi-screw, high-speed, cut-out, moldless, submerged or disc.
What plows are used on personal plots
Many plows have been invented and created. On personal plots it is enough to use the following:
Single-body is the most common and is easy to use. Anyone who does not have the skills or is not familiar with the process of mechanized plowing can work with it. There is a lot of information on the Internet on how to make a homemade plow for a walk-behind tractor, and drawings for it. It’s not too difficult to make such a plow yourself. Reversible – good for use on hard soils. It has a curved shape. Due to this, the land is plowed in such a way that the layer turns over. This plow is more difficult to make. You must have the skills to work with such an object of labor in order to make the product correctly. A rotary plow is even more complex than a reversible one. It consists of several plowshares running one after another - on the same axis. The axis is scrolling. The layers are turning over. Due to physical inertia and forward movement, the plowing process is facilitated. This treatment makes it possible to effectively plow up to 30 cm in depth. A do-it-yourself rotary plow has one more advantage: you can plow along any trajectory, not just in a straight line. An area with slanting or curved edges can be plowed as desired with this device. Naturally, this is convenient.
How to make a single-furrow plow
Such a plow looks something like this. It is not necessary to have a wheel nearby.
There is a single-hull without a wheel:
This must be done by carefully measuring everything and thinking through the drawing in advance. Here is an example of such a drawing:
A model is made from hard cardboard, completely identical in size and shape to the plow. If the layout is successful, then it is duplicated in steel. Steel should be alloyed, 3 mm thick. Once the steel shape is cut out, the problem arises of how to make the ploughshare into that peculiar oval-helical shape. Stamping a mold at home and even in a workshop is problematic. Therefore, we again make a form from thick cardboard, now only straight. After this, we carefully cut the steel mold (with a grinder) into strips of steel. We number each strip. We cut the cardboard form into exactly the same strips. Let's number it. We experiment with bending and gluing (duct tape, tape) the strips so that the bent and glued strips take and repeat the shape of the first cardboard model. We study the position and bend of each strip. We carry out the operation of bending and twisting steel strips. One by one, welding the twisted strips and checking them with the layout. We use a vice and available tools. When the ploughshare is ready for roughing, carefully grind the welding areas. Now about the plowshare knife that is below. It requires hardened alloy steel. It is advisable to make it removable so that it can be removed and replaced with a ready-made, pre-sharpened one. It's more convenient. We fasten the knife with short, strong countersunk bolts. Three countersunk socket bolts on the blade side are sufficient.
Making a plowshare from a pipe
This was a variant of the most sophisticated way to create a single-body plow. There are simpler ways, but they work. There is a way to make a plowshare from a pipe. It is indicated in the drawing above. Suitable for making a simple plow. Only for an exclusive, powerful plow, the option of making it from a pipe will not work. There are fewer opportunities to give the desired shape. A bent piece from a pipe can only be heated and bent, trying to achieve the desired shape. Solid metal is difficult to bend at home, even when heated.
There is a simple method, but quite effective for shallow plowing. An example of this method is given in this picture of a shop plow for a walk-behind tractor.
You can do this manually in your own way. Two steel blanks are cut to the desired shape. They need to be bent and welded at a beveled angle. Use a large hammer to trim the lower part of the larger side of the square and give it a shape. Make a blade. Place the blade on the bolts. Find a square, strong metal stand. Place it on the inside of the ploughshare angle, drilling everything and securing it with bolts. We attach a square rod to the top of the rack perpendicular to it, which will connect the tiller to the walk-behind tractor. So that the plow can be adjusted according to the plowing depth (higher, lower), weld two strong plates with two holes for bolts on the sides of the rod. Drill holes in the rack for the bolts. In a row - higher, lower on the counter. We fasten the rod through the eyes of the plates with bolts and nuts on the rack. The product is ready for use.
Zykov single-hull plow
On the Internet you can find Zykov’s popular single-hull plow, drawings, and dimensions for making it yourself. Here's what it looks like:
The plowshare can be given this shape by working with a large hammer and a gas torch to heat the metal. This model is famous for its efficiency and ease of execution. Here's the drawing:
How to make a rotary plow for a walk-behind tractor
The simplest way is clearly presented in this picture:

Rack. Two plowshares are welded on it. One is a pruner. The other (upper) is turning over and throwing back the earth. At the top, to strengthen the rigidity of the ploughshare tipping the earth, a corner is welded, resting on the upper edge of the tipper. Rigidity is maintained. We see a store option. If you do it yourself, you can change, make better and simpler the unit for rearranging the plowing depth. The cross member that is connected to the stand with bolts must be welded to the plow. Make the crossbar itself longer. No box shown in the picture is needed. Attach a bracket to the crossbar in front, into which you need to attach another vertical post. Small, but enough to get out of the turning earth zone. Drill several holes for bolts in the front of this vertical small rack (square-shaped). A rod coming from the walk-behind tractor at a right angle is fixed through the holes at the required height. The rod is attached to this front strut using two welded plates with eyes. Two bolts are inserted and secured with nuts. They connect the rod and the rack into one whole. This connection is easier and more efficient to make. And the plowing depth can be adjusted. You can also here, so that the earth cannot get stuck in the gap, weld a thin sheet of tin between the upper and lower plowshare. This additional factor will help the earth move smoothly and quickly in an arc and turn over.
Which plow is better for a walk-behind tractor?
To increase the productivity of the work performed, it is very important to responsibly approach the question: which plow is better to choose for a walk-behind tractor?
reversible plow
For example, a reversible plow can be made independently from high-strength steel. Consequently, it costs him nothing to withstand the necessary pressure while working on a plot of land.
It is also necessary to take into account the density of the treated soil. This especially needs to be taken into account for a rotary plow - the engine of the walk-behind tractor should not overheat, which will allow the unit to be used longer.
Rotary plow
A rotary plow for a walk-behind tractor is compared to a metal ridge, which makes it possible to plow the soil. These types of plows of different models may have different shapes. However, these models are united by the fact that their shape expands towards the top, which allows these units to pour earth away from the trench.
When choosing a plow, it is necessary to take into account the presence of a walk-behind tractor plow setting. It is necessary to be able to adjust the cutting depth and tilt angle for greater efficiency in working with the plow.
Reversible plow
A reversible plow that can be disassembled is perhaps the most ideal option because the blade can be replaced or sharpened. You also need to decide what size your plow will be, which will directly depend on what model of walk-behind tractor you are using.
To use the plow more efficiently, it is necessary to adjust the device, for which it is better to use a hitch (although not necessary). For more precise adjustment, it is necessary to take into account several principles: first, it is necessary that the longitudinal axis of the regulator and the walk-behind tractor coincide, and second, the vertical position of the beam.
This setup will allow you to perform agricultural work more efficiently. It is also necessary to use axle extensions and metal wheels with weights for various tasks.
When purchasing a plow for a walk-behind tractor, you must follow several rules: the plow should not have a thin stand, a shortened blade, a thin body sheet, or low-quality steel. There must be an instruction manual. Compliance with all of the above will reduce your costs by preventing breakdowns, and also perform quality work.
Review of plow models for plowing soil
The share plow for plowing is considered the most ancient and still remains popular. General purpose models are suitable for plowing old arable soil. Such products have special disc knives and skimmers. Special plowshare models are used for plowing soil with stones, as well as swampy areas, etc.
To plow fields with heavy soil, overdried or waterlogged, a disc model . This option allows you to put the soil in order and wait for a better harvest.
Depending on the type of soil, the type of plow is selected
Types of smooth plowing plows are represented by reversible, key, and balancing models. To ensure smooth plowing, completely different models are used. Smooth plowing involves tilling the soil without dividing it into paddocks. Processing begins from any side of the field, the layer of earth is laid in one layer.
Planting machines are used for cultivating soil to a depth of 40-80 cm. Taking this into account, the design of the product is reinforced and made of a more durable alloy.
To cultivate the soil of low-fertility, podzolic solonetz and chestnut rocks, longline options . Any homemade plow will not bring as much benefit or effect as a special one. Therefore, it is worth choosing a product from among the most popular manufacturers. The essence of the layered option is to remove the top soil and mix it with the bottom. There is a more fertile layer at the top.
Among such a wide variety, each consumer will be able to choose the appropriate option for cultivating their land - taking into account the characteristics of the soil, the desired result, and purpose.
If it is still difficult to make a choice, then it is worth watching a video of a tractor with plows, which will allow you to evaluate the results of each model.
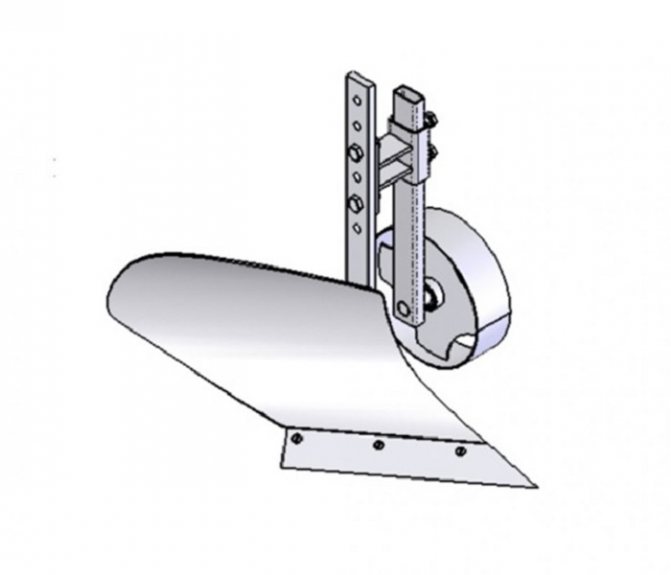
Double-sided plow for walk-behind tractor
A double-sided plow for a walk-behind tractor (hiller) is used to hill various agricultural crops. This also eliminates weeds between the rows. With such plows you can cultivate the soil, cut furrows to plant plants, and then fill them up, including the reverse drive of the walk-behind tractor. Such devices differ only in the grip width – fixed and variable. The only difference between them is the movable wings, which adjust the grip width.
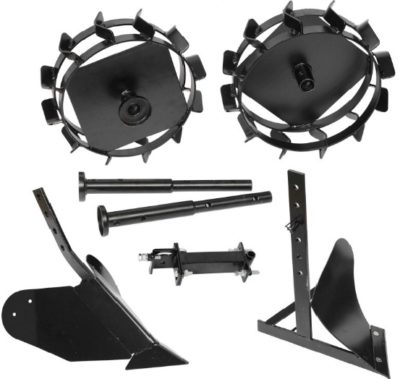
The plow, which has a fixed working width, works with a light walk-behind tractor (up to 30 kg), the engine of which has a power of up to 3.5 hp. Their feature is 12 mm racks (protect the walk-behind tractor from overload).
The most common type of hillers, which have a variable working width. Their only drawback is that soil falls into the furrow after passing. Such plows come with walk-behind tractors weighing more than 30 kg, with 4.0 hp engines. and higher.
Photo of a plow for a walk-behind tractor
Zykov plow for walk-behind tractor
Double-sided plow (hiller)
Zykov plow for walk-behind tractor
Zykov’s specially designed plow for a walk-behind tractor has a significant difference in shape from other similar units, which makes it possible to better cultivate the soil, crumble it and turn it over. This treatment helps almost completely get rid of weeds.
Construction of Zykov's plow
- -share on the unit body;
- - a stand that helps attach equipment to the walk-behind tractor;
- - field board (gives stability to the model);
- - supporting part;
- -feather to turn the soil and get more evenly processed arable land.
How to make a plow for a walk-behind tractor yourself
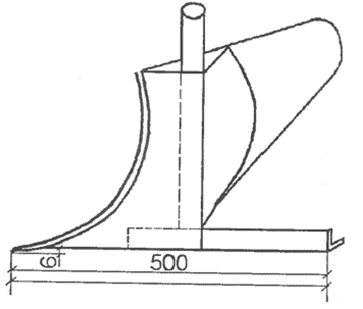
Now we will answer a frequently asked question from owners who bought a walk-behind tractor: how to make a plow for a walk-behind tractor with your own hands. To make working elements, you need 3-5 mm steel. First you need to make a ploughshare (for example, a circular saw blade is suitable for it). The cutting part of the plowshare must be sharpened well and at an angle of 45 degrees.
The next step will be making the blade. For it, you can take a pipe with a diameter of 0.5 m and a wall thickness of 5 mm. We cut out the blank for the blade with a cutter and polish it with a grinder.
Having finished making all the parts, you can begin to assemble the plow body. To do this, we take steel 2-3 mm thick and assemble the entire structure.
So there are several types of plows, let's look at some of their features. Plows are single-body, reversible and rotary.
How to adjust a plow for plowing
1. Adjustment of the plow for plowing should begin with its working parts. The main working element of the plow is the ploughshare; when plowing, more than half of the load falls on it. The plowshare must be sharpened accordingly. Otherwise, fuel consumption will increase by 20%, productivity will decrease by almost 20%, and the processing depth may decrease by more than a third.
2. The blades of the plowshares must have attachments with a cutting edge of up to 1 mm, a sharpening angle of 25 - 400. These attachments must be made of hard alloys and of the same size. Deviations should not exceed: blade length 15 mm, back length 10 mm, and width 5 mm. Make sure that all bolt heads are recessed to 1 mm or flush. At the junction of the share and the blade there should be no gap exceeding a millimeter, and the blade itself should not protrude more than two millimeters.
DIY plow drawings
After I got a self-made agricultural winch, which is used for plowing the garden, the question became: should I buy a plow or make it myself? Walking through the shops and bazaar of Smolensk, you get a strange feeling that the plows produced by the industry for walk-behind tractors are a sad sight.
And these industrial creations are suitable only for “picking” and not for plowing the land, and even with the rotation of the layer, and regarding the depth and width of plowing, we can conclude that for planting potatoes with a distance between rows of 60 cm, not one of the proposed ones is suitable in the plow trade. Either our manufacturers are saving money, or the power of the most popular walk-behind tractors is not enough to work with a normal plow with a working width of 30 cm. When planting potatoes, you shouldn’t plow one furrow three times. And the price wants to leave the best - under 2 thousand. rubles (for a couple of pieces of iron from a scrap metal collection point).
The next step to find something useful is to search the Internet. To my surprise, there are 3-4 original descriptions with drawings floating in the vastness of the Russian-language network (this fact surprises me very much). The next step is to look at what those around you are using. It was not possible to buy a suitable plow; the decision was made to make a plow with our own hands. Based on the fact that the plow was supposed to be used for planting potatoes with a winch for plowing, the following requirements are imposed on it:
1. Plowing width – up to 30 cm.
2. Plowing depth -10-20cm.
3. The plow must hold the furrow itself, without digging in or jumping out of the furrow. The geometry of the plow must ensure movement with the specified parameters without the help of a plowman.
4. Possibility of adjusting the depth and width of plowing.
5. Minimum weight and sufficient strength.
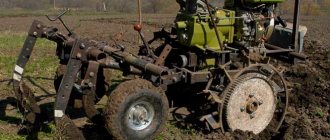
My uncle has been using his homemade motorized winch for plowing for more than 10 years and has tried several options. For the last few years, he has settled on an option optimized for a homemade motorized winch for the garden, namely for planting potatoes with a distance between rows of 60 cm. There is also a homemade hiller for a motorized winch and a homemade potato digger, all this can be viewed on the corresponding pages of the site.
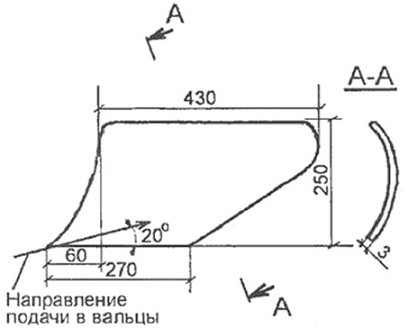
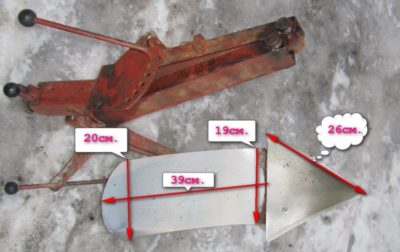
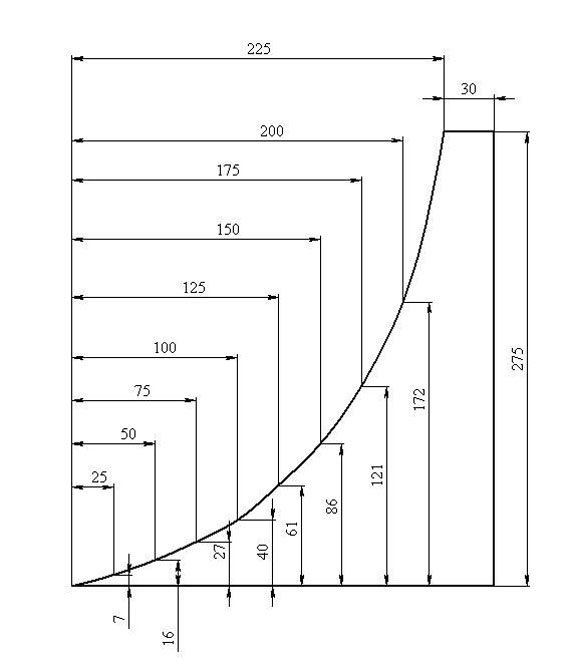
Plow drawing
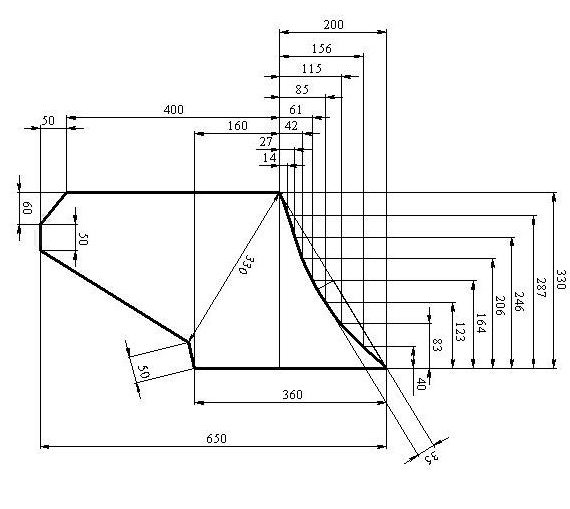
Field board drawing.
The blade is bent according to this template until the two profiles coincide and then welded at an angle.
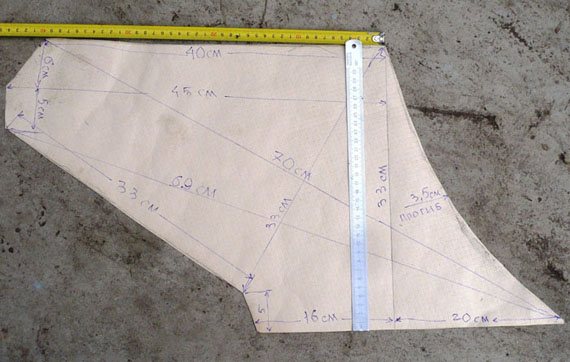
Using a drawing of a homemade plow, you need to draw a template for the plow pattern on thick paper, and then transfer the picture to metal and cut out the blank with a grinder. Personally, I used stainless steel material with a thickness of 1.8 mm. Many often use a sheet of 2-3 mm. The cutting part of the plow is reinforced with a strip of thicker metal. Someone suggests using a disk from a circular machine for these purposes, or a spring from a “Muscovite”. From personal experience, if you plow a summer cottage plot for a family of 4 people in the spring and fall, cultivating six acres, you shouldn’t strive for super-strength. It is more profitable to make a plow that is light but strong enough for its tasks. It’s better to repair or replace something after 10 years, and only if necessary, than to carry around the heavy structure of a homemade plow for 10 years. There is no need for excess weight.
This is what the plowing width adjustment system looks like. By rearranging the large wheel, you can change the plowing width within significant limits. When I plant potatoes, I set the grip to 30 cm, in two passes the distance between the rows is 60 cm. For autumn plowing of the garden or when plowing virgin soil, I use a smaller grip. The small wheel is made so wide that the plow does not press into the ground.
Having looked at the pictures below, you can imagine the basic principles of operation of a homemade plow, or rather a guide system that allows the plow, without the participation of a plowman, to move strictly in a straight line at the established plowing depth and width. The plowing width is regulated by moving the large wheel, which, when the point of application of the traction force is shifted as shown in the figure, is pressed against the furrow, which allows the plow to repeat the direction of the previous furrow. The plow turns slightly, which increases the plowing width. In fact, the width of the nose in the direction perpendicular to the axis of movement of the plow is less than 300 mm, however, the specified width is available for plowing.
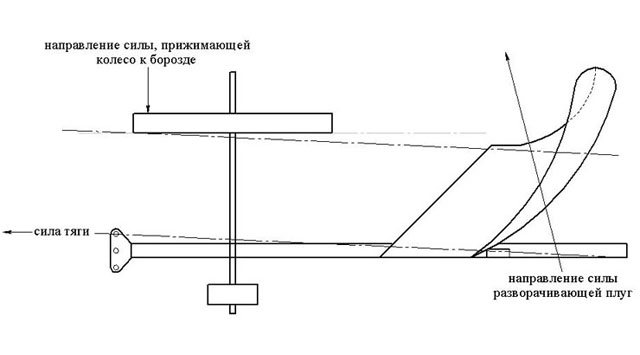
The plow wheel runs along the bottom of the plowed furrow and this situation is observed from the previous furrow to the next. As a result of the application of traction force, a force is exerted to deepen the plow until the plow is aligned with the axis of the wheel, as shown in the figure, as a result, all forces are balanced, and the system operates very stably. Rough adjustment of the plowing depth is carried out by selecting the appropriate difference in wheel diameters, and smooth adjustment is carried out by adjusting the tilt of the plow. At this stage, there was no longer any need to use handles to control the plow, except for some special plowing conditions.

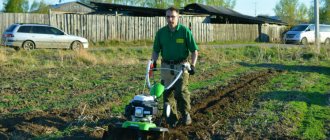
Plows not only loose soil as in the video, but also virgin soil
Plow picture - photos and drawings
Search by image. Search RF by image instead of text. To do this, drag the image onto the gray area. Upload an image. Drag the image here. Sort by: Random. In focus. Number of people.
All Without people 1 person 2 people 3 people 4 people or more. Image type.
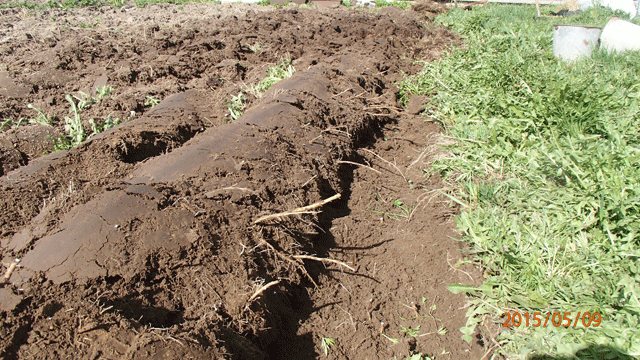
Plows are also called devices for working underwater, for laying cables, for preparing the earth's surface before sound probing and side-scan sonar when searching for oil. Also, the plow is a unit of tribute, taxation of the rural population in Ancient Rus' [source not specified day]. Today, in industrialized countries, the plow is pulled by a tractor. Plowing reduces the number of weeds, loosens and makes the soil softer and more pliable, making further sowing easier. During the plowing process, annual weeds that have already begun to grow, but are not yet sufficiently strong, are damaged.
Number of people All Without people 1 person 2 people 3 people 4 people or more. You can choose up to 3 colors. Refine your search. Similar images.
We use cookies to give you the best choice. By using our website you agree to the use of cookies as described in our Cookie Policy. Help Center. Languages Russian language.
Add to Likebox. Collection of.. Snowplow design concept from collection. Ice relocation service signs.
Vector illustration isolated.. Yellow dog cleans snow with snow removing machine Powerful motor tractor with..
Editable stroke signs Male and Female Laborer Characters.. Simultaneously with plantation plowing, organic and mineral fertilizers can be applied [9]. For two- and three-tier plowing of solonetzic and podzolic soils, a specially designed tiered plow is used [8].
For three-tier plowing: A specially adapted forestry plow, equipped with a simultaneously working body with right- and left-turning blades, and having a device for sowing coniferous seeds into the torn furrows, opens furrows for planting and sowing forest crops in ungrazed clearings [8]. To cultivate rocky soils, a special plow is used, which is equipped with a lever mechanism for deepening the bodies when encountering an obstacle and deepening them after overcoming it [8].
The plow is equipped with a spring protection system, which serves to deepen the plow bodies when hitting obstacles - stones, flagstones and other objects and automatically deepen them after overcoming the obstacles, as well as to ensure stable operation of the bodies when plowing soils of different mechanical composition, density and humidity. The plow is equipped with bodies with extended half-screw moldboards.
The toe of the ploughshare is reinforced with a special chisel. All intensively wearing parts of the housings are made of high-quality steel and heat-treated. Changing the working width is carried out using rods and the hydraulic system of the tractor.
On the vast plains of North America and the virgin lands of Kazakhstan, unprotected from the effects of wind erosion, the use of a traditional moldboard plow did not justify itself. Scientists have developed a moldless flat-cutter plow especially for smooth plowing.