Kinds
There are dozens of models of garlic planters on the market, but based on the principle of operation, 3 main types can be distinguished :
- manual garlic cutter;
- seeder on walk-behind tractor;
- seeder for tractor.
Manual
The most economical option . Used in small areas. However, it requires physical effort: you need to set up the seeder yourself, transport it to the site and carry the seeder in front of you, passing through the entire sowing line.
On a walk-behind tractor
Attached to the walk-behind tractor. To operate, it is enough to use special fasteners and adjust the device to the desired mode.
To the tractor
Attaches to the tractor. This seeder is suitable for processing large areas; the design is quite massive. Allows you to plant a large number of seeds.
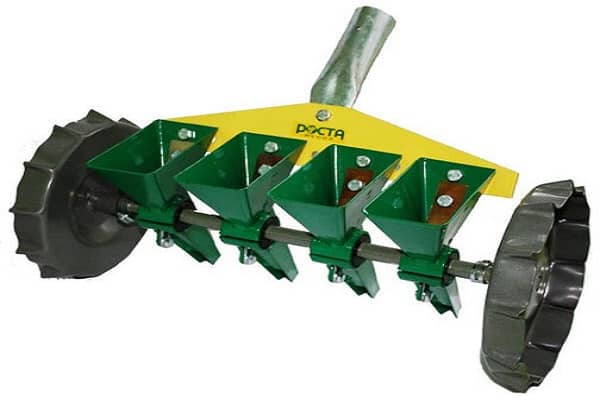
Four-row
Four-row garlic planters are most often attached to walk-behind tractors. The soil is prepared in advance and the seed is calibrated. All sections of the mechanism are removable, they can be removed and rearranged.
Planter models
Every year new models of planters appear on the agricultural machinery market. These can be units both for large farms and small structures for small summer cottages.
Let's look at the most popular models among farmers:
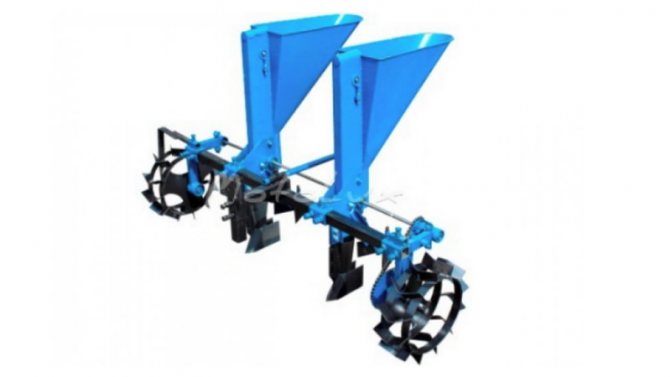
To the walk-behind tractor
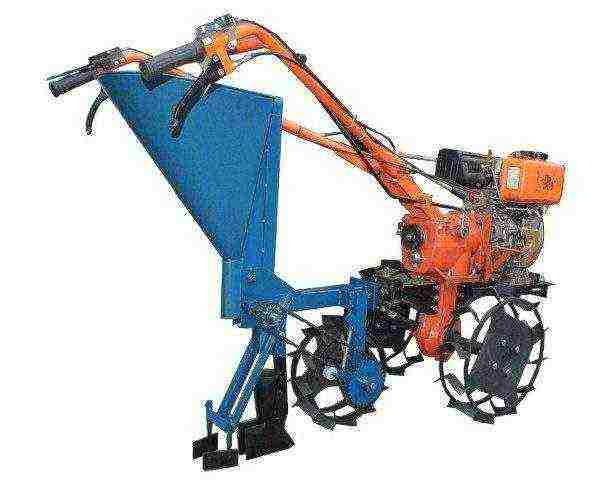
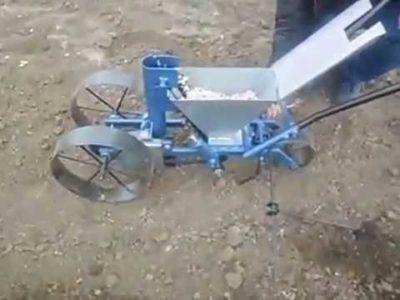
Garlic seeder for walk-behind tractor
Walk-behind tractors are an indispensable piece of equipment widely used in agriculture. As a basis for the planter, you can choose a walk-behind tractor from any domestic manufacturer: Luch, Oka, Zubr and others. The advantages of such a seeder are ease of use, since no additional manual labor is required. The disadvantages include the need to purchase fuel for the walk-behind tractor.
When purchasing a planter for a walk-behind tractor, do not forget about special mounts or adapters.
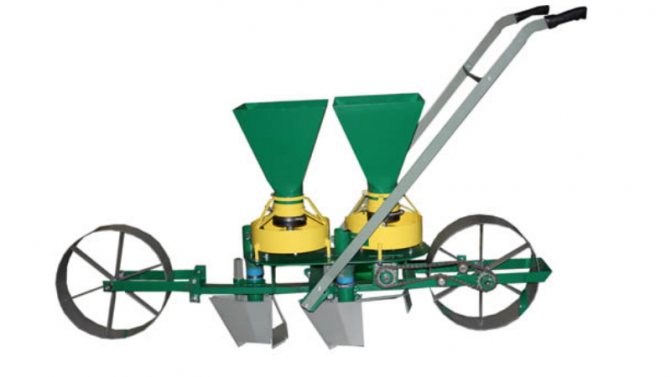
Manual
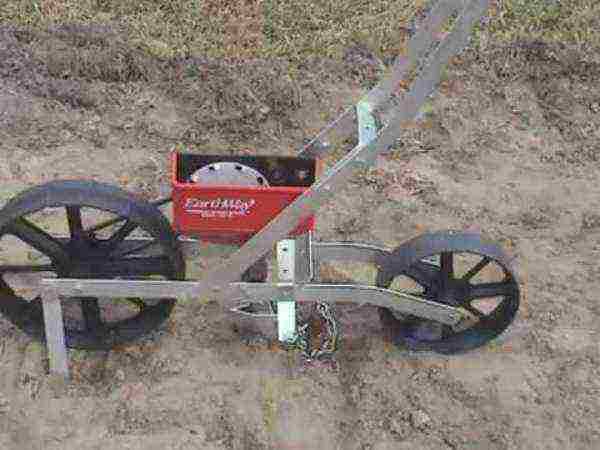
Manual garlic planter
This apparatus for planting garlic is easier to operate. The gardener will be required to manually set up, transport to the site and use force to move the equipment during the sowing process. The advantages include efficiency, since there is no need to spend money on fuel. The disadvantages are large time and power costs compared to a seeder attached to a walk-behind tractor.
A manual planter is only suitable for small gardens and loose soil.
Four-row
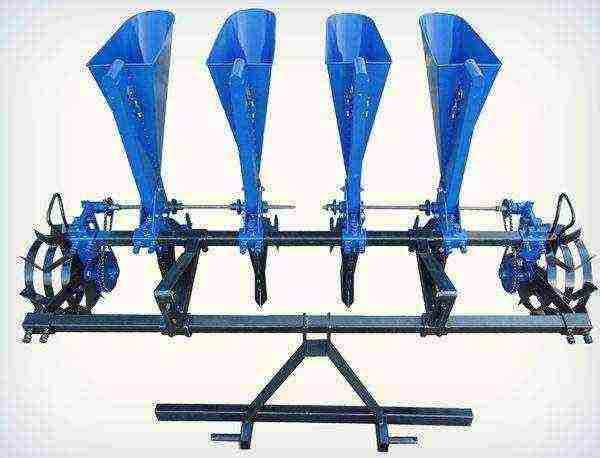
Four-row garlic seeder
The peculiarity of this device is the precise planting of garlic cloves in 4 rows. The advantages of the technology include ease of use and the ability to use on any soil.
The four-row seeder is suitable for planting cloves of any diameter. You can also use it to plant garlic bulbs.
Landing marker and its types
A planting marker is a device made of metal or wood that allows you to mark beds for planting many crops. Such a device has undoubted advantages:
- planting material is laid at an equal depth;
- planting a crop is greatly simplified;
- Holes are marked with perfect accuracy;
- using a homemade seeder does not require additional costs;
- landing time is significantly reduced;
- the process becomes less labor intensive.
There are several types of markers; you can make them yourself from scrap materials. They can be metal and wood. The main thing is to decide on the geometry and type of device. There are three types of landing devices:
- Needle-shaped.
- Serrated.
- Transverse or slatted.
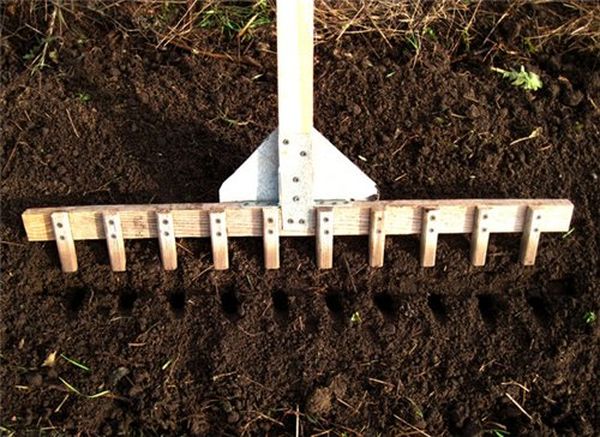
Needle markers
This device for planting garlic is based on a board. The width of the board is 25-30 centimeters. The needle teeth must be placed on it in a square manner. The height and distance between the teeth should be equal to the optimal depth for embedding planting material and the distance between plants. And needle markers are used for sowing seeds to a certain depth and planting seedlings.
Jagged markers
This type of marker resembles a rake, but instead of metal teeth, triangular bars are attached to the bar. The distance between them and the sizes are determined according to the planting scheme, corresponding to the distance between the plants. The required depth at which the garlic needs to be planted is taken into account. Wood, as well as metal, can be used to make the device. Use jagged markers for planting onions and garlic.
To make the device, you need to take a metal corner, a wooden board or a piece of chipboard. Blind holes are drilled, onto which a handle is attached on top using welding or glue (for wood), and wooden or metal spikes on the other side. When planting with one hand, the device is lowered to the ground by the handle and pressed with the foot. Carefully rises, the marking is ready. Getting holes of a given depth with such a marker ceases to be a problem.
Slat markers
With this device, the planting process will be quick and easy. The structure of the device is a board or plank, on one side of which triangular cross-section slats are nailed. To make it more convenient to use such a tool, a handle is attached to the top side of the board. One press of your foot on the marker and you get even transverse rows. Longitudinal rows can be made using a jagged marker.
Weight and dimensions
All parts of the seeders are made of durable and thick metal. The more massive the structure, the greater the weight and size.
The dimensions of manual garlic planters are small. The weight of the units is up to 10 kg, but working with them will require more time and physical effort.
The large weight of tractor attachments is due to the size of the device and the need to press with great force on the surface of the earth in order to make a furrow.
Main types of planters
There are various models of this device on the modern market, but they all differ in the main principle of operation. They can be manual or attached to a walk-behind tractor, and can also sow a different number of rows: from 1 to 5 or more. It depends on the specific needs of the person and the amount of work required.
Manual
This is a simpler version of the device, easy to use, but requiring some physical effort on the part of a person. The seeder will need to be manually adjusted, transported to the site in the same way, and force must be exerted to move during the sowing process. It is a more budget option and does not require additional materials.
The garlic planter can be manual or made as an attachment for a tractor or walk-behind tractor.
Manual ones cost less and do not require fuel, but in the process it will be necessary to exert greater effort to press the opener into the ground and move it forward. For the unit to operate, the soil must be soft and loose.
The attachments on the walk-behind tractor are heavy and have devices for planting several rows at the same time. They cling through special fasteners and adapters to the rear of the machine. With different power capabilities of tractors, seeders are used that differ in weight and number of rows.
We invite you to familiarize yourself with: Do-it-yourself opening polycarbonate greenhouse
Each of the devices is quite good; the best models are selected solely from the individual preferences of the farmer.
Planting garlic using tools
Of course, it is possible to plant garlic manually in the fall before winter. However, if a summer resident does not have a couple of beds, but much more, then it is better to pay attention to a device for planting garlic, which will make the process simpler and faster.
There are different tools for planting, but the purposes of their use are all the same:
- Maintaining the required depth when planting.
- There is no need to ensure that the landing is level.
- The speed of the process increases.
- Keep the same distance between the garlic cloves.

Tools for sowing garlic are easy to make yourself
The use of such tools makes the work of the summer resident easier, and as a result, planting does not take much time.
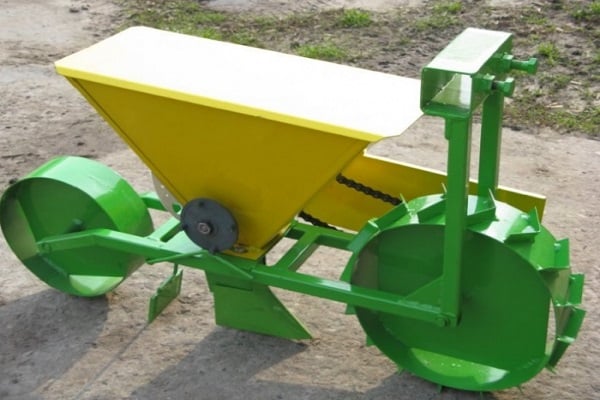
What is a garlic seeder
Sowing any crop in the garden requires a responsible approach. The final result – the harvest – largely depends on how this happens. At first glance, it seems that planting garlic is a completely simple task; you only need to place its cloves at a certain distance from each other, preferably in a straight line, in the ground.
Planting garlic with a seeder
But if a summer resident decides to sow garlic from bulbs in the spring, this is already difficult to do, because they are much smaller. Therefore, for large summer cottages or farms it is worth purchasing a seeder.
You can not only buy a planter in a store, but you can make it yourself, which will be much cheaper.
This agricultural unit is an excellent work assistant. It will facilitate manual labor, save time and improve the quality of sowing, as it evenly distributes the cloves throughout the area.
Popular models on the market
Domestic manufacturers have developed a number of seeders that meet the needs of any farmer. It’s convenient that there are no problems finding and purchasing the necessary spare parts at an affordable price. Let's look at the most popular models:
- SMK-3 VPS27/1-10/4 is a manual three-row seeder. This model has the following parameters: distance between rows - 12 cm, the ability to install attachments for other crops, furrow depth - from 1 to 3 cm, weight - 3 kg.
- The ChS-1 single-row seeder is designed for installation on a 6-hp walk-behind tractor. pp., it is possible to calibrate seeds (15-25 mm) with planting increments of 11, 12.5, 14 cm, container capacity - 10 l, furrow depth - 6-8 cm, weight - 20 kg.
- The two-row model ChS-2 is manufactured as an attachment for any 6-hp walk-behind tractor. With. The width between the rows is adjusted within 20-40 cm, the sowing depth is 6-8 cm. There is a calibration device and large containers for seeds. The weight of the entire structure is 44 kg.
- The four-row ChS-4 is equipped with a capacity of 10 liters, the planting depth is 8-10 cm with a seed ejection distance of 11, 12.5, 14 cm. The row spacing is selected within the range of 20-53 cm. The weight of the entire structure is 73 kg.
- The attachment for the walk-behind tractor is a collapsible model, so the number of simultaneously planted rows can be changed. Seed calibration is carried out within the range of 2-16 mm. The container volume is 5 liters. Loosening depth is 1-10 cm. You can change the frequency of opening the gutter. Product weight - 60 kg.
ChSN-4
The model is suitable for planting garlic, tulips and onion sets. It is mounted, four-row. Row spacing is 30-40 cm. Planting depth is 40-150 mm. Sowing seeds - 9-14 pcs. on m.p.
Additionally, it is equipped with a drip irrigation paver (the ability to apply soluble fertilizers during sowing) during planting and pressing wheels. Weight – 270 kg. Productivity 2-2.5 ha/day. Connects to tractors: T-25, MTZ, YuMZ.
ChSN-4U
The model is suitable for planting garlic, tulips and onion sets. It is mounted, four-row. Row spacing – 20-40 cm. Planting depth – 20-150 mm. Sowing seeds – 10 pcs. on m.p. Weight – 1500 kg. Productivity is 2-3 hectares per day. The required tractor power is over 25 hp. (Horse power).
Garlic seeder for T-25, MTZ, YuMZ 7.244
Suitable for sowing tulips and onion sets. The model is suspended, four-row with the ability to apply soluble fertilizers during sowing. Row spacing is 30-40 cm. Planting depth is 40-150 mm. Sowing seeds 10 pcs. on m.p. Productivity - 2-2.5 hectares per day. Weight – 1500 kg. Additionally, it is equipped with a drip irrigation stacker and pressing wheels. Operates with MTZ, YuMZ, T-25 tractors.
MPLS-3
The MPLS machine is designed for spot planting of bulbous crops using the two-line method. Available in three- and six-row, the characteristics are shown in the table below.
| Bed width | 0,92 | 2,22 | 3,62 |
| Productivity, ha/hour | 0,6-0,8 | 0,8-1,3 | 1,5-2,2 |
| Number of planted rows | 3 | 4 | 6 |
| Compatible with tractors of the class | 1,4 | 1,4 | 1,4 |
| Number of lines in a row | 2 | 2 | 2 |
| Distance between rows, mm | 400 | 700 | 700 |
| Distance between lines, mm | 120 | 120 | 120 |
| Landing step in line, cm | 8-12 | 8-12 | 8-12 |
| Overall dimensions, mm | |||
| Length Width Height | 1900/2200/1700 | 2400/2620/2300 | 2400/4020/2300 |
| Weight kg | 700 | 1200 | 1600 |
ChS-2
Model characteristics:
- equipped with a 6 hp walk-behind tractor. With.;
- row spacing - 20 - 40 cm;
- container capacity - up to 8 kg;
- planting depth - 6-8 cm;
- sowing - 7-10 pieces per m.p.;
- weight - 44 kg.
Before starting work, it is required to first prepare and treat the soil and calibrate the garlic cloves to 15-25 mm.
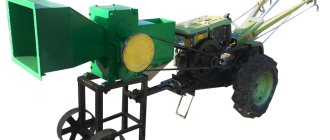
Motoblock four-row seeder
Model with adjustable holes for ejecting teeth from 2 to 16 mm. The number of rows is from 1 to 4. The frequency of opening of the gutter is adjustable. Container volume - 5 l. Seeding depth - 10-100 mm. Weight - 60 kg. The device requires soil preparation and calibration of garlic cloves.
ChS4

The model works stably on uneven ground, but the ground must be prepared and the garlic cloves calibrated. Its characteristics:
- container volume for planting material - 10 l;
- landing pitch - 110, 125 and 140 mm;
- depth - from 60 to 80 mm;
- width between rows - 200-530 mm;
- weight - 73 kg.
Mounted seeder No. 7.589
Model for planting bulbous crops, mounted, four-row, with the ability to apply soluble fertilizers. Row spacing is 30-40 cm, sowing 10 pieces per m.p. Depth – 40-150 mm. Weight 261 kg. Productivity is 2-2.5 hectares per day. It is equipped with a drip irrigation paver and rolling wheels. Works with T-25, YuMZ, MTZ tractors.
Mounted seeder No. 7.558
Seeder for bulbous crops, mounted, four-row, with the ability to apply soluble fertilizers during sowing. Characteristics:
- sowing - 9-14 pieces per m.p.;
- row spacing - 30-40 cm;
- planting depth - 40-150 mm;
- productivity - 2-2.5 hectares per day;
- additionally equipped with a drip irrigation paver during planting and pressing wheels;
- weight – 265 kg;
- can work with MTZ, YuMZ, T-25 tractors.
ChSN-4 J369
Seeder for garlic, tulips, onion sets, four-row hanging, with the ability to apply soluble fertilizers during sowing. Sowing 10 pieces per m.p. Row spacing is 30-40 cm. Planting depth is from 40 to 150 mm. Additionally, it is equipped with a drip irrigation stacker and rolling wheels. Productivity - 2-3 hectares per day. Weight – 260 kg. Operates with tractors T-25, YuMZ, MTZ.
SLR-2
The SLR seeder (manual onion seeder) - 2 provides two-row sowing of onion crops (onion sets, garlic, tulips, gladioli, potato microtubers) both on a flat surface and on a ridge.
Characteristics:
- distance between sowing lines - 90 mm;
- recommended speed - 2-2.5 km/h;
- planting method - single-row, two-line;
- number of teeth in a line – 15-30 pieces per line;
- embedment depth 1-7 cm;
- the distance between the openers in the section is 9 cm;
- weight – 37 kg.
Manual seeder SMK-3 VPS27/1-10/4
Three-row seeder for bulbous crops. Row spacing is 120 mm. Sowing depth - 10-30 mm. Weight 3 kg. The model is used only on previously prepared soil.
How to make a seeder?
Materials:
- a transparent plastic jar (will be a container for seeds);
- bolt;
- plastic tube (you will need to cut a piece that fits the depth of the jar);
- a metal tube slightly narrower in diameter;
- 2 washers for fixing the can;
- screw;
- a tin can (you can just use a lid);
- aluminum wire;
- wooden handle;
- hoe.
Inventory:
- drill;
- knife;
- scissors;
- nail;
- lighter;
- matches.
Instructions:
The plastic jar needs to be drilled through. The hole must be located exactly in the center - this is important for the stability of the structure.- Remove the cover. Make a triangle-shaped hole on the side (for seeds).
- Cut the lid from a tin can. This will be the valve that regulates the filling of seeds. The valve must be attached to the jar with wire so that it can open and close freely.
- Cut a piece of plastic pipe and insert it into the center of the jar. This way the can will not shrink as the bolt is tightened.
- You need to insert a metal tube into a piece of plastic pipe - this will create a bearing. As a result, the can should rotate - this is a sign that the design is working correctly.
- A bolt is in turn inserted into the metal pipe. You need to tighten it with a nut between two washers - this will make rotation free.
- Make 2 holes on the side of the plastic jar with a hot nail. In this case, the diameter of the nail will be the same as that of the garlic clove that will be planted.
- Drill a hole in a wooden handle for a bolt and screw it to the tank (can).
- Bend the hoe and attach it with wire to the handle, above the tank.
Advantages of homemade over purchased
A tool created with your own hands will always compare favorably with purchased equipment:
- Individual parameters and convenience: equipment is created to meet the necessary requirements.
- It's easy to fix; you can use improvised means.
- Low cost.
In the process of work, you may need to purchase some additional parts, think through the design in advance and determine the purposes for which the tool is created.
What tools and materials will be needed?
The main structural elements necessary to create a garlic planter:
- control handle;
- containers for seeding material;
- rotating shaft;
- wheels;
- chains;
- opener
The tool can be made of wood, metal, plastic. You can use an old children's bicycle as a basis. The design is created according to the drawing.
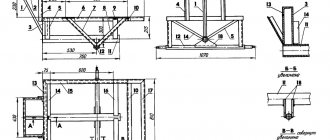
Schemes and step-by-step assembly technology
Plan for creating a garlic planter with your own hands:
- Draw a drawing.
- Create a container for the seed: a hole is made in the center of a plastic canister or other container, and a gap for the seeds is cut out on the side.
- The container must have a lid; tin cans and wire are often used to create it.
- The frame is assembled from metal elements.
- The container is screwed to the frame.
- The wheel axle is being manufactured.
- The planter wheel is connected using a chain to the walk-behind tractor wheel.
- The opener is installed.
- Creates a seat and legroom.
Important! When creating a tool with your own hands, you must take into account safety regulations. Particular care should be taken when working with welding: use safety glasses, gloves, and boots.
Two people work with the walk-behind tractor and the planter: one person controls the tool, the other controls the planting.
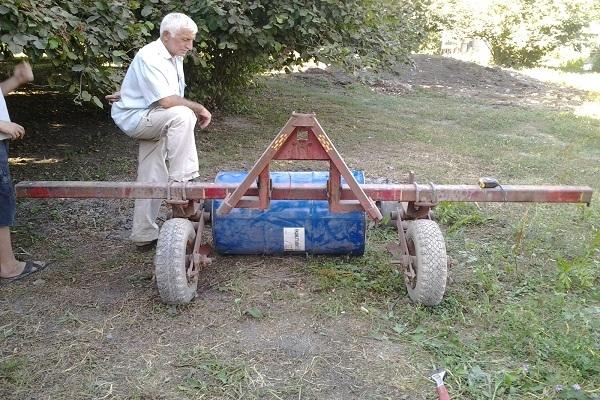
First device.
Two boards, between which there are pegs at a certain distance, the outer ones of which are also long handles.
Board 2cm*10cm. The distance between the teeth and in depth is 10 cm. The teeth are screwed on with self-tapping screws, and cuttings of boards are inserted into the spaces between them; we make the width the same as the width of the bed in which the onions or garlic will be planted.
By the way, I started a new channel, called
“Diary of a Rural Everyman ,” where I talk, now about my life, so to speak, “lifestyle” - here and now. Welcome!
A very simple device, but it does its main job perfectly!
It turns out such beauty!
The second device.
A block of wood 35*35, long in width of the bed. Using a 20mm drill bit, I drilled holes every 150mm. Here we make the distance that you are used to when planting garlic and onions.
I cut 20*100 pieces from a polypropylene pipe. I inserted the pieces into the holes and secured them with small self-tapping screws.
Handles are required for this device. We need to finish it somehow!
The third device.
Used in the tape, two-row method. The width between rows is up to 25 cm. In a row, the distance between the cloves is 10 cm.
This device is suitable for manual landing, without resting your foot.
DIY making
To figure out how to make a garlic seeder with your own hands, you don’t need a lot of knowledge. It is enough to know its design features and decide on its purpose. First, a drawing is prepared, then the parts necessary for assembly are found or purchased. To make a seeder you will need:
- Shaft with brushes.
- Container for planting material with a double bottom. A plate with holes is installed in it. Their diameter must correspond to the diameter of the inlet and outlet holes. When moving, the plate will regulate the number of seeds coming out, so that they will be planted evenly.
- Wheels.
- Plastic and metal pipe.
- Opener.
- Guide handle.
- Tin.
- Bolt.
If the structure is equipped with a walk-behind tractor, the work process will become several times easier. Having installed the walk-behind tractor, the seeder will independently move around the garden.
The only thing that is required from the farmer is to direct its movement in the right direction. After preparing all the parts, you can start making a garlic planter with your own hands. The drawings will help you assemble the device accurately. Work order:
- A hole is drilled in the seed container. It should be located in the middle. The second hole is made in the lid.
- A valve cover is made for the hole for the seeds. It is cut from a tin can.
- A piece of plastic pipe is inserted into the hole in the container. Then a metal pipe is inserted into it.
- For free rotation, the bolt and nut are inserted into a metal pipe and fixed between the washers.
- Then two holes are drilled in the side of the can. Their diameter should correspond to the size of the seeds.
- A wooden handle is screwed to the container. A bent hoe is attached to this handle. A metal hoe is used.
- Plastic wheels from a children's bicycle are suitable for the seeder. The wheels of a toy car are also suitable.
Growing onions and garlic
Onions and garlic are important vegetable crops that are widely used in cooking, including in Russian cuisine. Few dishes are complete without them, and few other products are in demand as much as onions and garlic.
Considering the huge need for these two vegetables, almost all amateur gardeners try to grow at least a little onion and garlic on their plot for the needs of their own family.
Unfortunately, not everyone knows how to grow these crops correctly.
What are onions and garlic?
Onions are a fairly large group of botanical species (botanical genus) belonging to the Amaryllis family of plants. There are about a thousand species of onions in nature, among which there are both completely wild and cultivated species. Moreover, cultivated onions are not only edible, but also decorative.
Since there are about a dozen vegetable types of onions, and a dozen and a half dozen decorative ones, it will be completely impossible to talk about them all in one article.
Moreover, many of these species differ quite significantly in cultivation technology.
So here we will only talk about the two most common and popular types of onions - onions and garlic, and how and when to plant onions and garlic.
So, onions are a biennial plant with a large bulb and tubular leaves. Depending on the variety, the size of the bulb can range from 3-4 to 15 cm in diameter.
The bulb has a filmy (scaly) structure, that is, it consists of many layers.
It is this bulb that is the main product obtained from this type of plant, although young green stems are also suitable for food.
In turn, garlic is a close relative of onions, but differs from it in the structure of the bulb and its taste. A garlic bulb does not consist of many layers of flakes, but of several isolated cloves with a more or less uniform structure.
Both types - spring and winter onions and garlic - are widely used in cooking around the world. Their role is almost always limited to flavoring, and very rarely they become one of the main ingredients of a dish. Garlic, which has a pronounced antiseptic effect, is also widely used in folk and scientific medicine.
Growing garlic and onions
Onions reproduce through seeds. But since this is a biennial plant, and the bulb (the main product) ripens only in the second year, in vegetable growing it is customary to distinguish between planting seeds and bulbs.
The seeds are usually called nigella, and the bulbs are called sevka. In the first year, nigella is sown, which by autumn grows and forms a bulb measuring about one and a half centimeters in diameter. This is the onion set, which is planted in the spring to obtain full-fledged marketable bulbs.
As for garlic, planting onions and garlic have a lot in common, since planting garlic is very close in technology to sets.
Obtaining onion seeds
The easiest way, of course, is to purchase onion seeds at a gardening store. But since this method is not of particular interest, it is better to consider the technology for obtaining seeds independently.
Large bulbs that have all the characteristics of the variety of interest are planted in open ground either in early spring, when the snow has barely melted, or in the fall, shortly before the cold weather. When planting onions and garlic, it is always better to choose a dry, well-lit area, which needs to be thoroughly dug up, adding a little humus and wood ash.
Bulbs planted in the ground at the beginning of summer will grow flower stalks (arrows), on the tops of which spherical umbrellas (boxes) containing small black seeds will form. If the bulbs are healthy, the arrows they throw out will be quite long, so it is possible that they will even have to be tied up. While the arrows are growing and the seeds are ripening, the bed should be watered moderately.
Unfortunately, onion seeds in pods ripen quite unevenly, which is why some of these seeds will inevitably be lost due to the opening of some of the seed pods.
However, you can use a trick and wrap the onion umbrellas with gauze or other fabric. But such tricks make sense only if we are talking about a rare variety that is difficult to obtain.
And even then only on the condition that every onion counts.
They begin to collect seeds at the moment when cracked boxes begin to appear in the umbrellas. Then the umbrellas are simply cut off and laid out in a dry, warm room to dry and ripen. After two to three weeks, the umbrellas will be completely dry, after which they can be easily ground and the seeds can be separated from the husk.
Sowing nigella onions and subsequent care
When working with nigella onions, keep in mind that the germination capacity of these seeds is rapidly lost: next year half will die, the next year another half of what remains, and in the third year the seed material will simply be lost. In view of this, available seeds must be used immediately. For the same reason, many gardeners do not trust seeds from the store, since it is not known how old they are.
Before sowing, it is advisable to disinfect nigella. If the seeds were purchased externally, disinfection is mandatory so as not to introduce infection into your garden.
Potassium permanganate is quite suitable as a disinfectant, in a weak solution of which the seeds should be kept for about half an hour.
After all disinfection procedures, the seeds are germinated on a damp cloth at room temperature.
Nigella is sown in the ground in the first half of April. Seeds can be thrown ungerminated into well-moistened soil, but in this case seedlings should be expected a little later.
If fertilizers were already applied to the garden bed last year, then it is no longer necessary to apply them under the chernushka. Otherwise, you can use both ordinary humus and special complex fertilizers intended for onions.
Chernushka is sown in a bed from which all weeds, especially their roots, have been previously removed. If this is not done, weeding will be a very difficult and troublesome task.
Seeds can be sown either in rows or scattered. The first option provides larger bulbs at the end of the season, and the second saves space in the garden bed. The planting rate for nigella is 6-8 kg per hectare.
There is no need to bury the nigella too deeply, just place it 1-2 cm below the surface level and then roll it lightly.
Until the first shoots appear, it is recommended to keep the bed with nigella moist. If a soil crust is constantly forming on the surface, it must be carefully loosened so that tender shoots can break through to the surface.
As soon as the first shoots appear above the ground, it is necessary to carry out the procedure of thinning the nigella, leaving at least 2 cm between shoots. If you want to get medium-sized marketable bulbs already in the first year, after three weeks thinning is carried out again, but now the distance between plants is increased to 6 cm.
If necessary, nigella seedlings need to be watered. But in any case, watering must be stopped three weeks before harvesting, which is done after the tops fall down.
Planting onion sets
In the fall, small onions with a diameter of about a centimeter or a little more are dug out from the bed where the nigella onion was sown. This is the onion set. It can also be purchased ready-made in the store, but since the cost of ready-made varietal sets is quite high, it is still more profitable to use your own grown sets.
The technology for planting onion sets is generally similar to sowing nigella, but has some of its own characteristics. Firstly, the sets do not need to be soaked for the purpose of germination; simply treating them with potassium permanganate is enough. Secondly, to speed up germination, the tops of the bulbs are cut off before planting. The main thing here is not to overdo it or cut off too much.
Planting time is as soon as the spring frosts end and the soil dries out and warms up enough. It should be noted that some farmers practice planting small seedlings in the fall. The question of when to plant garlic and onions before winter is quite debatable, but most agree that it is better to do this in mid-September.
Soil preparation is carried out in the same way as with nigella. But the scheme for planting sets assumes the following distances: 25 - 30 cm between the beds and 12 cm between the bulbs in a row. Onion sets must be planted with the roots down, after which they are covered with soil.
The seeding rate greatly depends on the size of the seed and the density of planting, but usually it is about 600 kg per hectare for small seed and 1.1 tons per hectare for large seed.
To get a good harvest, it is advisable to water the bed with onion sets regularly - once a week would be optimal.
Growing Garlic
Although in principle garlic is capable of propagating by seeds and forms the same seed pods as onions, in agriculture onions are propagated almost exclusively by cloves rather than by seeds.
Since these cloves are very similar to the bulbs of onion sets, the technology for growing garlic is very similar to growing second-year onions.
In addition, many insist that you can plant onions and garlic directly in the same bed, using the same technology.
Preparation for sowing begins by selecting the largest cloves. They are then planted first in order to ultimately obtain bulbs of maximum size. Medium-sized cloves are planted if there is space left in the garden bed. It is not recommended to plant small cloves, since they will grow into small bulbs with equally small cloves.
The seeding rate depends on the size of the planting material. Large cloves consume an average of 20–25 kg per hundred square meters; medium cloves consume 10–15 kg per hundred square meters.
Garlic has both spring and winter varieties. Moreover, winter crops clearly dominate. Winter garlic is planted 2-3 weeks before frost, which in central Russia usually occurs in the second half of September. But spring garlic is planted when the soil warms up to 5-6 degrees Celsius. In the middle zone this is the second half of April.
Planting scheme is a highly controversial issue among gardeners. Many agree that the following is optimal: the width of the bed is 30-40 cm and there are three rows of strips of garlic in it, the distance between the cloves is 12-15 cm, the row spacing is 40-60 cm (with this width it is more convenient to care for the bed).
To save yourself the trouble of weeding your garlic beds, it is recommended to mulch them with straw. This crop is one of those for which mulch will not interfere with growth, so a layer of straw can be laid directly on the bed. The optimal thickness of the mulch layer is 15-20 cm with a depth of planting garlic in the soil of about 5-8 cm.
During the growing season, garlic shoots out large arrows, on which seed pods then form. To prevent the plant from wasting energy on forming the arrow and seed pod, this arrow should be cut off. Since the arrows appear unevenly, it is better to cut them off in several stages. This procedure is carried out at the moment when the arrow begins to twist and form a coil.
Winter garlic is harvested at the end of July. The optimal moment is when the lower leaves begin to dry out. If five or six sheets have dried, you can start cleaning. Spring garlic is harvested a month later. The garlic is dug up along with the remaining tops and, without cutting the tops, sent to dry. This should be done in the shade, avoiding the crop getting wet in the rain.
Is it possible to plant onions and garlic in the same bed?
Many gardeners are interested in whether it is possible to plant garlic and onions in the same bed at the same time. To answer this question, it is necessary to consider the following below.
Since onions and garlic are very close relatives, they have the same set of pests and diseases. They also have similar requirements for agroclimatic and agrotechnical conditions.
In practice, this means that in crop rotation these two crops are interchangeable or the same. That is, it is highly not recommended to plant onions and garlic in one place for several years in a row.
There should be a pause of at least 3-4 years between them to avoid the spread of diseases and pests, as well as unilateral depletion of the soil.
That is, the answer to the question whether it is possible to plant garlic after onions is definitely no.
But when it comes to placing onions and garlic in neighboring beds or even in one, there is no consensus. On the one hand, these cultures are so close and related that they get along quite well side by side, without interfering with each other, but also without stimulating the growth of their neighbor.
On the other hand, as already mentioned, they have the same set of pests and diseases, so infection of one crop will immediately affect another. Therefore, by placing onions and garlic at different ends of the garden, you can save at least one crop if the second one suffers.
Main errors and problems
When planting garlic using a special planter, in order to avoid possible problems, pay attention to the following recommendations:
- Correctly correlate the model of the walk-behind tractor with the type of planter.
- For small areas, manual models are used.
- Control the sowing of seeds and their calibration.
- When manufacturing the tool, safety precautions are observed.
- Sowing is carried out at the recommended time.
The use of planters greatly facilitates manual labor and optimizes the planting process. When used correctly, garlic planting techniques look neat and the beds are easier to care for.
Sources
- https://minitraktor34.ru/selhoztehnika/seyalka-dlya-chesnoka.html
- https://rusfermer.net/ogorod/korneplody/chesnok-kor/vyrashhivanie-ch/posadka-ch/chesnokosazhalka.html
- https://DSad12.ru/ovoshchi/samodelnaya-sazhalka-dlya-chesnoka.html
- https://ProPosadki.ru/ovoshhi/chesnok/prisposoblenie-dlya-posadki-chesnoka-vruchnuyu
- https://OgorodGuru.com/ovoshhi/prisposoblenie-dlya-posadki-chesnoka
- https://agronom.expert/posadka/ogorod/amarillisovye/chesnok/seyalka-dlya-chesnoka.html
- https://MoeFermerstvo.ru/chesnok/sazhalka-ruchnaya
- https://zen.yandex.ru/media/id/5c061eebaff29f03eac88395/samodelnye-instrumenty-dlia-posadki-luka-i-chesnoka-5d9b6f7935c8d800ae71fbe0
- https://hozzdvor.ru/nebolshoe-prisposoblenie-dlya-posadki-chesnoka-luka-i-dr.html