UAZ 3160 | Clutch pedal adjustment |
8.2. Clutch pedal adjustment
| EXECUTION ORDER | ||||||||||||||||
| BLEEDING THE HYDRAULIC CLUTCH SYSTEM Any hydraulic system works normally if air is removed from it. Warning When removing air, add only clean fluid recommended by the manufacturer. The fluid used in the hydraulic drive dissolves paint and plastic, so if the fluid gets on your vehicle's paint, wash it with plenty of water.
|
Clutch adjustment UAZ 3303
UAZ.
Clutch basket. Disassembly, repair, restoration. Features of repair and a homemade stand for repairing and adjusting the clutch basket. ——- Help the project...Quick bleeding of the clutch on a UAZ 452 (UAZ loaf, Farmer, Tadpole) Other options: pump, syringe... Don't forget to leave comments. Liked? Like, subscribe... How to lower the pedals on a UAZ Bukhanka and reduce their travel. The problem is relevant, many suffer with this. 1. Lower the pedal frame with brackets; 2. Lengthen the pedal lever...Clutch. Drive adjustment. VAZ cars require proper adjustment of the clutch mechanism. Incorrect adjustment causes...How to adjust the clutch drive. How to adjust the clutch drive of VAZ-classic cars, tips in the process. VKontakte groups for repairs... Clutch adjustmentRepair of the UAZ GAZ clutch slave cylinder After repairing the cylinder, it was installed on the 417 engine and 2 washers 1.5 mm thick were placed under it. To align...UAZ clutch. Features of operation and reasons for failure. If you have any questions, write to Evgeniy Ivanovich: Repair of the UAZ clutch master cylinder https://vk.com/buhankarulit. DO NOT CHANGE THE CUFFS, A WASTE OF TIME, STILL RUN. The UAZ clutch fork is bent (Repair) For those who want to help the development of the channel Sberbank of the Russian Federation, card number 4276 3000 3487 8184. Reservoir for the master cylinder of the UAZ-3303 clutch Semi-automatic clutch on the UAZ-3303 (device) Clutch UAZ 469 Total 1 mm Measured March 10, 2014. Between the flywheel and the driven disk (new) there are 3 washers with a height of 9.50 mm. (GAZ-24 feet for... UAZ 452, Loaf, windshield blower, modernizationInstallation of CLUTCH and gearbox + transfer case UAZ Loaf in OnePreparation, installation, clutch and gearbox + transfer case in one, without a lift, without a winch and without disk centering... avtoclubvideo.ru
Repair
The presence of a diagram of the internal structure of the structure allows you to carry out independent repairs in case of simple malfunctions. Increased fuel and oil consumption, coolant leakage, uncharacteristic noises and knocking in the mechanism are the first indications for repair. Maintenance and replacement of worn-out components helps prolong the functioning of parts and vehicles.
How to adjust the clutch pads
In order to adjust the clutch on a UAZ, you will need to carry out the following repair work:
- Measuring with a ruler the free radius of movement of the drive pedal that turns off the mechanism. The standard value for the spring-lever type should be within the range of 35 to 55 mm, for the diaphragm type - from 5 to 30 mm.
- Measuring the full travel of the pedal after it has been lowered to the limit. The standard value for the spring-lever type is 18.5 cm, for the diaphragm type - 16.5 cm.
- Adjust the required position by changing the position using the key.
- Controlling the distance when the pedal is lowered between the partition of the motor part and the middle of the rod axis. It is necessary to achieve a value of 9.6 cm. The fork must have a free path of movement of at least 1.7 cm. Changing the length of the work basket pusher is an adjustment tool. To do this, you need to remove and screw back the pusher until the desired value is obtained.
Read more: What tires for Skoda Octavia A5
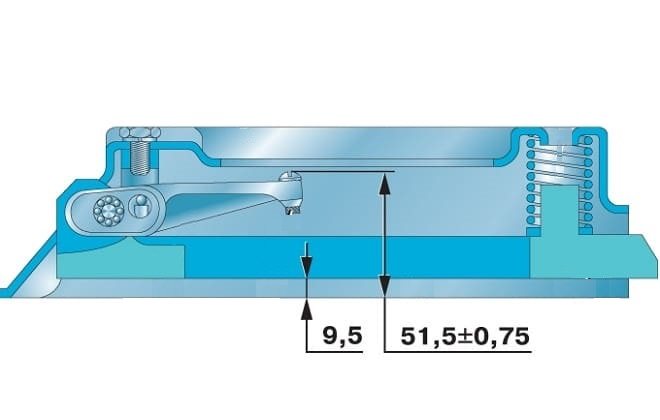
Adjustment of the free play of the clutch pedal is required if the distance between the rotating part located on the release levers and the adjusting screws and elements of the device does not lie within the range of 50.75-52.25 mm. The screws can be removed and put back in until the correct size is established.
The diaphragm spring connection does not require free play adjustment and does not require adjustment of the mechanism release system. The correct dimensions of the gaps and strokes are ensured by the design features.
How to bleed the clutch
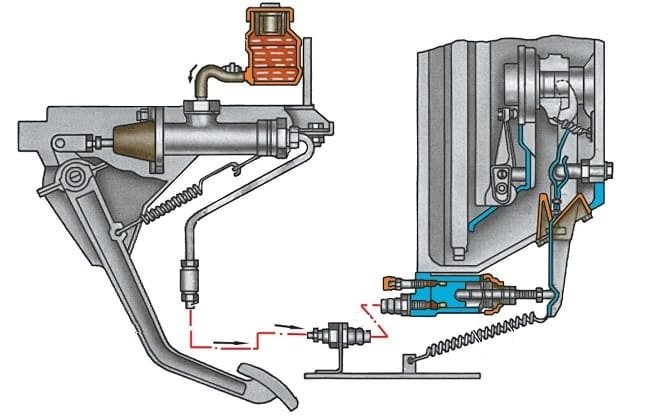
Bleeding the hydraulic drive will be required if the pedal is pressed too softly and it is not possible to completely turn off the mechanism. All this indicates the presence of air in the hydraulic drive unit. Repair measures are carried out through the bypass valve in the same way as work with a hydraulic brake drive. Having an assistant will make the task easier. Sequencing:
- Adding working fluid to the master cylinder tank to the standard limit.
- Release the bypass valve head from the protective element, connect the rubber hose.
- Preparing a container with a volume of more than 0.5 liters filled with the working mixture. Place the free end of the hose into the liquid.
- Creating pressure in the resulting system with several presses on the pedal in 1-2 seconds.
- Turn the bypass valve half a turn.
Air will escape from the system into the container with liquid. When the movement of bubbles stops, you need to press the pedal and turn the valve all the way. During activities, the presence of the mixture in the master cylinder tank should be constantly monitored to avoid re-entry of air into the system.
The described procedures are performed several times until the bubbles completely disappear.
After pumping, add liquid to the tank and return the protective cap to the valve. Do not use liquid from the container into which the hose was placed for this purpose. It contains air that disappears on its own after 24 hours or after filtration.
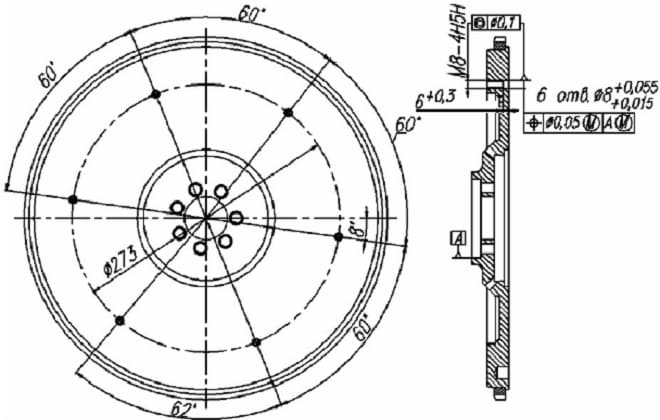
How to install the clutch disc correctly
The functionality of the vehicle, smooth movement, absence of noise and vibration, and comfortable movement along the highway depend on the correct installation of the part. Sequence of actions on how to correctly install the clutch disc:
- Removing the gearbox and hydraulic drive working cylinder.
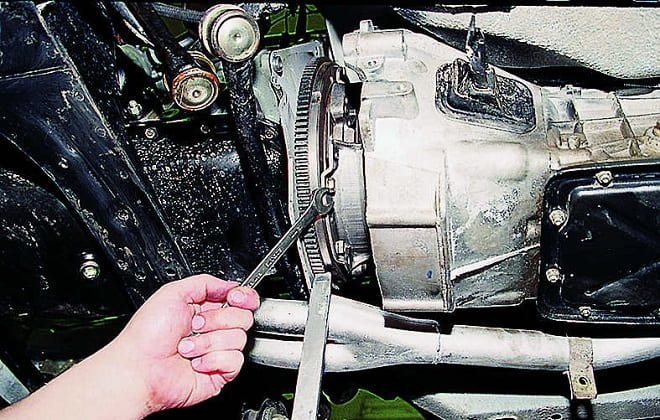
- Removing the 4 bolts connecting the clutch housing at the bottom using a wrench.
- Removing the clutch housing lower element and gasket from the structure.
- Setting the position mark of the flywheel and basket - drive disk.
- Removing the fasteners connecting the basket and the flywheel.
- Removing the drive and driven disks.
One of the clutch disc surfaces protrudes more than the other. This side should be facing the gearbox. Installation of elements is carried out in reverse order. To adjust the disks, you will need a special mandrel. After completing the work, it is better to apply lubricant to the splined end of the main shaft.
How to change the clutch
The clutch is a means of disconnecting the engine shaft from the gearbox for a short period during a gear change, a method of smooth transition when starting and starting to move.
The UAZ 452 clutch is distinguished by a dry mechanism and the presence of one disc with a torsional vibration damper. The system is characterized by the transmission of torque from the engine to the transmission with a coefficient of 17 kg/cm. During repairs, you can update the system and install a petal mechanism.
The first stage is preparatory work. To dismantle and subsequently install the structure, you will need the following materials and tools:
- set of heads;
- a set of keys of different sizes;
- for dismantling and installing the rear driveshaft - a bent spanner;
- a small mirror will help to work in hard-to-reach areas;
- screwdrivers: flat and Phillips;
- thread sealant mixture;
- mandrel for adjusting the driven disk.
Clutch installation is carried out in the following sequence:
- Installation of transport on high, securely fixing supports (bricks, wooden blocks).
- Removing used oil from gearboxes and other containers.
- Removing the rear cardan. Marking the position for future assembly will help prevent vibration.
- Disconnecting the part of the front driveshaft adjacent to the transfer case. Marking the correct location of the part.
- Removing the muffler.
- Alternately disconnecting the clamps of the resonator, muffler and exhaust pipe bracket, bolts between the catalyst and the muffler flange.
- Removing the entire structure and thermal screen.
- Unscrewing the rod of the gear mechanism control elements. Do not remove or change the position of the adjusting nuts.
- Unscrewing the handbrake cable, moving it with the protective casing to the side.
- Removing the indicator wire block from the gearbox sensor.
- Disconnecting the speed sensor wire, the control rod of the junction box and removing the working cylinder.
- Disconnecting the exhaust pipe from the engine, the bracket and the catalyst from the crankcase.
- Removing the crankcase fasteners with the engine jacked up.
- Remove all bolts holding the transmission.
- Pull back the junction box and gearbox using a pry bar. Dismantling of designated units.
- Removing the starter and housing bolts using a universal joint tool.
- Marking the location of the basket and removing it.
- Preparing new parts for replacement, searching for special round or cylindrical protrusions on the surface of worn and new components.
A special mandrel will help in assembling the clutch.
Before installing it, the disk and flywheel housing must be degreased. Install the driven disk on the mandrel and insert the resulting structure into the flywheel. Pre-lubricate all fasteners with thread locker. Tighten the bolts in several stages. After installation, you can remove the mandrel. The gearbox and transfer mechanism are mounted in the reverse order. Upon completion of the work, it is necessary to carry out measures to adjust the clutch pedal travel.
Read more: Biodiesel production from rapeseed
Traction is an important component of transportation. Timely replacement of old elements, regular diagnostics and monitoring of operation are the key to long service.
In connection with the replacement of the “burnt” ZMZ-410 with the “contract UMZ-4218”, a problem arose with the clutch. On mine there was a petal one,
and on the donor there is a claw.
The diameter of the 410 is smaller (!) than that of UMP. So, it didn’t work out with the transfer...))) And on the donor, one of the paws lived its own life - it walked on its own, wherever you want, you go there...))) I went to the nearest store (I’m repairing it outside the city, so there’s a choice not big) for new paws. The seller went through all the stocks, but only the old-style paws were available, which are adjusted with bolts at the end of the paw. They must be regulated, strictly, at the stand and, in the future, there is no way to correct something on the spot. I had to take them...
In the garage there was a flywheel from a loader with a motor from a GAZ-51, we selected a ring according to the diameter, built a “stand”... We adjusted it according to Feng Shui))), assembled everything, put it in place and... no clutch! Or rather, there is no spin! I’ll take a look - the paws are at different(!) distances from the release...(((The assistant who helped me install the engine for three days didn’t come back to “work” anymore... So, further manipulations with finishing everything happened in one person...) )) I took it off, adjusted it again (again according to Feng Shui, with mats, etc.), installed it - no clutch! My nerves are on edge...))) I call the shops for the petal one at UMP, find where it’s closer and cheaper, go buy it and... everything is correct, BUMMER! The basket mount does not fit mine... Out of anger, I buy a new type of feet (with an adjusting nut)
and in the third circle - stand, adjustment, feng shui, mats, on the car...))) I stuck it in, then I looked - the release lever with the clutch was lying next to me on the floor...(((I had to pull it off again and, again, stick it in(( (...And that's it, all in one mess))) And, HURRAY - the paws are in place after adjustment, nothing is out of place... There is a spin, but... it's not enough! I take out the finger F8 from there and..., yes, who put it there. There, after all, under the finger F10... According to the material of the previous owner (as everyone does), and since I am the only new owner, it turned out that myself, of course...))) By the way, the petal basket forgave all that... Somehow I stuffed a 10mm bolt in there, hooked the nut and...that’s happiness - THERE IS a spin! Checking everything collected on the go, soon... And good luck to you all!
Adjusting the UAZ clutch
UAZ.
Clutch basket. Disassembly, repair, restoration. Features of repair and a homemade stand for repairing and adjusting the clutch basket. ——- Help the project...UAZ clutch. Features of operation and reasons for failure. If you have any questions, write to Evgeniy Ivanovich: How to adjust the clutch drive. How to adjust the clutch drive of VAZ classic cars, tips in the process. VKontakte groups for repairs...UAZ Patriot 2020 Clutch adjustment, fuel consumptionClutch adjustmentClutch. Drive adjustment. VAZ cars require proper adjustment of the clutch mechanism. Incorrect adjustment causes... Repair of the UAZ clutch master cylinder https://vk.com/buhankarulit. DO NOT CHANGE THE CUFFS, A WASTE OF TIME, STILL RUN. Repair of the UAZ GAZ clutch slave cylinder After repairing the cylinder, it was installed on the 417 engine and 2 washers 1.5 mm thick were placed under it. To level...Adjusting the clutch pedal. Accelerated self-training course for novice drivers: https://autonakat.ru/kupit-metodiku.html Sign up for lessons...UAZ 469 Clutch Total 1 mm Measured March 10, 2014. Between the flywheel and the driven disk (new) are laid 3 washers 9.50 mm high. (GAZ-24 feet for... How to lower the pedals on a UAZ Bukhanka and reduce their travel. The problem is relevant, many people suffer with this. 1. Lower the pedal frame with brackets; 2. Extend the pedal lever... Repair of the clutch drive on the UAZ Patriot On the road, the clutch was lost, the pedal failed. [Volga] The difference between the ZMZ 24D claw clutch and the ZMZ 402 petal clutch. Demonstration of the differences between the old-style clutch (claw) and the ZMZ-24D engine (GAZ 24-01) in comparison with the standard... UAZ clutch repair. Clutch basket. In this video I will talk about replacing mine clutch on a UAZ. Since the releaser has come to an end and it’s all gone...Quick pumping of the clutch on a UAZ 452 (UAZ loaf, Farmer, Tadpole)Other options: pump, syringe... Don’t forget to leave comments. Did you like it? Like, subscribe... avtoclubvideo. ru
Clutch adjustment UAZ 469
UAZ.
Clutch basket. Disassembly, repair, restoration. Features of repair and a homemade stand for repairing and adjusting the clutch basket. ——- Help the project...UAZ clutch. Features of operation and reasons for failure. If you have any questions, write to Evgeniy Ivanovich: Clutch. Drive adjustment. VAZ cars require proper adjustment of the clutch mechanism. Incorrect adjustment causes...How to adjust the clutch drive. How to adjust the clutch drive of VAZ-classic cars, tips in the process. VKontakte groups for repairs... Clutch UAZ 469 Total 1 mm Measurement March 10, 2014. Between the flywheel and the driven disk (new) there are 3 washers with a height of 9.50 mm. (GAZ-24 feet for... Clutch adjustment How to bleed the clutch on a UAZ Repair of the UAZ GAZ clutch slave cylinder After repairing the cylinder, it was installed on the 417 engine and 2 washers 1.5 mm thick were placed under it. To align... UAZ clutch repair. Clutch basket. In this video I I’ll tell you about replacing my clutch on a UAZ. Since the release valve has come to an end and it’s all gone...Adjusting the clutch pedal. Accelerated self-training course for novice drivers: https://autonakat.ru/kupit-metodiku.html Sign up for lessons...Repairing the clutch drive on a UAZ PatriotOn the road the clutch was lost, the pedal failed.Operation of the LUK clutch on a GAZ-21Operation of the LUK clutch on a GAZ-21.Part number: LUK 625233909.[Volga] Difference between the ZMZ 24D claw clutch and the ZMZ 402 paddle clutch.Demonstration of the differences between the old-style (claw) clutch and engine ZMZ-24D (GAZ 24-01) in comparison with the stan...How to lower the pedals on a UAZ Bukhanka and reduce their stroke. The problem is relevant, many suffer from this. 1. Lower the pedal frame with brackets; 2. We lengthen the pedal lever... Stream: The clutch on the UAZ has disappeared, we remove the burst pipe. Suddenly the clutch began to disappear, the tube burst. We removed it and will install a new one tomorrow. avtoclubvideo.ru
A little about the history of the creation of the Soviet SUV
Initially, the UAZ 469 was developed as an all-terrain military vehicle, which was intended to replace the older GAZ -69 model. The car was developed from the mid-60s, and began to be mass-produced in 1972; its further modification was the UAZ-3151 (produced since 1985). The civilian modernized version was the UAZ-315195 Hunter. Three years ago, the Russian Ministry of Defense completely refused to supply UAZ, switching to other types of SUVs. Although UAZs have proven themselves in the army as reliable, unpretentious vehicles, they are very outdated.
The familiar Loaf model
The UAZ 3303 commercial truck became a further modification of the famous “loaf”, a family of cars from the Ulyanovsk plant, including the very first UAZ 450. It began to be mass-produced back in 1958. The car became the first independent development of the plant, based on the components and assemblies of the GAZ-69 and GAZ-21. The very first tests exceeded all the designers' wildest plans; the car confidently overcame even snow cover 50 cm deep, and also drove along a tank track with a load of a ton of weight. The development of the SUV began in the mid-50s, prototypes appeared a month later.
Since the GAZ 69 had an unsuccessful wheelbase, the new car had to use a carriage layout, which was developed in two modifications:
- a truck with a wooden body;
- all-metal van.
To ensure the necessary rigidity of the body, ribs were developed on the roof of the van, which visually resembled a loaf of bread. In the mid-late 80s, the “loaf” underwent modernization, the engine remained old, but boosted to 90 horses. The SUVs were equipped with an improved dual-circuit braking system and a vacuum clutch release amplifier, and the bridges were also modernized. The names have changed once again.
There appeared the UAZ-3303 - a light-duty flatbed truck, the UAZ-3741 - a multi-purpose van, the UAZ-2206 - a minibus, and the UAZ-3962 - an ambulance. Ten years later, the plant began experiments to improve the characteristics and improve the “loaf”; a variety of cars were produced, in particular, the “Farmer” family, but in the early 2000s the management changed, all new projects were canceled, and since then they have been producing one modification - van.