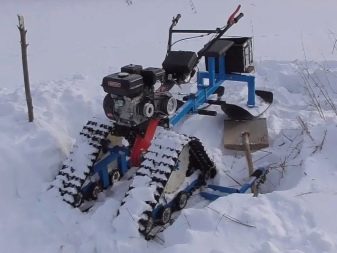
DIY tracked snowmobile from a walk-behind tractor
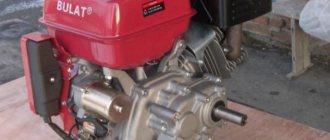
To make a tracked snowmobile from a walk-behind tractor with your own hands, simple materials are used. The frame is made of stamped channels and square pipes. Round water and gas pipes were used to make the shafts. The engine was used from the Neva walk-behind tractor.
The snowmobile looked a little rough. But after conducting winter tests, good driving characteristics were revealed: speed, cross-country ability. It is also light and compact, and quite economical in fuel consumption. The original design assumed an asymmetrical engine arrangement. This provided a number of advantages: during maintenance - good access to the engine; convenient starting and gear shifting; redirecting the chain drive directly to the track drive shaft.
But during testing, when moving on loose snow, when making a turn, the snowmobile often fell over. Because of this circumstance, it was decided to place the engine in the center of the front of the snowmobile. The design has been improved, especially the front of the frame. An intermediate shaft was also installed, which transmitted torque from the engine to the track. In addition, modernization was carried out, which improved the driving performance, comfort and reliability of the snowmobile.
Installing a walk-behind tractor on low-pressure winter wheels
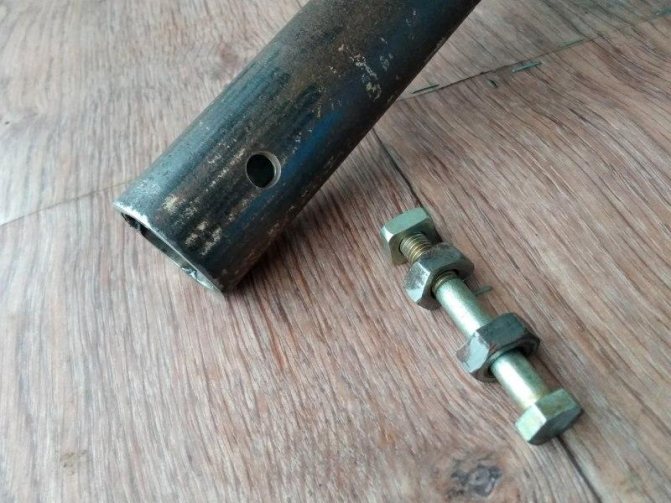
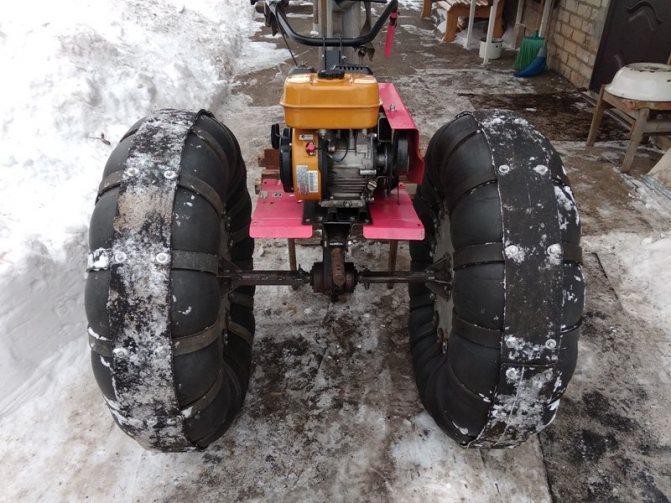
Finally, the time has come when you can start installing new homemade low-pressure wheels on the walk-behind tractor and conduct test road trials. The two front wheels have already been made quite a long time ago, but I did not have the opportunity to install them due to the lack of shaft extensions for the walk-behind tractor gearbox. For some time I could not decide on the best option for making them, but from the very beginning I decided to make them completely myself from start to finish, so as not to use purchased or ready-made parts at all. But in reality, everything turned out to be not quite as simple as I thought. The fact is that the diameter of the shafts on my walk-behind tractor is 30 mm, or rather it is the diameter of the gearbox bearing seats, and the diameter I need for installing wheels and attachments is slightly smaller - 29.5 mm. And even here the first problem arose: I could not find even a piece of pipe of suitable internal diameter and with sufficient wall thickness to make these extensions.
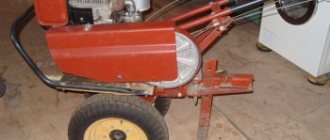
I looked everywhere, but could only find a pipe with an internal diameter of 28 mm, which is very small, and a good piece of pipe about a meter long and with a diameter of 32 mm, which is already a lot. There's nothing you can do, you'll have to use ready-made extension cords. So for now my walk-behind tractor "Cascade" with a Subaru EX17 engine with 6 hp. stands on its standard wheels, and its winter walkers stand forlornly nearby:
My walk-behind tractor and its new winter walkers
Shop as a quick solution:
First, I looked through everything on the Internet, found out what we have in our stores that are similar and what can be purchased quickly at a reasonable price. Important search parameters were: the total length of the extensions was about 25 cm, the internal diameter was no more than 30 mm. It is desirable to have a milled groove, since the shaft on my walk-behind tractor is designed to accept a rectangular key. By the way, on the Internet there were ready-made hubs for cutters that would fit me perfectly and the side flanges were already welded to them. The only thing I didn't like about all this is that there are no grooved seats anywhere. It was decided to take what was available. I was not able to get into the store personally, but I gave a responsible instruction to a trusted person with detailed instructions, drawings and dimensions. And now I’m already preparing for the long-awaited meeting, anticipating seeing something very similar to this:
Waiting: store-bought walk-behind shaft extensions
Waiting: Shop flanged cutter hubs
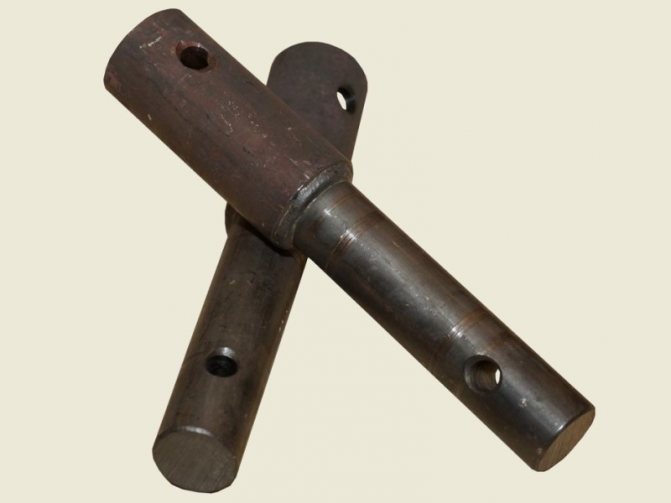
But problems with the purchase began immediately, since extension cords with a length of only 17 cm were available. When talking with the seller on the phone, I asked him to check the internal diameter and wall thickness of the pipe with a caliper, which should be 30 and 4 mm, respectively - these are the exact dimensions for me on the attachment. The seller checked everything and said that the sizes match exactly. I had to agree to the purchase, since there is no other choice and time is running out, and I myself will increase the length with an insert to the length that I need. The main thing is that everything fits onto the shaft without any play, because this is the only reason I chose a spare store-bought version. Within an hour I was holding in my hands a couple of these stubs of dubious quality for as much as 600 rubles:
Harsh reality
I cannot use such a work of art for my further work for the following reasons:
- the internal bore diameter is 31 mm instead of the 30 I need, the pipe wall thickness is 3 mm instead of the 4 I need - the stub on the gearbox shaft dangles so that the backlash of a regular walk-behind tractor wheel reaches +/- 1.5 cm, but on a homemade wheel this the backlash will be even greater;
— in the photo above you can see with the naked eye that the cores are crooked, the solid shaft is welded to the pipe at an angle of 3-4 degrees, per 10 cm of the shaft length the deviation from the center of the axis is >2 mm; if you install wheels on such extension adapters, the walk-behind tractor will jump and roll, move together and move apart, but just not roll; the gearbox bearings of the walk-behind tractor will most likely be broken;
— the cross-section of the solid shaft of the adapter turned out to be an oval, and not even a circle, as expected; I had the feeling that they were being squeezed in a powerful hydraulic press;
- the holes for the pins in the shaft and pipe are drilled very poorly - it looks like they were made with a dull or even broken drill; all surfaces of the adapters are beaten, burrs and dents.
All the shortcomings of these products, and for money, forced me to finally abandon such dubious purchases. It seemed that the situation had reached a dead end, but a solution was finally found! This solution, to be consistent, came to my mind about a day before the purchase in the store, but at first it seemed technically complex, time-consuming and not very reliable, but in reality it was only labor-intensive. I returned the stubs back to the store and, at their cost, exchanged them for bearings for the rear wheel, a pair of drive belts and a spark plug for a walk-behind tractor:
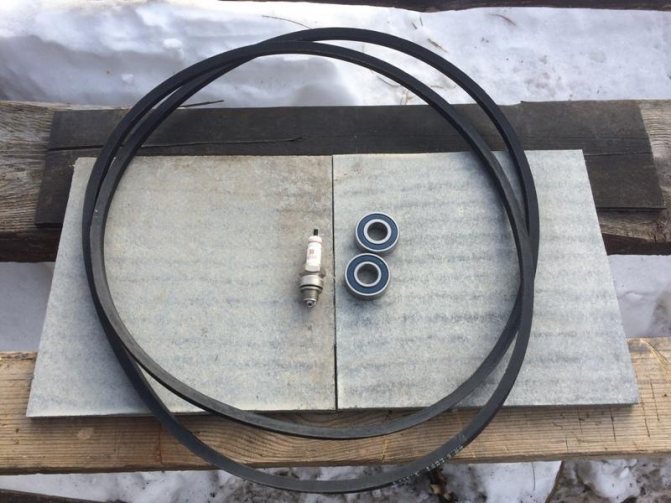
Exchange: two sealed bearings 203 for the rear wheel, two forward belts A1213 plus a spare spark plug
Homemade extension adapters for walk-behind tractor gear shafts:
The most critical element in the manufacture of the structure turned out to be a piece of pipe, which should fit tightly enough on the gearbox shaft and not have any play on it. I only had that meter-long piece with a wall thickness of about 3.5 mm and an internal diameter of 32 mm, which I need to somehow reduce to 30. Reduce? - this means you need to insert something inside, thereby adding 1 mm on each side. This something will be homemade liners made of galvanized sheet steel. The edges of the pipe were trimmed with a grinder and strips of the same width as the depth of fit of the extension on the gearbox shaft were cut from the same sheet. Then I had to roll these strips into tubes as evenly as possible, but this turned out to be very difficult to do because of their rigidity. I had to calculate the gap so that when the liner was driven into the pipe, its ends would rest against each other and expand themselves along the inner diameter.
The main thing is to guess with the gap: when pressed, the liner itself takes on a perfect round shape
The liner fits in the pipe like a cast one, but it needs to be sanded from the inside
To be honest, I didn’t even expect that everything would work out so neatly. My biggest fear was that I wouldn’t be able to make the liners perfectly even - that’s what happened at first, but then they miraculously straightened out on their own when I pressed them in. But in the end, the internal diameter turned out to be slightly smaller than required and the pipe with the liner did not fit on the shaft. I first had to manually grind the liners from the inside - this turned out to be the most labor-intensive. I sanded it with medium-grain sandpaper, which I wound on another shaft of a smaller diameter. The first liner took me a few hours as it was more of a jeweler's job than sanding. I had to constantly try on the gearbox shaft, change the sandpaper with a new side, sand it by hand and much more. But everything turned out perfect - the pipe sat on the shaft by hand with zero play. I even had to polish the liner a little so that a little play appeared, otherwise when it all turns slightly sour, you will have to knock them off the walk-behind tractor with a sledgehammer and heat them with a gas burner.
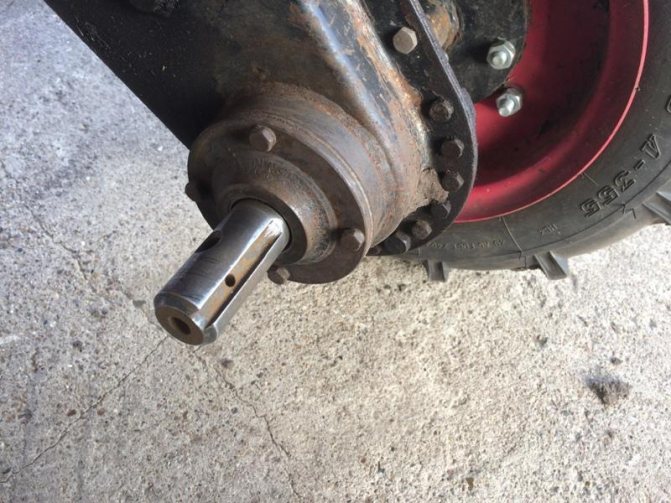
A walk-behind tractor axle shaft with a milled groove for installing a rectangular key
It is necessary to polish the liners so that minimal play appears
I didn’t grind the second liner from the inside with my hands, but spent an hour and made a tool for this using a drill from a cutting of a suitable diameter, a long bolt, a couple of washers and nuts. Things went much more fun with her:
Stuff for a drill from a cutting of a handle, a bolt, washers and a nut
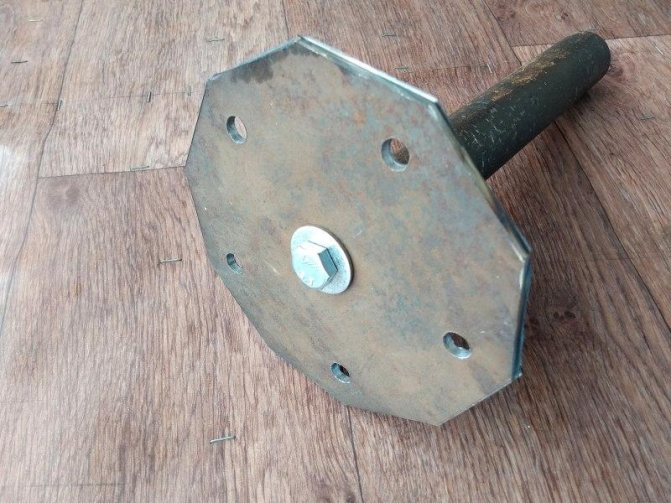
Now you can start making flanges. Although I have ready-made flanges, they are already on the shafts of another motor helmet and they could be cut off, but I don’t want to spoil it. So you have to start doing everything from scratch. To do this, I already have a metal plate 10 mm thick, which I cut in half, and I divided one half in half - circles with a diameter of 15 cm fit into these blanks. It took me almost the whole day to make just one flange from this plate . The most time consuming part was marking and drilling holes for M10 bolts. The work was delayed not even because of this, but because I could not drill the holes geometrically correctly and I had to correct all the holes for several hours with a hand drill with a reamer instead of a drill. In the end, everything worked out, but very sloppily - the holes took the shape of an ellipse, which were turned in different directions. And it took a lot of time and effort to give the flange a round shape - I used up almost the entire cutting disc. It would be possible to make it a polyhedron, but making deep, even straight, cuts in metal of such thickness was somehow scary. I had to take care in advance about high-quality Crimean (Simferopol?) cutting discs, but I had to work only with those that I had at hand - Luga-Abrasive, the quality of which is becoming lower every year.
The next day I did not make the second flange in the same way, which means the previous day was in vain and I have to start all over again, but from a thinner and easier-to-process material. From sheet steel, I only have material with a thickness of 4 mm, which is a little small for a flange, but I have already figured out how to strengthen it. In addition, I will not make them round, but in the shape of a polyhedron. Since there are five mounting bolts, there will be twice as many faces, namely ten. I marked out all the centers of the holes and the corners of the edges in advance and drew the houses on sheets of A4 paper. All I have to do is attach the paper with markings to the blanks and quickly mark the centers of the holes and the corners of the edges. By the way, you can already drill with only 2 drills: 3.5 mm and finally 10, and not three, as I did yesterday in thick metal. I cut off the extra edges and this is what I got:
Blanks for flanges for walk-behind tractor shaft extensions
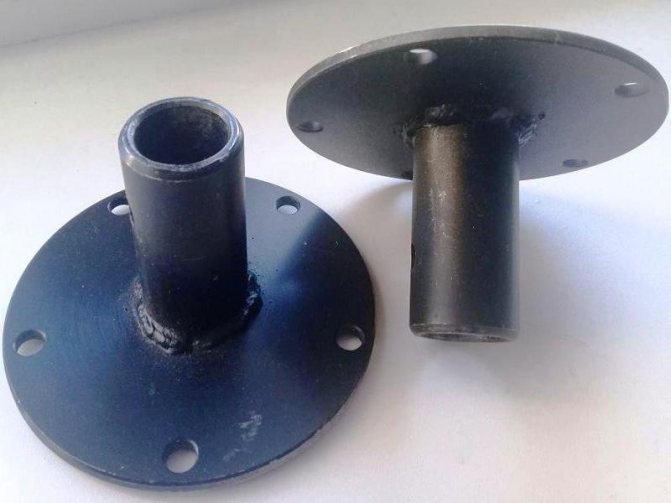
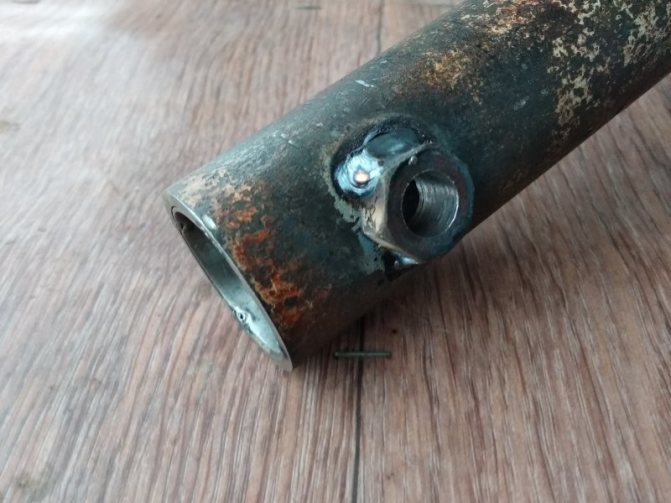
In the garage, I came across thick washers of large diameter: just the size of the lengths of pipes I have for extension cords - it was decided to put them to use, since they will play an important role. I first welded a nut for M10 bolts to them on one side and strictly in the center. After that, I welded these washers at the points to the ends of the pipes with the nuts inward. The result is a pipe closed on one side where the flange will be installed. Now it can be screwed on with a bolt for ease of welding work.
We weld the M10 nut on one side of the washer, weld the washer on the outside of the pipe
The flange can already be screwed to the pipe for convenience.
Now the very important moment has come, when it is necessary to weld the flange to the pipe tightly. The main thing in this matter is to ensure that the flange itself is flat and strictly perpendicular to the axis of rotation. If there are any deviations of the flange from the plane, then 4 mm steel can simply be straightened with a heavy hammer on a flat surface through a board. But maintaining perpendicularity is a little more difficult, since it is advisable to do everything as accurately as possible from the very beginning: cut off the ends of the pipe evenly and precisely weld the washer to it. Therefore, I first welded it at just a few points, so that at any time I could quickly cut it off and re-weld it more smoothly. But everything worked out smoothly for me right away and I checked it very simply - I placed the pipe with a flange screwed to the side on the edge of the table and rolled it back and forth along the surface. If there was any deviation from plane or perpendicularity, it would immediately become visible to the naked eye. And I can already scald everything well and I will do it only in one pass. But here, too, it was necessary to take into account that when you work with electric welding with a fairly high current and with a wide seam, then the metal “leads” strongly after cooling. This is where the very unsuccessful flange that I made yesterday came in handy - I simply temporarily bolted it to the workpiece, combining it into one pancake. Now there was no fear that welding would greatly deform the metal. To compensate for the deformation between the flanges, you can insert an additional thin washer into the very middle to pre-bend the flange in the opposite direction, but I did without it.
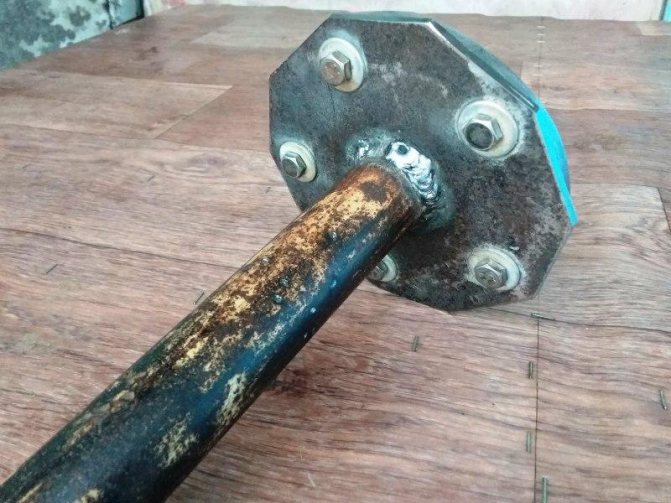
In one pass I welded everything at once: pipe, washer, flange
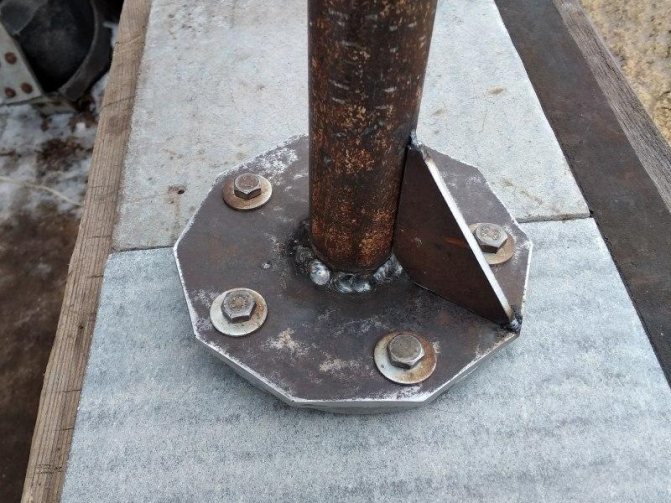
I did not disassemble the pancake sandwich after I had welded the flange in a circle to the pipe, since later I would strengthen the structure with stiffeners and I would have to work with electric welding again. I immediately cut these ribs in the form of identical triangles from all the scraps that remained after marking and cutting out the flanges from a common sheet. A total of ten ribs will be needed, that is, five pieces for each axle extension. These ribs will be welded on one side to the pipe and the other side to the flange between the bolt holes. After cutting, each workpiece had to be cleaned, tried on in place, and very slightly modified on sandpaper so that it would fit tightly with its legs to the surfaces. First, I welded them one by one at just two points, evenly distributing them between the bolt holes so that they looked exactly at the corners of the flange edge, and their plane coincided with the shaft axis.
The inner corner of the rib is cut off so that the circular seam does not interfere and water does not stagnate in the sections
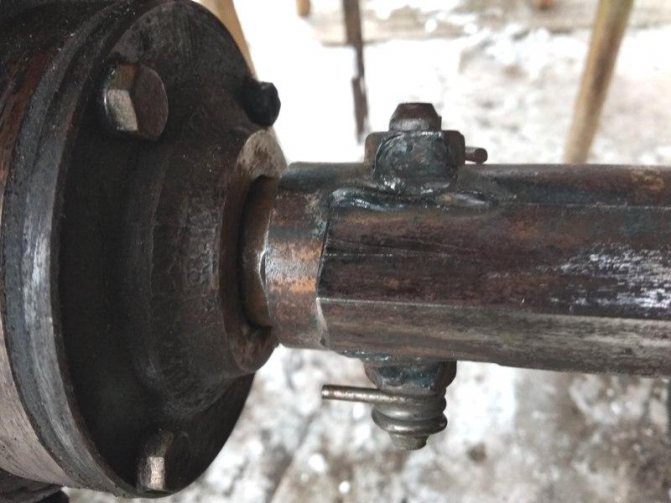
After turning the workpiece in my hands and visually checking the geometry for noticeable deviations, I finally welded the stiffeners. I did this by gradually turning the adapter extension in one direction and adding one short seam on each side. When everything had cooled down well enough after welding, it was possible to disassemble and remove the excess pancake. All that remains is to beat off the weld slag, droplets of molten metal and work a little with sandpaper. As a result, I did not find any temperature deformations and, to finally make sure of this, I bolted the extension to the wheel in its regular place, not identifying absolutely any gaps. By the way, these stiffening ribs do not at all interfere with working with a spanner wrench and installing the wheel is quite convenient - at least I did not notice a fundamental difference from the time when these ribs did not yet exist.

Very durable design of walk-behind tractor axle extensions
Well, the last element of the extensions is a through hole with a diameter of 10 mm in the pipe for installing a locking pin, which prevents the wheel from turning on the walk-behind tractor shaft. I will not use a standard pin, since I planned to strengthen this unit with additional nuts welded to the pipe and then the length of the pin will no longer be enough. Instead, I will use long bolts with incomplete threads, or even better, homemade ones made from high-strength studs, since they say that ordinary bolts sometimes get cut off. To do this, I prepared two M10 nuts on each side, in which I selected a hollow on one side with a grinder, holding them in a vice. In the tube of the shaft extensions, I very accurately marked the centers of the holes at a distance of 30 mm from the end (and correctly it should be 25 mm, so then I will cut off these 5 mm). It is necessary to mark very precisely so that the holes are perfectly opposite each other, otherwise the locking bolt will not pass through the pipe and the hole in the gearbox shaft. First I drilled thin holes with a 3.5mm drill and then enlarged them to an intermediate size of 8mm. It will become clear later why I did this in the first place.
Holes with an intermediate diameter of 8 mm in the pipe for a coupling bolt
Now I temporarily needed any M8 bolt of suitable length so that I could put two reinforcing nuts on it and the extension pipe itself, pulling it all tightly together. I welded the nuts to the pipe using double but very good tacks. I remove the temporary bolt, drill the holes to a working value of 10 mm in one pass and enjoy the work done. It's time to install the wheels, fixing them on the shaft with either a bolt or a cut-off pin. I will use the second option - I will cut the threaded ends from the stud to the required length and weld them on the other side along the nut. Oh, by the way, the weight of one extension with all the mounting bolts and locking pin is only 1.5 kg!
The nuts are welded on both sides very well, the holes are drilled to the required 10 mm
Installation of a winter wheel with shaft extensions on a walk-behind tractor:
After a while I thought about it and finally decided to strengthen the extension pipe, since its total diameter of 38 mm seemed visually small to me. Maybe I had such a desire only in comparison with the dimensions of the wheel, but still I don’t want to tempt fate once again, especially since she will have enough chances without it. For reinforcement, I used corners with a shelf width of 15 mm, which I didn’t have, so I made them from 20 pieces, cutting off a little bit from the edges. I welded two pieces on each pipe along almost the entire length, placing them opposite each other and between the holes for the locking pin, which ultimately brought the weight of each extension to exactly 2 kg. But now you definitely don’t have to be afraid that they will be bent or rolled up somewhere in an open field. By the way, the standard locking pins fit perfectly, and I will carry the homemade pins made from a hairpin with me in case of replacement.
The standard locking pin with a spring fit perfectly, the homemade ones will go into the repair kit
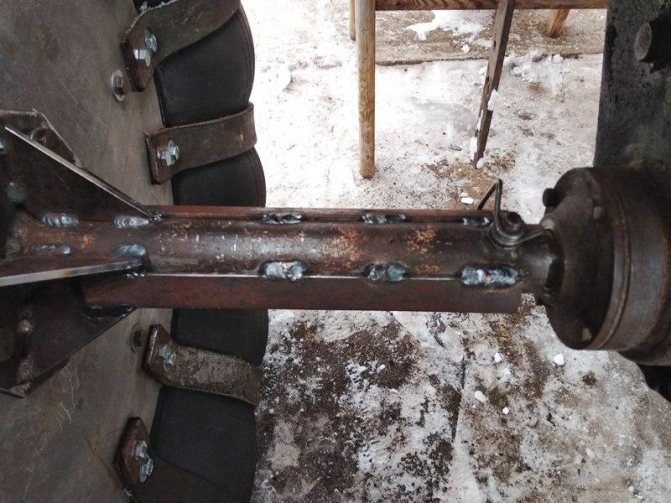
Reinforced gearbox shaft extension with two fifteenth angles along almost the entire length
The most convenient procedure for installing the wheels was this: first, I removed the original wheels one by one and installed extension adapters, immediately fixing them with my fingers. Then I had to lift the walk-behind tractor onto the trestles with outside help. Then I, alone and one by one, screwed on the winter wheels - each with five hardened M10 bolts with lock washers. Then, when all the nuances are determined, I will make some kind of simple lift that can be rolled under the walk-behind tractor on wheels and lifted. And for field conditions, I will make a lightweight folding pick, which can be used as a lever, inserted into a special hole in the body frame. I was very pleased with the result of the work done:
Walk-behind tractor on homemade winter wheels made from inner tubes
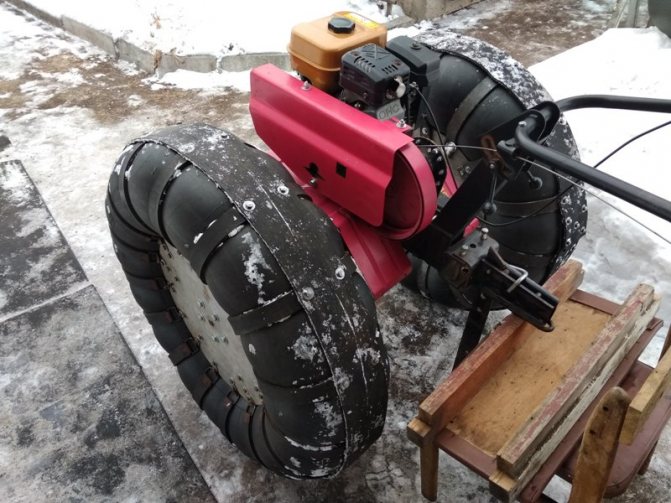
The design of the walk-behind tractor on winter wheels looks harmonious
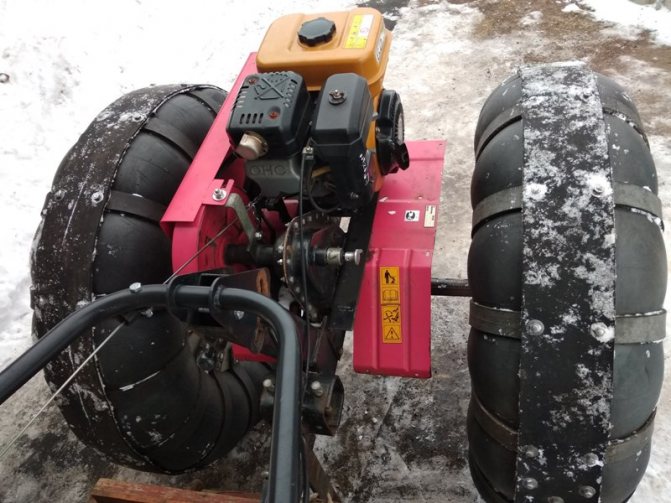
The muffler was turned 45 degrees upward to prevent gases from reaching the wheels
Summarizing:
The very first tests confirmed the correctness of the chosen decision to start making a snowmobile from a walk-behind tractor. I was afraid that the engine power would not be sufficient to spin the wheels of this diameter and the engine would stall or the drive belts would slip from the engine to the gearbox. But none of this was absolutely confirmed. In either the first or second speed, I was able to hold the walk-behind tractor in place with great difficulty, and only if I rested my feet somewhere. The belt drive allows you to move away smoothly, without any jerking. The grousers, which are the ends of the bolts with nuts on the outside of the bandage, do their job perfectly. At the same time, the distance between them along the circumference makes it very easy to turn the walk-behind tractor without a differential, even on the spot. The weight of the walk-behind tractor is very well balanced and it is easy to hold even with one hand. I completely met the weight limit set by me at 150 kg, I even had some reserve left. With a volume of air in the wheel cylinders of 300-320 liters and this weight, a walk-behind tractor, completely submerged in water, will plunge a little deeper than a third. The only negative is the high center of gravity, but I’m not going to use it as a watercraft.
Weight of the walk-behind tractor separately: 85 kg Weight of wheels with a fur coat and extensions: 52 kg Total weight of the structure: 137 kg Weight reserve: 13 kg
To be continued... And here [Comte]: the very beginning
and
previous article
Full version in the diary: Installing a walk-behind tractor on winter wheels
My diary:
A snowmobile
made from a walk-behind tractor for winter fishing. I’m on VK:
Snowmobile from a walk-behind tractor.
I provide external links to my homemade Diary - the latest information will be there. I will upload to Kont as soon as possible and based on my diary. Now [11/19/2019] a lot has already been done in “metal” and tested, I am adding and updating articles from ready-made and new material. Work continues.
I will be glad to like-minded people and readers, any comments, reviews and advice.
How to make a snowmobile from a walk-behind tractor with tracks
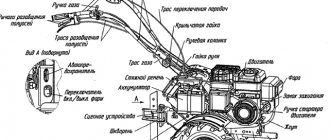
Diagram of drive units and frame of a homemade snowmobile from a walk-behind tractor:
To place the engine with the subframe in the center of the front part of the frame, a platform was welded there in which holes were prepared for the “legs” of the subframe. Similar holes are made in the traverse. The holes in the “legs” of the subframe were converted into longitudinal slots to tension the drive chain when moving the engine.
The underframe has also been redesigned and moved back a little. Thanks to this, the engine is started on the handle. A big plus was the presence of a forced cooling walk-behind tractor on the engine. I used this to direct the air heated while cooling the engine to the carburetor. The gas tank was also moved to the body. It is installed there on stands in the corner to supply gasoline to the carburetor by gravity through a long hose.
Moving the engine to the center of the car resulted in increased stability. Thanks to this, the track of the steering skis was reduced to 950 mm, which led to improved maneuverability of the snowmobile.
After the intermediate shaft was installed, the angular velocity was reduced due to the increase in torque. The speed of the snowmobile was slightly reduced, but the traction characteristics were significantly increased. Now the snowmobile is able to carry two riders with a load, and pull a light sled with luggage. The drive sprockets of the caterpillar mover were also replaced with the same ones of a smaller diameter.
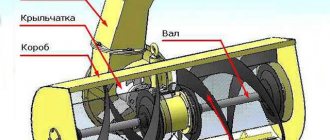
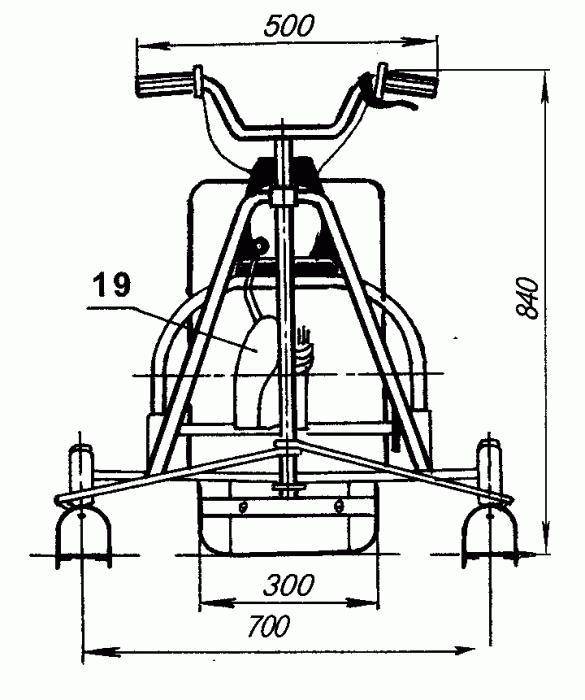
Diagram of a snowmobile steering column made from a walk-behind tractor
- Steering column diagram:
- front frame cross member (1);
- stand made of steel pipe (2);
- steering wheel support made from angle 25x25 (3);
- steering shaft made of steel pipe (4);
- crossbar made of steel pipe 28x28 (5);
- bipod (6); bronze washer (7);
- support sleeve with angle (8);
- nut, type M10 (9).
Chainsaw snowmobile
Advice. The snowmobile can be made as either a tracked vehicle or a ski vehicle.
Before you start making a snowmobile from a chainsaw, you need to choose equipment that will have all the necessary characteristics. The best option for this purpose is the Druzhba, Ural and Shtil chainsaw (the power of these tools is ideal for creating high-speed snowmobiles).
Important! The engine and gearbox are the main parts of the chainsaw that are used during operation.
The snowmobile design consists of four parts:
- Caterpillars.
- Transmissions.
- Engine.
Chainsaw Ural
The assembly of a homemade snowmobile is carried out not according to some proposed scheme or standard drawing, but based on the materials and tools that the master has at his disposal.
Instructions for assembling a snowmobile from a chainsaw
Assembling a product is quite an interesting job. It consists of several successive steps that must be performed carefully and responsibly.
- The first stage is the assembly of the frame base of the future homemade snowmobile. For work you will need steel corners (size - 50 x 36 cm) or steel sheets (thickness - at least 2 mm). The middle part of the structure is made from the corners, and the front and back are made from sheets.
Advice. To give the necessary rigidity to the structure, the metal is bent at an angle of 90 degrees.
- Carefully make two through holes to accommodate the track shaft and track wheel guides (tensioners are installed on both sides of the side members).
Important! The front device is specifically designed to tension the second stage of the idler gear, and it also helps in adjusting the track itself.
- Special brackets are carefully welded to the bottom of the side members (they are attached at the same distance from each other), support rollers are installed in their open grooves.
- The rollers (in rubber covers) are placed on five axes, each of which is attached to the underside of the open grooves.
- Between each of the elements special bushings made of duralumin are installed (they are made from a suitable pipe).
Advice. In order not to waste time making rollers and axles for them, they can be borrowed from old equipment for digging up potatoes.
- The bracket axles themselves are secured using nuts and locknuts (they are designed to strengthen the snowmobile frame and hold the side members at a certain distance from each other).
- Three metal corners are used to make racks for attaching the prepared chainsaw gearbox, and install the intermediate shaft of the chain drive.
- A seat for the user is installed on the prepared frame (a suitable box or car seat is used for these purposes), it is fixed in the area between the middle and rear parts of the structure.
Chainsaw snowmobile
- A hole is made in the front section of the frame to accommodate the steering wheel; it is made from a pipe with welded control handles.
- Metal gussets are installed in the places where the snowmobile racks are attached (they strengthen the structure, make it stronger and more reliable).
Important! In order for the future homemade snowmobile to have good maneuverability in snowy terrain, it is equipped with a caterpillar mechanism.
- A snowmobile drive shaft is made from a metal pipe, and a special round flange is inserted into it for attaching gears.
- To create the steering, equipment from old motorcycles or mopeds with three-lever control is used.
The finished snowmobile is light in weight and can easily be placed in the trunk of a car for transportation over long distances. Its controls are so simple and intuitive that even a child can easily use it.
Snowmobile from walk-behind tractor video
After people see the prices for snowmobiles in a store, they ask the question of how to make a snowmobile from a walk-behind tractor yourself, how expensive and difficult is it? How do you start making a homemade snowmobile from a walk-behind tractor? First you need to determine what engine power to use. We used a 6 horsepower walk-behind tractor engine as the engine. Typically, four-stroke engines with forced air or water cooling are installed on walk-behind tractors.
From the walk-behind tractor you can also use a reverse gearbox, a centrifugal clutch, steering and a fuel tank. Next, you need to think about the snowmobile's propulsion system. Most of them are equipped with a caterpillar drive.
Features of snowmobiles
A snowmobile made from a walk-behind tractor will be able to accelerate to 70 kilometers per hour. However, in this case, the assembly work should be approached professionally. This will result in a snowmobile that will be able to overcome snow jams. With such a unit you can plow the land, go to the forest, hunt or fish, or just ride. Fuel will be consumed in small quantities, so approximately 2 liters per hour will be consumed.
The best homemade products - a snowmobile from a walk-behind tractor
When making a homemade snowmobile, they use tracks from other snowmobiles, or homemade ones assembled from scrap materials. After choosing a track, you need to decide what type of suspension to use. You need to choose from two main types: roller suspension and skid suspension.
Each of them has both advantages and disadvantages. After this, it is important to decide what kind of layout the snowmobile will have. Typically, a snowmobile is equipped with two steering skis at the front and a track block at the rear.
The engine can be installed either at the rear or at the front of the snowmobile.
How to make your own snowmobile from a walk-behind tractor
This snowmobile can be made in a few weekends at the dacha in the garage. At first glance, its design looks very simple. If we compare its cross-country ability in wet or loose snow, it will not be inferior to many industrially produced snowmobiles.
The creation of a snowmobile was based on the principle: the lighter the weight and the larger the size of the caterpillar, the higher its cross-country ability in deep and loose snow. Therefore, the design will be as light as possible.
How to make a homemade snowmobile from a walk-behind tractor on tracks
Four wheels are installed inside the track. When movement occurs, they roll along a conveyor belt with fixed lugs. The caterpillar drive is carried out by a chain from the motor, special drive sprockets, through the driven shaft. They were taken from Buran.
The engine is taken from a conventional walk-behind tractor with a power of 6 hp. You won't be able to accelerate quickly on it. The soft ski and track suspension have been removed because the sled is designed to ride on powder. This simplified the design and reduced the weight of the snowmobile.
Walk-behind tractor in winter
A modern walk-behind tractor is a productive and functional device capable of performing a wide variety of work in the garden.
However, in most cases, this device is designed with an eye toward use in the summer. At the same time, no one forbids using it in the cold season, but it is necessary to take additional measures to ensure normal operating conditions, as well as carefully monitor the conditions of use and condition of the device. Even if you do not plan to use your favorite walk-behind tractor or any other model, preparation for winter still requires certain procedures.
Most of the models presented are air-cooled, which greatly simplifies maintenance of the unit in winter. There is no need to add antifreeze or monitor the integrity of the radiator. However, there are also disadvantages. Just as an air-cooled engine heats up faster in the summer, it also cools down faster in the winter when it stops running.
In order to ensure normal engine operating conditions in winter, sometimes it is necessary to insulate it. Of course, if the air temperature is kept within acceptable limits, then you can do without this, but if severe frosts come, then the unit will not work normally without such insulation.
You may be able to find special covers for your unit on sale, but this is unlikely. Most likely, you will have to make do with available materials and ingenuity. When insulating the engine, it is very important not to damage various components, and also to protect the structure from insulating material getting into the clutch pulley and other moving elements.
The problem of starting a cold engine deserves special mention. Snow blowers and other units intended for winter use use various mechanisms and systems to facilitate this task, but we are talking about something else. Favorite walk-behind tractors , like all others, are designed primarily for summer use.
If you store your device in an unheated room, then a simple solution that is accessible to everyone is suitable for you - warm up the engine by pouring hot water on it. A few liters will be enough to warm up your unit to a level that allows it to start.
Also, if you use a walk-behind tractor frequently in winter, you should worry about the oil in the gearbox. You can use synthetic varieties that retain their properties better than mineral ones when temperature changes. Or, in winter, use thinner oil, since it will thicken in the cold.
Completely different procedures need to be carried out if you plan to preserve your single-cylinder assistant until spring. In this case, there is no point in wrapping the engine and worrying about warming up.
It is better to store the walk-behind tractor in winter in a dry and ventilated room; there is no need for heating. You need to drain the gasoline from the tank and let the unit run until all the fuel from the carburetor is completely exhausted. When setting up the walk-behind tractor for the winter, it would be a good idea to check the oil level in the engine and gearbox, top it up if necessary, or even better, replace it with fresh one.
Also, some owners recommend unscrewing the spark plug and pouring a little oil into the cylinder - just a couple of teaspoons. Then manually turn the crankshaft a couple of turns.
Well, it wouldn’t hurt to wash the walk-behind tractor thoroughly before storing it so that it is free of dirt and dust. You can also wipe all metal parts, in particular cutters, with an oily rag to prevent corrosion.
Homemade snowmobile from a walk-behind tractor video
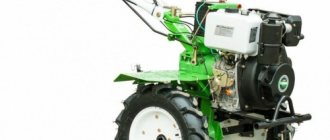
A walk-behind tractor is a universal device for agricultural work. The device is considered universal due to the fact that the design suggests the possibility of its reconstruction. You can make an ATV or a snowmobile with your own hands from a walk-behind tractor. Such conversion does not require significant financial costs or skills, and one machine will perform many functions.
It is advisable to convert a walk-behind tractor into a snowmobile, if only because of the price: the cost of the most primitive machine for moving on snow ranges from 3.5 thousand to 5 thousand dollars. There are also models costing over 10 thousand dollars.
Not everyone can buy a regular snowmobile, so if you urgently need a winter vehicle, you can use a walk-behind tractor. Such homemade products are very popular among rural residents.
Recommendations for safe movement
Do not forget that any vehicle, even one made independently, requires attention and caution. You should not overestimate your capabilities and move in the dark or in bad weather conditions. If visibility is poor, you may not notice changes in the topography of the ground, holes, ditches covered with snow. Low stability of a snowmobile when hitting any obstacle (stones, stumps, metal objects) can lead to capsizing, throwing off the rider and/or crushing it with its weight, causing injury, even death.
Care must be taken when overcoming slopes and when driving a snowmobile under any overhanging obstacles: sagging wires, guy wires, fallen trees. The impact will fall on the rider's chest, so if there is a backrest, injury is inevitable. You must be aware of possible obstacles on the roads and take safety precautions seriously.
To learn how to make a snowmobile from a walk-behind tractor with your own hands, see the following video.
Many farmers are interested in how to make a snowmobile from a walk-behind tractor. To cultivate a small plot of land, gardeners purchase a walk-behind tractor. To use it in winter, owners turn the device into a walk-behind snowmobile.
Homemade snowmobiles from a walk-behind tractor
Not every walk-behind tractor is converted into a snowmobile, so before purchasing a power unit, pay attention to the following technical features:
- Availability of rear towbar.
- The engine is not lower than middle class.
- Manual control is required.
- Air-cooled motor.
When the power unit has been purchased, proceed to its conversion. The main tools and parts that will be needed for this are a small list:
- welding machine;
- pipe bender;
- tracks, two wide skis or wheels;
- auxiliary details.
The main thing is to select all the parts necessary for the transformation. Some of them are made independently. Design begins with choosing a snowmobile model. Snowmobiles are divided into two main classes: wheeled snowmobiles and tracked snowmobiles. It is advisable to first make a layout.
Converting a walk-behind tractor into a snowmobile
The first and second stages consist of manufacturing the frame and mounting the power unit:
- The frame is made from old motorcycle or car pipes. A pipe bender will help to shape it.
- The joints are processed by spot welding.
- We move the engine to the center of the housing structure.
- We place the engine on a specially made platform with fasteners for fixing the motor itself.
Mounting the motor on a special platform is very important, since otherwise it may become clogged with snow and, as a result, burn out.
The installation of the steering wheel and seat is chosen by the master independently - the main thing is that it is comfortable to operate the device. Depending on the engine power, the snowmobile can accommodate several passengers.
How to prepare special equipment for the coming season?
After the unit has safely “survived” the winter period, we begin to prepare it for the new season and loads. This procedure is divided into several stages.
- We are replacing the fuel. We drain the remaining gasoline and add new one. In winter, gasoline could turn sour.
- Let's check the spark plug. Its position must be stable, without air access.
- Open the fuel tap.
- Keep the air gap lever closed until the engine warms up.
- We set the ignition to the “on” mode.
- Pull the starter handle. As soon as we feel “resistance”, we make a sharp movement “towards ourselves”.
- We are not afraid of smoke. It is released when oil burns.
If you notice significant problems in the operation of the walk-behind tractor after winter storage, contact a specialist.
For the rules for preserving a walk-behind tractor for the winter, see below.
Snowmobile made from a walk-behind tractor on wheels
The wheeled snowmobile is popular due to its sufficient maneuverability. But there is also a negative point - the wheels can fall into the snow. A snowmobile on wheels or low-pressure chambers (pneumatics) is easy to assemble. Wheels can be purchased at the store or made yourself.
The main attention should be paid to the choice of power unit - the motor on the walk-behind tractor must be as powerful as possible, otherwise the unit will not be able to perform its specific functions - moving on snow or ice.
It is important to properly design the drives and frame of the all-terrain vehicle. It is desirable that each wheel has a separate drive. This will significantly simplify control in extreme conditions. For a snowmobile, four wheels are most often used, since three-wheeled vehicles are less stable.
Low pressure wheels and wide skis are often combined. Thus, the stability and maneuverability of the device increases, but maneuverability does not decrease.
Homemade snowmobile on wheels
Crawler snowmobile
Snowmobiles made from a walk-behind tractor on tracks are characterized by high cross-country ability. But due to their enormous mass, they are more difficult to control and maneuverability deteriorates. In addition, the cost of installing tracks is different from skis or wheels.
You can make the tracks yourself, but this is a long and complicated process. At the same time, there are several features of a tracked vehicle for driving through snow:
- The motor is installed in the traction part, so you will have to significantly alter the walk-behind tractor frame.
- If the tracks are made independently, then attention is paid to the quality of the connections.
- The seat and steering part are installed so that the balance of all components of the unit is maintained.
You should not accelerate to high speeds on tracked snowmobiles. This may lead to an accident.
Converting a walk-behind tractor into a tracked snowmobile is not difficult, the main thing is to take care of safety.
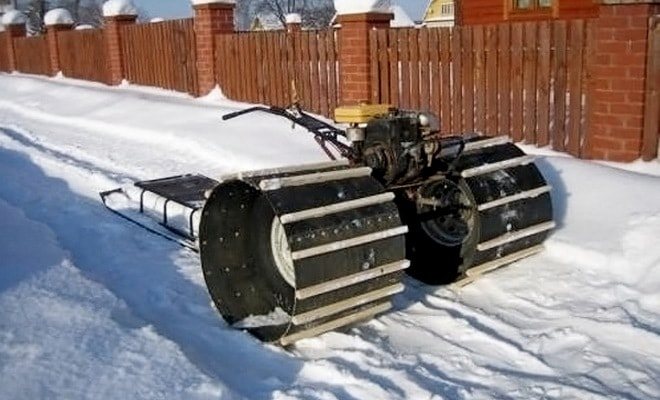
Snowmobile type tubifex-stick insect
Homemade tracked motor-block snowmobiles can be divided into two main groups depending on the material of the snow hooks: “pipe bugs” and “stick bugs”. They differ in the material used for the tracks. To make the track structure more durable and resistant to deformation, tubes (ordinary plastic water pipes) are used. But in this case, the grip of the tracks and snow is low.
Drawing of tracks for a stick insect snowmobile
Another variation uses a wooden beam for the tracks. The service life of this method of arranging tracks is not very long, but the adhesion to the surface is much higher.
Proper start of the walk-behind tractor after winter
Before starting a walk-behind tractor after a long winter period of inactivity, you need to carefully prepare it. First of all, it is necessary to remove the equipment from the garage and inspect it - there should be no pockets of corrosion on the metal surfaces of the agricultural unit, the appearance of which can be caused by high air humidity. If corrosion occurs, it will need to be removed, the problem areas treated with a special rust converter, and the areas painted.
After this you will need:
- drain the old fuel from the tank, and also remove the old gearbox grease. The latter must be thoroughly washed and dried. Next, you will need to fill in fresh fuel and new transmission oil;
- rinse the fuel pipes, make sure that they have not lost their tightness and that no cracks have appeared on their walls;
- Remove all filter elements provided in the design, rinse them thoroughly in clean gasoline, dry them and install them back. Damaged filters must be replaced;
- remove and disassemble the carburetor, blow it with compressed air or wash it with gasoline. After this, completely dry parts of the fuel assembly must be assembled and installed in place;
- check the drive belts - due to high humidity, cracks could appear on their surface - in this case, the elements must be replaced immediately;
- disassemble and inspect the CPG of the power unit - if burrs or traces of rust appear on the walls of the unit, they will need to be removed;
- Unscrew and check the spark plug - there should be no traces of scale or resinous deposits on it. Otherwise, the candle needs to be cleaned and dried. After this, you need to ventilate the engine by sharply pulling the starter cable several times;
- check the gap of the ignition system and reset it if it has been violated;
- inspect the controls and make sure that the gas and brake cables are tensioned as required for operation;
- remove, recharge and install back the battery, if it is included in the design of the walk-behind tractor. At the same stage, you need to check the terminals and contacts of the electrical wiring - there should be no traces of oxidation on them;
- check the tire pressure and inflate them as indicated in the instructions for the walk-behind tractor;
- inspect the chassis of the walk-behind tractor and tighten the loose bolts;
- check the mechanism for connecting attachments and trailed equipment.
Only after all the above steps can the walk-behind tractor be started.
To start an agricultural implement with a gasoline engine, you must:
- Fully open the gasoline tap. At the same time, the fuel choke lever should be located in the “Start” position, and the clutch lever should be in the “Disengaged” position;
- Perform bleeding with a manual starter by sharply pulling the cable towards you several times;
- Move the ignition lever to the “On” position and pull the starter cable towards you several more times;
- As soon as the engine of the walk-behind tractor you are using is started, you will need to quickly move the fuel choke lever to the “Run” position.
If the gasoline walk-behind tractor is equipped with an electric starter, then the operator just needs to turn on the ignition and press the engine start button.
Starting a diesel walk-behind tractor is a little more difficult.
To do this you will need:
- Unscrew the valve intended for supplying fuel, gradually unscrewing each standard connection from it;
- As soon as the fuel reaches the nozzle, you need to open all the valves in the design and set the gas lever to the middle position;
- Press and hold the decompressor until fuel is pumped to the cylinder;
- Release the decompressor and begin to gently pull it until it returns to its original position;
- Press the decompressor again and at the same moment quickly pull the starter cable towards you.
After starting the power unit, you need to give it time to completely warm up - this may take from 5 to 10 minutes
It is important not to subject the walk-behind tractor to prolonged high loads, since after winter its moving parts should have time to warm up and become covered with a continuous oily film.
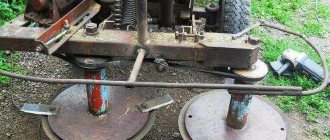
Swamp walkers from a walk-behind tractor
Self-made swamp vehicles, in their principle of operation and design, completely repeat the design of a snowmobile. Both have the same principle - to reduce the pressure on the surface on which the unit will move. To create a swamp vehicle, it is important to select or make wheels or tracks yourself - the width should be much larger than the standard.
To create a motor-block snow and swamp-going vehicle, follow the approximate plan:
- Strengthening the frame or rebuilding it is carried out by installing additional pipes.
- The motor and steering wheel are placed on the frame.
- The chassis and front sprockets are also installed here.
- An intermediate shaft with rubber linings is installed.
For the undercarriage, you can use tires or tracks. Each option is special in its own way, and all the characteristics for creating a tracked and wheeled unit are described above.
- Author: Maria Sukhorukikh
Rate this article:
- 5
- 4
- 3
- 2
- 1
(0 votes, average: 0 out of 5)
Share with your friends!