A homemade circular saw is a kind of handy tool that can cope with a number of construction tasks in domestic conditions. In principle, it won’t be difficult to make a circular saw yourself even if you don’t have any special skills, the main thing is to have at least a little idea about working with metal. The necessary material can usually be found in a garage or home workshop, and here a steel angle, a rectangular profile pipe and an engine will do. The assembled circular saw can be placed on an existing workbench, or, in the absence of one, you will have to build a table for the circular saw with your own hands. As for the motor, you can use a unit from an old washing machine or walk-behind tractor, but first things first.
Manual device from an angle grinder
If you have a grinder on your farm, then you won’t find a better device for a hand-held circular saw. Don't know how to make a mini circular saw at home from such a popular tool? Don’t despair, because its manufacture only involves providing a sliding stop and an axial handle to an existing unit. The sliding stop includes in its design two pieces of metal corner of a small cross-section, located on both sides of the saw blade. Using bolts and nuts, the corners are connected from the front and back sides with a transverse ligament, and the technological gap between the sidewalls of the thrust structure and the working element will be provided with washers.
It is necessary to put a metal band clamp on the grinder so that its screw tie is located at the bottom, and a strip of galvanized metal with a hole for a sliding stop, folded in half, is fixed to it. In principle, a special clamp with a stand can be made as a single unit, but in this case the thickness of the metal strip will ideally be at least one and a half millimeters. Next, you will have to make a couple of holes for bolts in the gearbox housing of the future circular saw, for which it is disassembled and the drilling points are determined. Through the holes made, an axial handle for a circular saw assembled from a grinder is attached, since the existing handle will not allow for high-quality cuts, even if the master has remarkable physical strength.
The axial handle, which will be equipped with a grinder grinder, is made of a metal rod or tube. The shape of the design can be a transverse bracket or a kind of horn. The ends of the metal part with which the handle is attached to the gearbox are equipped with holes for fasteners. There is one important point here: the ends cannot be riveted to prevent the handle from deflecting during operation of the circular saw assembled with your own hands. It is also necessary to make an adjusting rod from a piece of metal rod (4 - 6 mm), for which we bend one end into a loop, rivet it a little and form a hole for the front stop bolt. As usual, we adjust the uniformity of the gap with washers.
At the other end of the rod, a thread is cut, thanks to which it is connected to the handle. First, one nut is screwed onto the thread, and after assembling the structure, a second one is screwed. By tightening and lowering the nuts of this device for a homemade hand-held circular saw, the depth of cut is adjusted. This is how, at home, you can convert an angle grinder into a full-fledged disk tool designed for cutting various materials. By the way, by remaking a circular saw from a drill, you can achieve a similar result.
Mini table saw
The mobility of the element is achieved by sawing the horizontal segment into two equal parts, which after installation are fastened with clamps. A circular saw is fixed to the vertical part of the frame with a clamp. An assembled hand-held circular saw table can function as a cutting machine if a standard cutting disc is installed on the grinder. It is worth noting that the through cut here will not exceed 80 mm, and to process larger lumber you will need a more serious homemade circular saw, which will be discussed further.
Chopper for a walk-behind tractor: which one to choose and how to make it yourself

A well-groomed area always attracts the attention of strangers with its cleanliness and order. However, not everyone thinks about how much time and effort is required to bring a large territory to an idyll. Various attachments on the walk-behind tractor, and in particular the branch chopper, play a big role in this matter. This is what we will talk about today.
Read also: Viking (motoblock): technical characteristics, description, price, reviews
Stationary machine
A circular saw, as close as possible to factory models, requires a competent approach to assembly, so before making a stationary type circular saw, you need to think through everything down to the smallest detail. In principle, a tabletop mini circular saw differs from a stationary one in the height of the frame, which directly depends on the nature of the work performed and the dimensions of the workpieces that the device will process. One-time work can be carried out on a compact table saw, while a circular saw from a hand-held circular saw can be easily hidden in a shed or closet, and a carpenter who constantly manipulates lumber will need a stationary homemade circular saw. Below is a diagram that details all the elements and accessories for a circular saw of this type.
As can be seen from the figure, homemade circulars of this type have a clear design, and drawings like the one presented above greatly facilitate the process of assembling them. Before making a circular table, as well as mounting a circular table with your own hands, we will consider each part of the unit separately in order to know all the intricacies of its operation and installation.
Circular table
A table for a hand-held circular saw with a slot in the center is sometimes converted from an ordinary kitchen table or assembled from beams or metal profiles. Experts strongly recommend covering a table for a circular saw with a sheet of galvanized metal, since without a coating the base is at risk of abrasion in the center from constant friction of the lumber, which in turn will negatively affect the quality of the cut, and the depth of the cut will be uneven. It is better to make cross braces that strengthen the sawing table from a steel angle 60 - 80 mm with a horizontal segment outward in order to simplify the installation of the side stop. The homemade table on which the circular saw will be installed must be strong and stable, and it must also be securely fixed in a stationary position.
Saw blade
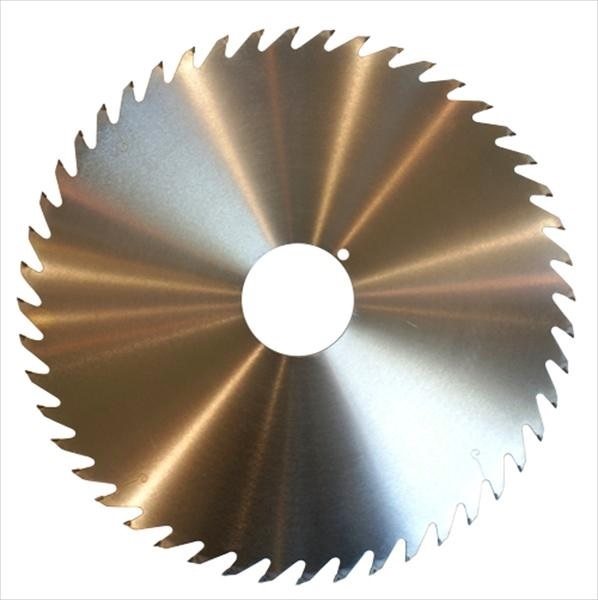
The toothed disk should rise above the surface of the table of the circular saw by a maximum of a third of its diameter, otherwise it will not cut the tree properly, and the process itself will become dangerous. If you need to cut a beam with a diameter of, for example, 100 mm, the same parameter of the cutter should not exceed 350 mm, however, a motor with a power of 1 kW will also be required. For workpieces with a diameter of over 150 mm, a mini circular saw made by hand is unlikely to be suitable. Some factory circular saws are equipped with a riving knife, which is installed behind the disk at a distance of 2 - 3 mm from the saw teeth. It eliminates the jamming moment due to the closure of parts of the sawn workpiece, so it can also be very useful in the case when a homemade circular saw is assembled.
Adjustable side support
It is possible to install a high-quality stop from a steel angle with a cross-section of about 80 mm, which is 3–4 cm longer than the table structure. The flat sides of the corner are bent down so that their width is one and a half cm greater than the thickness of the table. After installation, the emphasis is fixed on a homemade circular table in a given position using bolts. This element is adjusted according to a template placed between it and the cutter.
Shaft
The shaft installed on the circular saw is the most critical component, so its turning and testing together with the disk should be carried out exclusively by a specialist using special equipment. A pipe product with a carelessly fixed circle is immediately excluded, because the slightest errors in the operation of this element will result in major troubles such as equipment breakdown, damage to the workpiece and injury to the operator. The optimal solution would be to purchase a ready-made shaft with a seat for the cutter
. It is better to give preference to self-aligning ball bearings that have a curved inner surface, otherwise the unit you made yourself will quickly collapse and the shaft mounted on a homemade circular will become unusable.
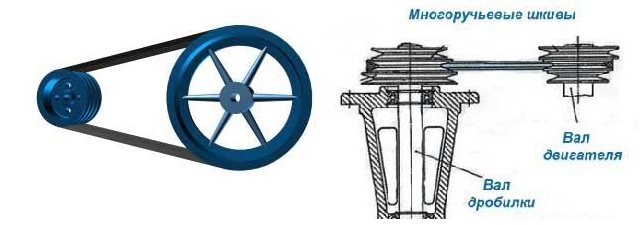
Broadcast
In our case, the ideal option would be a V-belt drive, but it is better to refuse a rigid gear mechanism, since such a homemade product does not guarantee safety. If a nail suddenly gets caught in the lumber, the motor rotor will cause the disc to fracture, which can lead to injury. If the inner diameter of the belt drive pulleys is small, then slippage will be ensured, and the tensioned belt will serve as a kind of damper. The gear ratio is usually selected based on engine speed, always taking into account the permissible number of disk revolutions. The smaller the diameter of the saw wheel, the higher its rotation speed can be, and the cleaner the converted unit will cut.
Motor
Among home-made devices, the most popular is a circular machine assembled from a washing machine motor. This choice is explained by the fact that its operating scheme is best suited for such purposes. Unlike collector units, which are usually supplied with power tools, the engine from a washing machine operates at lower speeds, which means that it lasts longer, has increased efficiency and is not so susceptible to all sorts of blockages. You can also use a three-phase motor, but then additional costs will be required for the purchase of a starting and operating capacitor, so it is more economical to make do with a device from a washing machine. That, in general, is all the wisdom.
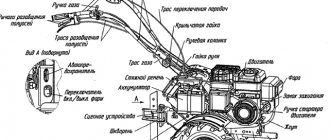
The universal walk-behind tractor module that we built is suitable not only for transport. Its engine produces up to 2 hp. can successfully work in another field. For example, it will operate a circular saw. The power is quite enough to cut boards up to 50 mm thick and 20 mm chipboard and fiberboard. And you will appreciate the advantage already at the beginning of construction, when electricity has not yet been supplied to the garden plot.
The basis of the machine is a durable table made of wooden blocks with a cross-section of 80×60 mm and a length of about 650 mm, as well as boards with a cross-section of 120×40 mm. The entire assembly is carried out using screws, but better yet, using bolts and nuts with M6 threads. Before assembly, wooden parts are additionally lubricated with glue - wood glue, casein or epoxy - for strength. The tabletop is cut from a whole sheet of plywood with a thickness of 12 ... 15 mm or chipboard with a thickness of 20 mm. Its dimensions are 1000x550 mm. The power unit is located under the table and mounted on a board-crossbar with a cross-section of 120x40 mm using a horizontal hinge consisting of two forks, pre-bent from steel strips 4 mm thick and 80 mm wide. They are connected to each other using a long bolt with an M8 thread or a threaded rod with nuts and washers. One of the forks is mounted on the crossbar, the other on the connecting flange of the power unit. The spindle is a housing with bearings and a shaft. The easiest way for this purpose is to use a unit from an old bicycle on which the pedals and a large sprocket rotate. Carefully cut it from the frame with a hacksaw and disassemble it. A bicycle sprocket will not be needed; it will have to be replaced with another one from a D6 or D8 engine. And so that it sits tightly on the shaft, turn the adapter sleeve on a lathe. Check its dimensions locally. Weld the sprocket to the bushing according to the figure. It is more difficult to install a circular saw on the spindle. Here it will be necessary to take into account the diameter of the mounting hole of the circular saw and, accordingly, determine the outer diameter of the adapter threaded bushing. The bushing is attached to the spindle at two or three welding points through holes drilled in the wall. The saw is finally secured to the bushing with a nut and locknut. Weld a plate of steel sheet 4-5 mm thick to the spindle assembly body and attach it to the tabletop with screws. Install an additional sprocket on the shaft of the power unit, the diameter of which is 2.5 times larger than that installed on the spindle. Make sure that both sprockets are located strictly in the same plane. The length of the chain is selected so that the power unit is located horizontally. If it turns out that the horizontal hinge is loose after assembly, secure the power block at the back with two cables - they will prevent it from moving to the right or left. The rotation speed of the circular saw is regulated by a pedal (see figure) connected by a cable to the carburetor throttle valve. The pedal is bent from a steel sheet 2.5 mm thick and is hinged to the table leg on an M10 threaded rod with nuts and washers. The cable sheath is fixed on a stop bent from a steel strip with a cross-section of 30×3 mm. The pedal area is covered with corrugated rubber. We warn you that a rapidly rotating saw can cause injury if handled carelessly. Therefore, strictly follow safety precautions. The work area must be equipped with a movable cover that covers the saw during operation. The casing is bent from tin or duralumin and mounted on a lever hinged on the side of the table. When sawing a board into slats, it should be fed into the work area not by hand, but by a pusher - a wooden block at least 300 mm long. Working on a machine driven by an internal combustion engine differs from electric ones. This is due to the need to use the throttle pedal. Therefore, remember, before feeding the workpiece, you should fully gain momentum by pressing the gas pedal all the way. And during work you will have to constantly correlate the feed force, spindle speed and optimal pedal position. It would be nice to equip the machine with a sawdust collector. Make a box from roofing iron and install it with a slight slope under the disk. Make sure that the carburetor air intake hose is not in a dusty area. Otherwise, the engine will stop frequently and its service life will decrease. Also, try to position the machine so that the engine is constantly blown by the wind.
N. Papiny, engineer Source: Lefty 1991
Circular saw based on a universal walk-behind tractor: 1 - bed leg (wooden block with a cross-section of 60x80 mm); 2 - longitudinal element of the base of the bed (board with a cross-section of 40 × 120 mm), 3 - table top (sheet of plywood 12 - 15 mm thick or chipboard 20 mm thick (dimensions - 550 × 1000 mm); 4 - bushing-roller chain of the machine spindle drive ; 5 — circular saw; 6 — universal power walk-behind tractor based on a B50 or B-501 engine; 7 — carburetor throttle drive cable; 8 — power unit suspension pin (bolt or M8 threaded rod with nuts and washers); 9 — fastening the spindle to the tabletop (M6 screws with nuts and washers); 10 - spindle axis (modified pedal shaft of a bicycle carriage); 11 - nut for fastening the circular saw; 12 - washers-spacers; 13 - spindle mounting bracket (steel strip 4 mm thick) ; 14 — bearing housing of the spindle (bicycle carriage housing); 15 — driven spindle sprocket (modified sprocket from the D6 or D8 engine); 16 — retainer; 17 — axis of the carburetor throttle pedal (steel threaded rod M10 with nuts and washers); 18 — cable stop (steel strip 3 mm thick and 30 mm wide); 14 — pedal return spring; 20 — throttle valve drive pedal (gas pedal); 21-lining (corrugated rubber); 22 - screw; 23, 27 — fork of the power unit suspension hinge (steel strip with a cross-section of 4×80 mm); 24 — M8 threaded bolts and nuts securing the fork to the power unit; 25 — cross member of the frame (board with a section of 40×120 mm); 26 - screws
A DIY circular saw is an excellent way to save a lot of money and at the same time acquire fairly high-quality and reliable equipment. A properly assembled homemade circular saw is in no way inferior to a factory saw and is also capable of sawing logs of even very large diameters.
A circular saw is used for straight cutting of lumber.
Do-it-yourself branch chopper for a walk-behind tractor: a set of preliminary works
Before you choose the design of a garden wood chipper and begin assembling it, you need to decide on the goals of its creation:
- To obtain sawdust, which can be added to the soil as compost or used for fuel briquettes, the easiest way is to use a disc crusher for a walk-behind tractor;
- For the purpose of coarse crushing of branches into a large fraction - shredders acting as a jointer;
After that:
- Select a traction block - walk-behind tractors with a power of at least 5-6 hp are compatible with the chopper attachment. The most reliable designs are obtained on the basis of the Neva, Cascade, and Tselina walk-behind tractors;
- They adapt the V-belt drive - in order for the cutting set to cut smoothly and not wear out the engine, it should account for half of the declared torque of the device. For example, for a walk-behind tractor with 3 thousand rpm, the rotation speed of the blades will be 1.5 thousand revolutions. At the same time, the length of the belts is adjusted: for the leader it will be 10 cm, and for the slave – 10 cm;
- Pulleys are modified - it is more effective if the pulley has 3-4 grooves. This will allow you to “maneuver” between revolutions and operating speeds only by re-throwing the belt, expanding the scope of application of the crusher.
Read also: Walk-behind tractor - Yenisei: characteristics of petrol walk-behind tractors MB-820 and TCP900EN, assembly
Material and technical base:
- discs for circular saws with pobedite soldering;
- gasoline drive from a home walk-behind tractor;
- belt;
- pulley;
- bearings;
- M20 bolts along with fasteners;
- pipes;
- steel;
- electric welding and grinder.
How to make a homemade circular saw?
In order for the circular saw to easily cut large logs, it is necessary to equip it with a truly powerful electric drive. In addition, for this purpose, a belt drive, a shaft and a motor with high traction force are installed on it. All hand-made circular saws consist of two parts: upper and lower.
At the bottom there is always various electrical equipment, namely:
- saw motor;
- transformer;
- device that starts the circular machine.
At the top of the circular saw install:
- pulley;
- cutting disc.
Return to contents
Large homemade circular saw
When making a frame for the top of the saw, it is best to use a metal corner 25 mm wide. In this case, the rectangle, which will represent the frame of the upper part of the homemade circular, should have dimensions of 600x400 mm. Next, four pipes are welded in the corners of this quadrangle, the diameter of which should be 17 mm and the height should be approximately 2.2 m.
After this, it is necessary to strengthen two corners on the frame, on which the bearings will later be fixed. The distance between these corners directly depends on the length of the shaft. To fix bearings, as a rule, clamps are used. It is best if the bearings installed on a homemade circular are closed. This way you won’t have to worry about wood chips getting into the space between the balls, rings and separator. Don't forget to also cut a thread at the very end of the shaft so that you can install a cutting blade on it later.
The lower part of the circular saw should be made much more massive, which will provide it with the necessary stability and reliability. Therefore, when making the lower frame, you need to take a corner with a width of at least 40 mm. Next, across the frame it is necessary to secure two additional corners, which will later support the motor of the homemade circular saw. The most suitable motor for a DIY circular saw is an asynchronous three-phase motor with a power of at least 1.5 kW and 1500 rpm. The pulley groove should be quite large, approximately 80 mm, and it should be mounted directly on the shaft itself. In addition, you will need to weld a fairly small metal platform to the frame on which the starting device will be placed. Large pipes 2.2 m long, which you previously welded in the corners of the frame, are necessary for high-quality tension of the belt so that the metal wings press the thin pipes.
Now you need to insert both the lower and upper parts of the homemade saw into the finished supports made of pipes, and then tighten and tighten the belt with metal wings. You can start the motor in this model of circular machine yourself using starting capacitors. In order to additionally load the motor and increase its torque, you can use a 220/36,400 W transformer.
Return to contents
Crusher for walk-behind tractor: design and types of designs
Garden shredders or shredders are a relatively new type of device on the domestic market. They are the most useful and simple alternative to recycling cut branches of trees and shrubs, as well as grass: they are crushed into mulch, which can be used as organic fertilizer.
Read also: Tractor MTZ 80: features and technical specifications
Due to their high cost, not every owner has them at their disposal. But having a walk-behind tractor at hand, you can make it yourself. We will talk about the nuances of this process further.

A garden wood chipper is an automated device that operates from an electric or internal combustion engine and is adapted for crushing fallen leaves, branches of fruit crops, and mown grass into organic matter. It is available for sale as an independent device and as an attachment to a traction element - a walk-behind tractor or a mini tractor.
In both cases, the structure is:
- Engine;
- Metal carcass;
- Compartment for receiving sawdust;
- Operating shaft equipped with blades;
- Safety cover.
The chopper adapter for walk-behind tractors is not compatible with all of their modifications.
The minimum requirements for retrofitting are:
- Medium or heavy power class of a specific model;
- Engine with hydrocooling system;
- Front PTO, which is connected to the chopper via a belt drive.
Structurally, walk-behind shredders are classified into:
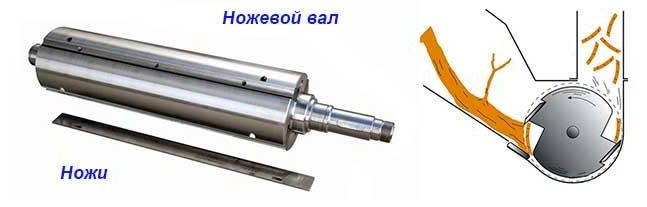
- knife - the cutting unit is represented by several saw blades, which are directly attached to the motor shaft. With the high power of the power unit and high-quality knives, they can easily grind fresh cut branches or soft components - dried hay, thin branches of bushes. The only limitation for this group can be the diameter of the branches: for dry – 25 mm, for fresh – 40 mm;
- milling shredders for a walk-behind tractor - similar to the first group, but instead of knives they contain a milling cutter - a gear with large teeth. Usually available in steel. They work slowly and smoothly, which is effective only for well-dried workpieces;
- universal shredders made from a walk-behind tractor - cope well with any organic mass that is prepared in several stages.
Pendulum circular saw with electric motor
You can make a homemade circular saw quite easily to cut logs and pieces of wood, the thickness of which corresponds to the strength of the electric drive installed on it. If you intend to work with large and very thick pieces of wood, then you should equip your homemade saw with a truly powerful electric motor, as well as install a shaft and belt drive on it. The best solution in this case would be to install a special pendulum frame.
When making a pendulum circular with your own hands, only very strong steel corners should be used as the material for the frame. Next, on the finished steel frame you will need to place all the mechanisms necessary for the normal operation of a homemade circular saw. With this design, you can personally set the flight altitude of the cutting blade without any special effort, while avoiding excessive design difficulties.
Return to contents
Is it possible to assemble the nozzle with your own hands?
Of course, you can make a branch chopper for a walk-behind tractor with your own hands, but it’s not easy. If you assemble a homemade structure strictly according to the instructions, no special problems should arise.
A branch chopper for a walk-behind tractor (homemade) is not just about saving money. A self-constructed unit has many advantages, in particular:
- allows the master to independently select the power required for the agricultural unit;
- allows you to equip the equipment with the number of knives required for work;
- allows you to determine the diameter of the sticks during the manufacture of such an agricultural machine;
- low cost of parts that are used in modeling this agricultural structure.
Mini circular saw: manufacturing instructions
Return to contents
Mini-circular base
To make such homemade products you will need:
- two metal plates;
- wooden beam;
- spindle from a bicycle;
- star;
- chain.
The mini-circular saw should be placed on a strong and stable table, since any rocking can pose a danger to human health and also interfere with normal operation of the saw. Before you start making a machine from a hand-held circular saw, you need to make a special table. In this case, you can use metal sawhorses and a regular old kitchen table as a bed. To begin, you will need to connect the trestles to each other with a wide wooden board at least 50 mm thick, and then secure the kitchen table to this base.
You can make the tabletop itself from two metal (preferably steel) plates with a cross-section of about 4 mm. In addition, you can use thick wooden blocks for this purpose.
It is important not to forget to leave a small gap between the metal sheets, the size of which is usually 10-12 mm.
In this case, you need to make sure that the edges of the metal plates are perfectly parallel to each other. Now that the table is completely ready, you can begin attaching the circular saw itself to it. It is important to note that it should be secured from below, and in such a way that its cutting disk is directly in the gap between the two sheets of the tabletop.
How can I make a circle with my own hands
?
Circular saw. This is perhaps one of the most useful and necessary tools for a craftsman engaged in the construction of private housing or the construction of his own country house. At the same time, many craftsmen are interested in how to make a circle with their own hands in order to save on purchasing it. Today there are a large number of different options available on the Internet, each master adds something to his design. We will not search for all available options, but we will look at the most popular ones, according to which many homemade circulars have already been made.
Do-it-yourself garden branch chopper

A branch chopper for a walk-behind tractor is a good thing, but not everyone can afford to buy it.
Therefore, the optimal solution is to make a shredder for cuttings and herbs with your own hands. This is certainly not easy work, but it is worth it. There are many advantages to a homemade branch chopper: the ability to independently choose the number of knives needed for work; the power of the unit, the diameter of the branches and, of course, the low price.
The design, if understood correctly, is quite simple. The grinding apparatus consists of:
- steel frame;
- gasoline engine or electric motor;
- cutting mechanism;
- bunkers for feeding sticks and unloading wood chips;
- main gear.
A self-made branch chopper for a walk-behind tractor is a cutting mechanism mounted on a frame.
Materials for production: knives from an electric planer, pulley, bearings, sheet metal, shaft, channel, bolts, nuts.
Tools: hammer, drill, welding, grinder, set of wrenches and pliers:
- We make the base for the frame from a channel, angle and pipes.
- We weld the frame.
- We put a package of saws and separate washers on the cutting block shaft.
- We put bearings on the two ends of the shaft.
- We mount the pulley at the longest end of the shaft.
- We attach the shaft to the frame with bolts and nuts.
- We install a small diameter pulley at the end of the shaft.
- We attach the engine to the frame, ensuring that the pulleys are located on one side.
- We put a belt on them and control the tension by moving the engine.
- We make blanks for the protective casing and bunker from steel.
- We weld the pieces together.
- We attach the casing and hopper with bolts and nuts to the frame.
- We connect it to the engine and check its functionality.
A homemade device is an indispensable assistant for your garden, easy to use and, moreover, not difficult to make with your own hands. At a minimum, it will save you from unnecessary branches, and the resulting sawdust will serve as fertilizer or as heating for your home.
Circular saw with Bulgarian
This is perhaps the most common version of the homemade circular saw. The advantage of this option is the simplicity of the design. You don’t need to think about how to transfer the rotation of the motor to the spindle, how to organize all the necessary pulley structures, etc. in the Bulgarian design, all this is already provided for. Naturally, to turn into a circular saw, you need to use a fairly powerful model that will provide a high-quality cut. In principle, the conversion itself here comes down to replacing the grinding disc with a saw and attaching the device to a stable surface.
However, there are also such disadvantages:
- a disk with a large diameter cannot be placed in Bulgarian;
- The angle grinder can only be attached from the side, so the width of the sawn wood will be limited.
Powerful pendulum saw
This is a more powerful and, therefore, more productive saw; a fairly powerful separate electric motor is used to drive it. To work with particularly thick wood, it is recommended to make a circuit according to the following scheme:
- a strong stationary frame is welded;
- At the bottom there is a smaller lift frame, which is attached to the main frame using the outer edge and connected to the height adjuster from the front edge. Such a regulator can be made of a vertical threaded pin and a rotating mechanism, which changes the height of the position of the saw and the height of its exit from the tabletop to the surface;
- In addition, a system is required for connecting the motor and the saw; for this, the design must provide appropriate shafts and.
Advantages of walk-behind circular saws
Let's name a few compelling advantages that influence the choice of owners of dachas and private houses:
- The ability to carry out various carpentry works without access to the mains.
- The mobility of the device - it can be quickly mounted and just as quickly disassembled, sawing building materials directly near the workpieces.
- Cost-effective - the owner of a walk-behind tractor makes the most of the unit without spending money on other target equipment, which will require investments.
- Compact dimensions - the attachment is always smaller than a full-fledged device, so it will not take up much space when stored.
It is worth paying attention to the performance of the walk-behind tractor engine; it is this that will provide the necessary power to the circular attachment, which operates from a walk-behind tractor drive, and not from a conventional electric motor.
It is best to use units with a power of 3, 4 or more horsepower. At the same time, it is worth considering that professional circular saws are powered by a 3-kilowatt electric motor, and 1 kW is 1.35962 horsepower.
Manual circular saws intended for short-term sawing of thin boards require a power of 1.5-2 kW. Therefore, based on the planned work, we select a working body with the appropriate characteristics.
Is it possible to make a homemade circular saw with an engine from a walk-behind tractor?
On the Internet you can find many diagrams and descriptions for creating a circular attachment for a walk-behind tractor yourself. One option is to use a table made of beams. The structure is connected together using bolted connections. In this case, the motor is disconnected from the walk-behind tractor and secured directly under the tabletop on a transverse board. A specially made hinge will securely secure the power unit in a pre-marked location on the frame.
You will also need a spindle from a bicycle and a D8 or D6 sprocket from the motor. Naturally, you will need a shaft, a bushing, a metal plate 4-5 mm thick and the circular saw itself.
Operating principle
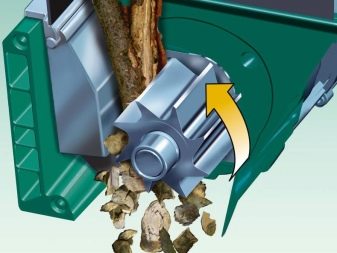
After starting the motor, rotation is transmitted from the machine motor to the gearbox of the raw material grinder using a belt drive and pulley. Next, raw materials must be supplied to a specially designed bunker. The rotating knives begin to guide the branches into the compartment, after which they are crushed in the cutting compartment. The final stage is pouring the waste out into a special bin. The result of the work is the production of crushed shavings and sawdust.
Read also Swimming pools for summer cottages frame reviews
The classification of shredders for walk-behind tractors distinguishes the following types of attachments.
- By type of power plants.
- According to the performance capabilities of the motor. There are petrol and electric options.
- According to the characteristics of knives. There are choppers that have from 15 to 30 circular saw blades that are fixed on shafts. The second option is jointer knives with grooves, the number of which can range from 2 to 6. The third option is shafts with knives that rotate synchronously. In turn, knives can have one or more blades.
- According to the functionality of the device.
- According to their purpose, crushers are divided into those that crush dry branches, stumps, grass or raw material. In specialized stores you can purchase universal attachments that can work with different types of raw materials.
- According to the availability of additional functions. If you want to expand the functionality of your device, you can buy additional accessories. For example, a popular attachment today is a attachment that can be used to chop firewood.