Potato planter for mini tractor: types and features
If you are the owner of a vegetable garden or small farm, then most likely you know how difficult it is to grow potatoes, how much labor and time it takes to get a decent harvest. So, a small-sized potato planter can save you from the monotonous work of planting potatoes; it will take over the entire process.
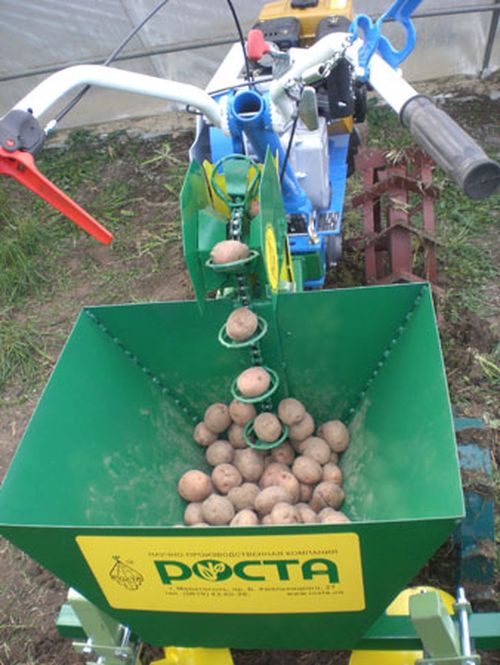
All you need to do is attach it to a mini-tractor and fill the hopper with seed potatoes, and the potato planter will do the rest on its own. The planting process will look like this: the device for planting potatoes will automatically dig a ridge and, using a conveyor, place the tubers in the hole; hillers located on the structure will fill the hole. Using a special apparatus, you can immediately fertilize the soil when planting.
Operating principle and type of mechanization
You are allowed to independently assemble devices suitable for connecting to machines - for example, for a walk-behind tractor. In this case, the machine will have a complex system in which the rotation of individual elements depends on the motor.
The operating principle is as follows:
- An axle is welded to the frame structure, on which the sprocket is mounted.
- A little higher, another sprocket is fixed, combined with the previous chain.
- When the tractor moves and the wheels rotate, the lever axis begins to rotate. Thanks to this, the top sprocket rotates through the chain drive.
- The line is secured with cups, and vegetable roots fall into the hopper. The potato tuber ends up in the ground.
Assembling a device for planting potatoes with your own hands is not difficult. Having selected the correct drawing and received the required materials, you can begin to work.
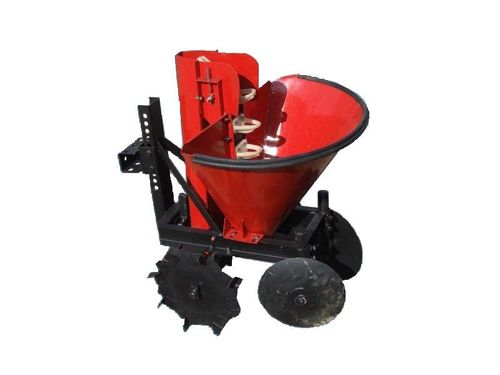
Purpose of potato planter
The design of the potato planter for a mini-tractor is installed on the tractor; you just need to choose the right type of equipment. And this can be done after you decide on the scale of the work. Today there are enough devices on the market that can be divided into types:
- double row potato planters;
- single-row potato planters;
The choice will need to be made depending on the model of your tractor and its power. But most often, a two-row potato planter for a mini-tractor is used, because in one stroke of the mini-tractor, potatoes can be planted in two rows at once.
Modern landing aids
Modern potato planters can be different, depending on the characteristics. Based on the type of working process, potato planters can be divided into the following types:
- Devices that can plant sprouted tubers.
- Machines that allow you to plant unsprouted tubers.
- Mixed type seeders.
The devices are divided into different types of landing.
It is customary to highlight:
- Single row. The mounts are installed by connecting to a mini-tractor. They are equipped with a potato planter. As a rule, such a unit holds about 140 kg of tubers.
- Double row. Structurally, they are no different from devices of the first type. They are connected by the fact that they are specialized for planting potatoes in small areas, where they can move at a speed not exceeding 15 km/h. They are small in volume, and this guarantees them greater mobility than their counterparts.
- Three and four rows. The devices can be used for planting potatoes on an area of 2 hectares; all work will last no more than 1 hour. The capacity of the device is approximately 550 kg.
Many gardeners interested in a potato planter ask a lot of questions about making one themselves. You must follow the instructions, which will be sufficient to create a working unit.
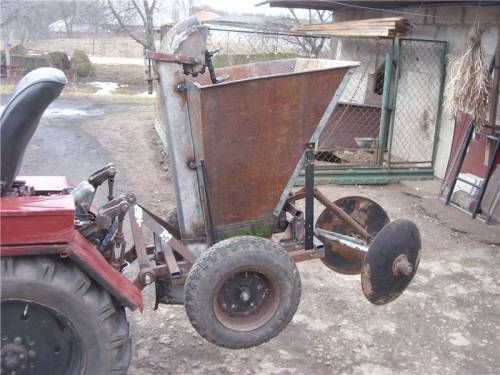
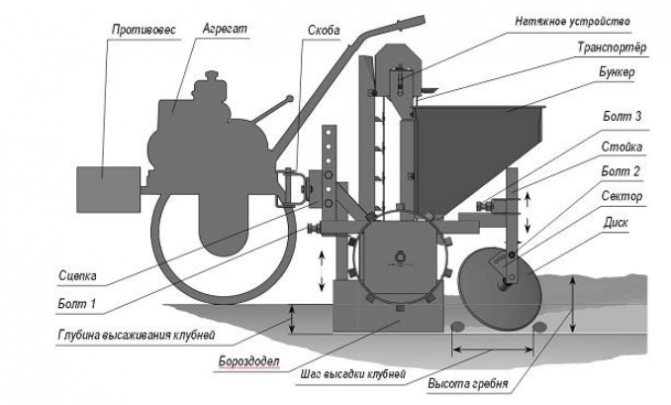
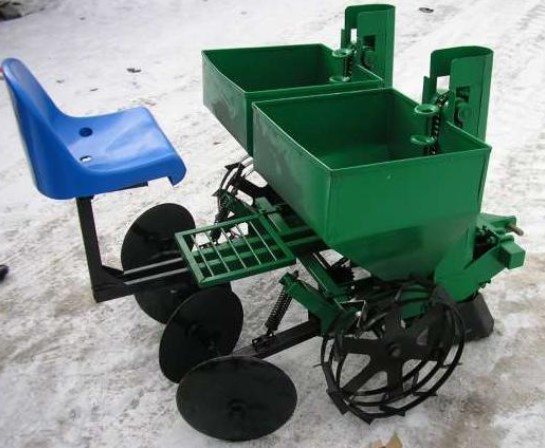
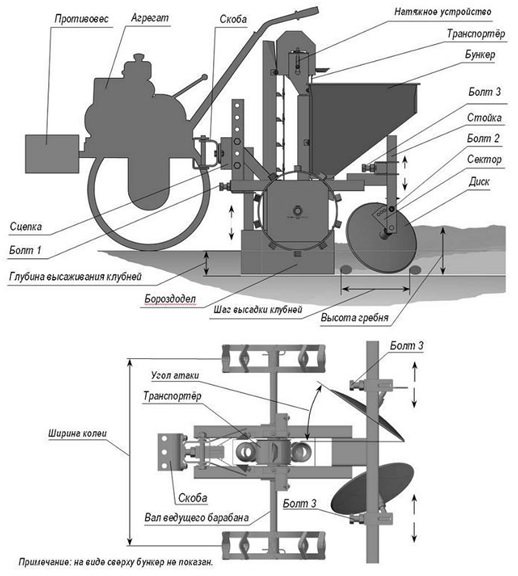
Design and operating principle
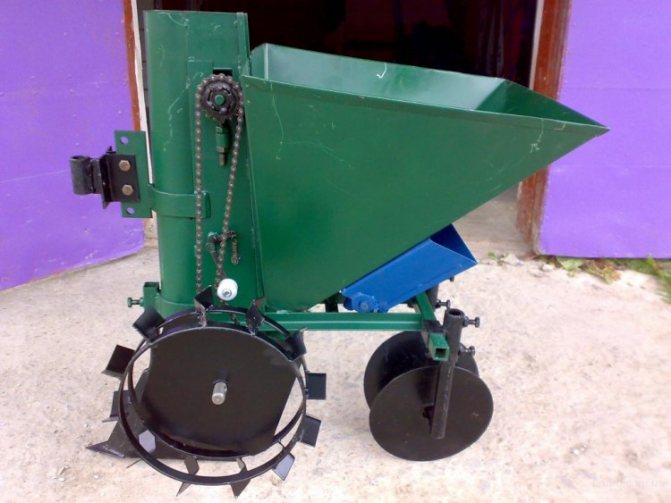
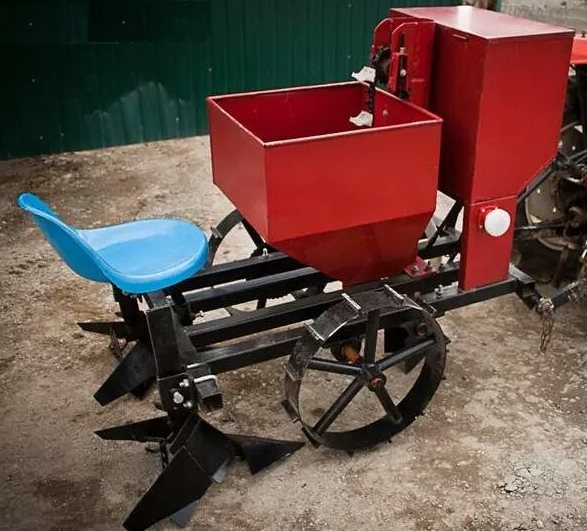
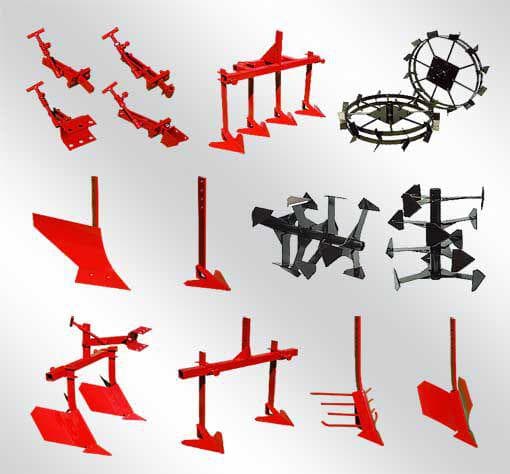
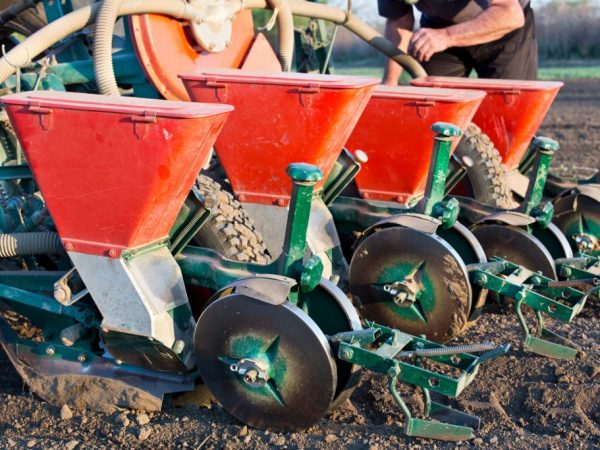
The design of a planter of any model always looks the same:
- Bucket for loading planting tubers.
- Drive frame with wheels.
- Openers for creating furrows.
- Special brackets with cups.
- Groove closures.
If necessary, you can add a little functionality to the planter, for example, install a separate container to add special fertilizer to the soil.
The principle of operation of the potato planter comes down to the following: the tubers are poured into a special hopper-bucket, and from there they are picked up by a special bracket and laid out on the soil. Furrows for planting are created by special openers. When the tuber fits into the grooves, it immediately falls asleep. During the planting process, special parameters are set for planting markings. For example, the distance between seedlings will vary from 15 to 35 cm, and the rows should be spaced at a distance of 50-60 cm.
For mini-tractors with low-power engines, lightweight planter options are most often suitable. If, for example, we have to choose a planter for a specific model of the MTZ 320 mini-tractor, then it is better to opt for a power of 0.6.
How to make it yourself
It is not always possible to purchase equipment on sale, but any device can be made with your own hands. Any work on making various models of nozzles can be done by visiting a forum or website on a specific topic. And, if there is a special video that contains, for example, a drawing of a potato planter for a mini tractor or a photo with diagrams, then any manufacturing assembly will be easy and high-quality.
To design such additional equipment, it is better to select a specific diagram or drawing based on a photo from the Internet.
The manufacture of the planter begins with installing the frame, you need to select channel No. 8, pieces of such metal will do. Special spars are attached to the frame. They will need to be welded to each other using specially selected pipe crossbars.
We select metal arches where they should be located on a special rod. The seatpost supports can be made using special metal corners, and they will need to be secured to the spar. The entire manufactured structure is attached to a special bracket by welding.
All that remains is to make a bunker for potatoes. Plywood, which will need to be covered with drying oil, is suitable for this purpose. On one side, the ripper attachment will be attached to the main frame, and the wheel axle will be attached to the main axle.
A homemade potato planter for a mini tractor, if you follow our recommendations correctly, will not differ from the factory model, and it will take very little effort and money.
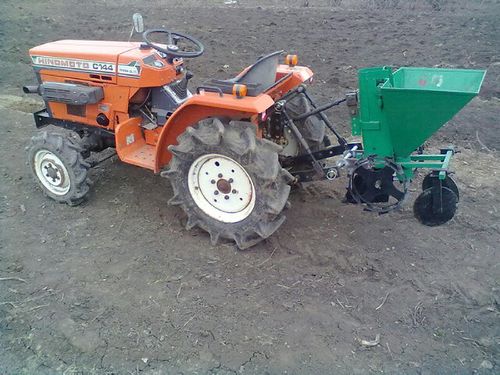
Today, the most popular potato planter models for mini-tractors are manufactured by Xingtai. In terms of design features, this model is often single-row with a planting depth of 80-120 mm. Seed potatoes are placed in two containers, which are used differently. One is for potatoes, the other is for fertilizer. If you need a two-row option, it will fit on a mini tractor with more power.
You can use these planter options for the MTZ-132N tractor. Before you buy a potato planter, you need to know the power of your mini-tractor and decide on the level of your potato planting tasks.
2 comments on the post “Potato planter for a mini tractor: types and features”
How to contact you. I am interested in a potato planter for the MTZ 132N mini tractor. My phone number is 89067536713
Manual potato planter
Potatoes are the most popular crop not only in our country, but throughout the world. It is nutritious, tasty, but difficult to plant.
But large fields should be cultivated using agricultural machinery. So, to dig up and plant potatoes on a plot of 10 acres, a farmer needs to cultivate about 20 tons of land with his own hands. This work is comparable to unloading an entire train. The easiest way to solve this unpleasant problem is to make a manual potato planter. This is a very simple device that almost anyone can make.
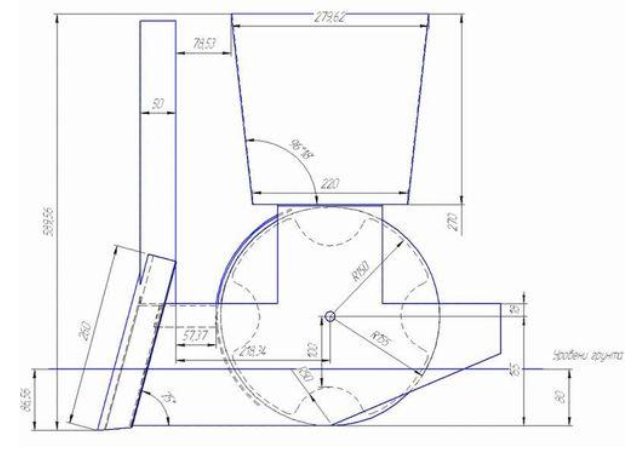
The manual device is a pipe (empty inside) with a hole at the top and a sliding valve at the bottom. For a deeper understanding (including dimensions), we will study in detail the diagram of the device.
Drawings and dimensions of the grain crusher
The pipe must be cut at an angle from below to form a sharp handle, the task of which is to sink into the ground. The bevel contains a sliding type valve. The valve's task is to open only at the moment when the tuber is already inside at the required depth.
To avoid different depths when planting, it is necessary to place a mark at the required distance from the bevel. Such a mark can be a special flat device that rests on the ground and does not allow the pipe to move deeper. This is very convenient, because such a limiter allows you to deepen the tuber downwards, helping with your foot (like a shovel).
The upper part of the device is open; there may be a special container with potatoes and a dispenser, which does not allow several to be sent underground at once.
The practicality of the device is its most important characteristic. Many people try to make a potato planter compact, convenient, and even work on its design. This is all important, but you should never forget about the main task of the device. Potato planters should not be large and heavy, so the pipe should be no more than a meter in length and must be thin-walled.
It should be remembered that the pipe must easily withstand immersion in the ground and pressure from black soil, so the material must be very durable. Cooking it from a sheet of tin is not the best idea, because deformations cannot be avoided.
The valve is usually made of steel. Using a regular door curtain, you can make a simple hinge for attaching a valve. You can make a footrest from a metal corner.
After all components and tools are prepared, you should proceed to the actual assembly:
- Using an angle grinder (grinder), we cut the pipe at an angle, achieving optimal sharpening (the sharper the end of the pipe, the better it will fit into the ground).
- We make a valve cover that should close the pipe tightly enough at the right time.
- We fix the hinge mechanism to the pipe body.
- At a distance of 200 mm from the tip of the pipe, using welding, we install a footrest (its length corresponds to the distances between the bushes that are expected in the future).
- Handles and a container for tubers must be attached to the pipe (you should not install a huge container).
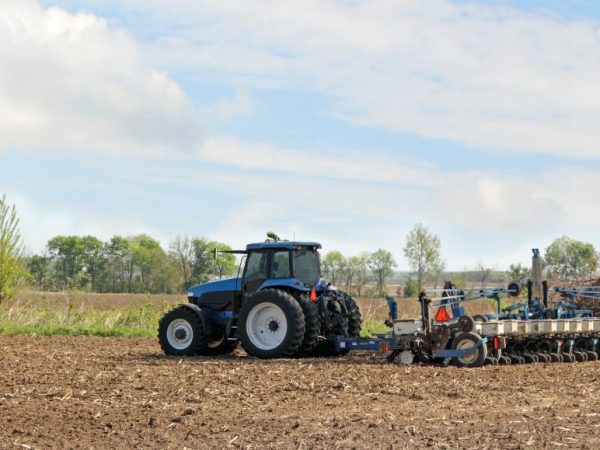
Potato planter for a mini tractor: design, operating principle and types
Planting potatoes takes a lot of effort and time. Especially if the crop has to be planted over large areas. In this case, a potato planter for a mini tractor can help. This equipment makes it possible to plant potatoes in any area, regardless of soil type and weather conditions. Its important advantage is its simplicity of design. Thanks to this, you can make a potato planter for a mini tractor with your own hands, spending a minimum of time and money on it.
All potato planters on the market have almost the same design.
The equipment structure consists of the following elements:
- frame equipped with paired drive wheels:
- a bucket necessary for loading planting material;
- openers designed for making furrows;
- planting brackets equipped with cups or spoons.
Some models of potato planters are designed in such a way that during operation they not only plant potatoes, but also simultaneously add fertilizers to the soil. The design of such implements includes separate containers and devices for seeding.
All potato planters for mini tractors work on the same principle. The tubers are poured into a bucket, from where a special bracket picks them up and places them on the soil. The coulters provided in the design are responsible for making furrows, which are dug in immediately after tubers fall into them.
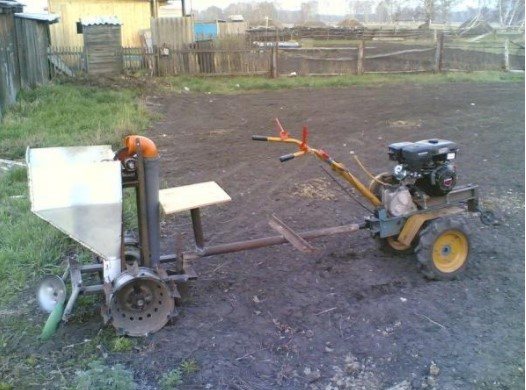
Potato planter for walk-behind tractor
If you have a walk-behind tractor or want to purchase one, then it makes sense to abandon the manual potato planter and go straight to the design of a device designed specifically for the walk-behind tractor. You should always start with the frame, since this is the basis on which all further components and assemblies will be fixed. For the frame, channels (material – steel) of type 8 (size standard) are used.
Such a device faces not only the task of automating potato planting, but also ensuring uniform distribution of bushes and covering them with the right amount of soil. In addition to making work easier, such a potato planter also improves the quality of planting.
We invite you to familiarize yourself with the DIY Florarium (85 photos): what it is, ideas on how to make it
Since the walk-behind tractor is designed for small equipment, this means that there are no special requirements for strength for the bunker; You can use regular plywood 1 cm thick. The load capacity of such a device will be about 0.25-0.3 centners.
The part of the device in which the tubers will move is called a container. The main requirement for the container is the presence of a lift, which is fixed vertically and is equipped with special bowls with diameters of 50-80 mm. The operation of the entire mechanism is carried out thanks to a chain transmission to the drive wheel.
In order for the tubers to enter the soil, a special seed tube is used, which must be placed at the bottom of the elevator and be pressed by the component that performs the raking.
An 80 mm sprocket is introduced into the mechanism, which guarantees transmission through the chain. The walk-behind tractor uses a star with a diameter twice as large – 160 mm.
Single-row potato planter
To implement such a system, you can use a chain from a regular bicycle or moped. With the help of such automation, the distance between future potato bushes will be about a third of a meter.
How to make a potato planter for a mini tractor with your own hands?
In order to make a durable, balanced potato planter for a mini tractor, you should prepare drawings before making it. They must indicate the dimensions of the parts and methods of their installation into the overall design of the equipment.
Tools and materials for work you will need:
- metal sheets, 2 and 3 mm thick;
- channel No. 8;
- set of fasteners;
- welding machine;
- Bulgarian;
- drill;
- set of wrenches.
Making a homemade potato planter should be done in this order:
- First you will need to make a strong frame for a potato planter for a mini tractor. For the frame, it is best to use channel No. 8, to which 2 spars must be welded. Next, the entire structure should be strengthened with several stiffeners;
- It is necessary to weld fasteners to the side members in their front part, which will be required to install the potato planter on a mini tractor;
- Next, you need to weld 2 strips cut from a metal sheet, 2 mm thick, to the side members. The strips must have a width of 2.5–3 cm. During the welding process, the plates must be fixed at an angle;
- On the other hand, a bunker for planting potatoes should be welded to the metal strips. It can be made from either metal or plywood. The main requirements for a bunker are maximum strength with minimum weight. It is easiest to work with plywood up to 12 mm thick. You need to cut out the walls of the container from it and connect them into one strong structure. Its corners will need to be reinforced with metal corners. Foam rubber should be placed on the bottom and inner walls of the container, which will protect the tubers from damage;
- After this, you will need to weld discs or a plow for a mini tractor to the lower part of the potato planter’s frame - these elements are intended for filling rows of potatoes with soil;
- Next, the homemade potato planter needs to be equipped with wheels. 2 identical rings cut from an old gas cylinder will serve their role well;
- The main problem in the manufacture of equipment is the search for stars. A two-row homemade potato planter must be equipped with a certain number of teeth. Sprockets with 15 and 40 teeth are suitable for this - they can be found in the design of an old combine:
- After installing the stars, you will need to install a chain on which you need to attach the blades. To make them, it is best to take sheet metal, but using wire will be a much simpler method. The landing pitch of the blades depends on their distance from each other. It is best to place them at a distance of 25–27 cm. You can learn more about making a homemade potato planter from the video.
A potato planter for a mini tractor manufactured according to the specified algorithm will demonstrate high performance and stability when working in areas with hard obstacles.
Instructions
Many people ask the question - how to make a potato planter with your own hands, the drawings of which are on the Internet? Indeed, there are enough recommendations on the Internet with detailed descriptions and dimensions, following which you can make a fairly efficient unit.
In this case, it will be something like this:
- You need to start, of course, with the manufacture of a frame structure on which the remaining components will be attached. To do this, we will need channels number 8, from which two longitudinal spars are welded, connected to each other by three transverse strips of steel.
- In front of the structure, you need to weld an arch with mounting forks going to the central rod.
- The frame can be strengthened with two inclined steel beams, which must be secured with the other side to the middle of the arch. Next, you need to secure the seatpost support, made from a 5x5x0.5 cm corner. We attach it to the spar with our own hands.
- A plastic type bracket must be welded to the inclined beams. It is to these beams that the potato tank will be attached.
- For the tank we will need ordinary plywood, the thickness of which will be approximately 12 mm.
We cut out all the sides of the bunker, and then fasten them together with steel corners. By the way, it wouldn’t hurt to treat the box with drying oil to protect it from moisture. - Rubber sheets can be installed inside the tank so that the potatoes are not damaged by its walls during movement. Next, we attach the hopper to the bracket using two bolts.
- Next, you need to attach the wheel axle and ripper to the bottom of the frame. In principle, you can look at the drawings of a potato planter made by yourself for greater clarity.
- The wheel axle is a structure made from various parts. As a basis, you can take an ordinary steel pipe, at the ends of which you need to install trunnions. It is difficult to give exact dimensions here, depending on what diameter of pipe you are using.
- Therefore, the trunnions need to be adjusted to these dimensions on a lathe.
- You need to drill holes in the steel pipe into which special pins with spikes will be installed. At the end they must be brewed.
- The wheel axle must be secured using steel clamps, using 4 M16 bolts.
- As a wheelbase, you can use wheels from old agricultural machinery. If there are none, then you need to work a little in this regard.
- You need to weld hubs onto the wheels, on which you then need to install a pair of bearings. Next, we place the bearings on the studs and protect them with a felt pad so that they do not become excessively dirty.
- The part holding the rippers is presented in the form of a square of steel rods welded together. At the ends of the square you need to weld clamps made of 6 mm sheet steel. The racks of the cultivator blades will be located inside them.
- The seeder for this unit is made of a steel pipe with a diameter of 100 mm. At the same time, the thickness of the pipe wall must be at least 3 mm so that the structure does not bend during operation.
- A furrow cutter made of 6 mm thick sheet steel is welded to the bottom of the pipe.
- Be sure to attach a seat for a person to the frame, as well as a footrest.
The frame structure of the seat itself is made of corners welded together. The seat can be made from ordinary boards, which are covered with something soft - foam rubber, for example.
In principle, the dimensions of a homemade potato planter are indicated approximately, based on a specific case. In any case, this scheme is working, so you can safely design the unit based on these parameters.
A homemade potato planter for the T 25 is made in a similar way, because there is no definite meaning on what will act as the main traction machine - a walk-behind tractor or a mini tractor. Of course, the power indicators will be different, but the design of the potato planter itself is almost identical.
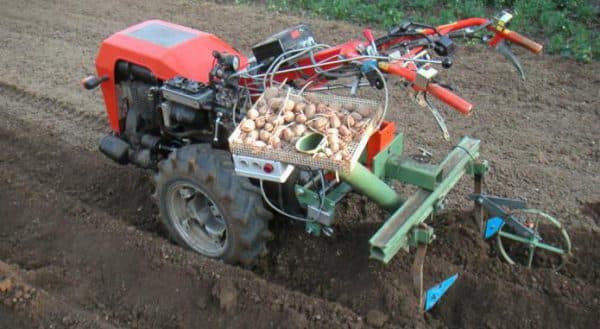
In general, the process of planting potatoes using a homemade potato planter is as follows:
- Potatoes are poured into the tuber tank. You need to put a couple of bags of potatoes on top so as not to waste time when the tubers in the bunker run out.
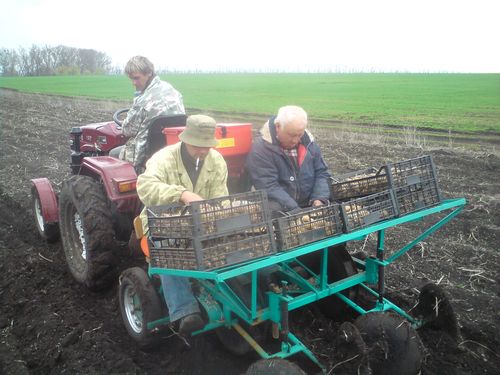
- One person sits on a seat located on the potato planter, and the second person sits on either a mini tractor or a walk-behind tractor (see).
- Movement should be carried out at a speed of no more than 1 km/h.
- A person sitting on a potato planter alternately throws tubers into tuber pipes located on both sides.
- After the tubers fall into the holes, they need to be covered with earth. It is for this purpose that discs were designed, which cover the holes with earth while rotating.
You can change the depth of removal of the top layer of soil that these discs produce. To do this you need:
- Adjust the stepladders that press the support to the posts by loosening them.
- You can slightly change the angle at which these disks are located. To do this, you need to turn them a little in the right direction.
After completing the planting process, all that remains is to remove the traces left by the walk-behind tractor and potato planter. In this case, baking powder will help us, i.e. cultivator blades located on stands. By the way, the degree of their immersion in the ground can also be adjusted.
A homemade potato planter with detailed dimensions can be a great way to save money that would inevitably be incurred if you purchased a potato planter from a specialty store.
Considering that the average cost of this unit is about 15 thousand rubles, this saving looks especially justified. At the same time, there are no special costs for the necessary materials during production, because the components are used from old, worn-out units.
Many people ask the question - how to make a potato planter with your own hands, the drawings of which are on the Internet? Indeed, there are enough recommendations on the Internet with detailed descriptions and dimensions, following which you can make a fairly efficient unit.
Algorithm of actions
The algorithm of actions, in this case, will be approximately as follows:
- You need to start, of course, with the manufacture of a frame structure on which the remaining components will be attached. To do this, we will need channels number 8, from which two longitudinal spars are welded, connected to each other by three transverse strips of steel.
- In front of the structure, you need to weld an arch with mounting forks going to the central rod.
- The frame can be strengthened with two inclined steel beams, which must be secured with the other side to the middle of the arch. Next, you need to secure the seatpost support, made from a 5x5x0.5 cm corner. We attach it to the spar with our own hands.
- A plastic type bracket must be welded to the inclined beams. It is to these beams that the potato tank will be attached.
- For the tank we will need ordinary plywood, the thickness of which will be approximately 12 mm.
We cut out all the sides of the bunker, and then fasten them together with steel corners. By the way, it wouldn’t hurt to treat the box with drying oil to protect it from moisture. - Rubber sheets can be installed inside the tank so that the potatoes are not damaged by its walls during movement. Next, we attach the hopper to the bracket using two bolts.
- Next, you need to attach the wheel axle and ripper to the bottom of the frame. In principle, you can look at the drawings of a potato planter made by yourself for greater clarity.
- The wheel axle is a structure made from various parts. As a basis, you can take an ordinary steel pipe, at the ends of which you need to install trunnions. It is difficult to give exact dimensions here, depending on what diameter of pipe you are using.
- Therefore, the trunnions need to be adjusted to these dimensions on a lathe.
- You need to drill holes in the steel pipe into which special pins with spikes will be installed. At the end they must be brewed.
- The wheel axle must be secured using steel clamps, using 4 M16 bolts.
Wheels from old equipment - As a wheelbase, you can use wheels from old agricultural machinery. If there are none, then you need to work a little in this regard.
- You need to weld hubs onto the wheels, on which you then need to install a pair of bearings. Next, we place the bearings on the studs and protect them with a felt pad so that they do not become excessively dirty.
- The part holding the rippers is presented in the form of a square of steel rods welded together. At the ends of the square you need to weld clamps made of 6 mm sheet steel. The racks of the cultivator blades will be located inside them.
- The seeder for this unit is made of a steel pipe with a diameter of 100 mm. At the same time, the thickness of the pipe wall must be at least 3 mm so that the structure does not bend during operation.
- A furrow cutter made of 6 mm thick sheet steel is welded to the bottom of the pipe.
- Be sure to attach a seat for a person to the frame, as well as a footrest.
The frame structure of the seat itself is made of corners welded together. The seat can be made from ordinary boards, which are covered with something soft - foam rubber, for example.
In principle, the dimensions of a homemade potato planter are indicated approximately, based on a specific case. In any case, this scheme is working, so you can safely design the unit based on these parameters.
Find out in more detail how to make a potato planter for a walk-behind tractor with your own hands: dimensions, drawings, pictures.
Potato planter for T-25
A homemade potato planter for the T 25 is made in a similar way, because there is no definite meaning on what will act as the main traction machine - a walk-behind tractor or a mini tractor. Of course, the power indicators will be different, but the design of the potato planter itself is almost identical.
Important tips for making a potato planter
You can operate homemade equipment for planting potatoes even if instead of a metal or plywood tank, a tank from an old washing machine is installed. Despite its low capacity, the use of this element will save time on making a homemade tank.
It is very important to pay attention to the wheels for the potato planter. These parts should have a large width so that they will not trample loose soil. The equipment seeder can be made of a simple pipe with a diameter of 10 to 25 cm.
The coupling mechanism between the potato planter and the mini tractor must be selected taking into account the model of the existing agricultural machine and the coupling mechanism provided in its design.
The single-row potato planter is easier to operate. During operation, this design makes 1 furrow, the step of throwing out potatoes in which depends on the width of the blades. To prevent planting material from getting stuck in the tank or seeder, tubers of approximately the same size should be selected in advance. Another option is to make additional space for an assistant who will supervise the process of planting potatoes.
To do this, you will need to attach an old car seat to the frame of your homemade equipment.
Potato planter for walk-behind tractor
The scope of application of a manual potato planter is small summer cottages, since some physical effort is still required. The easiest circuit to make.
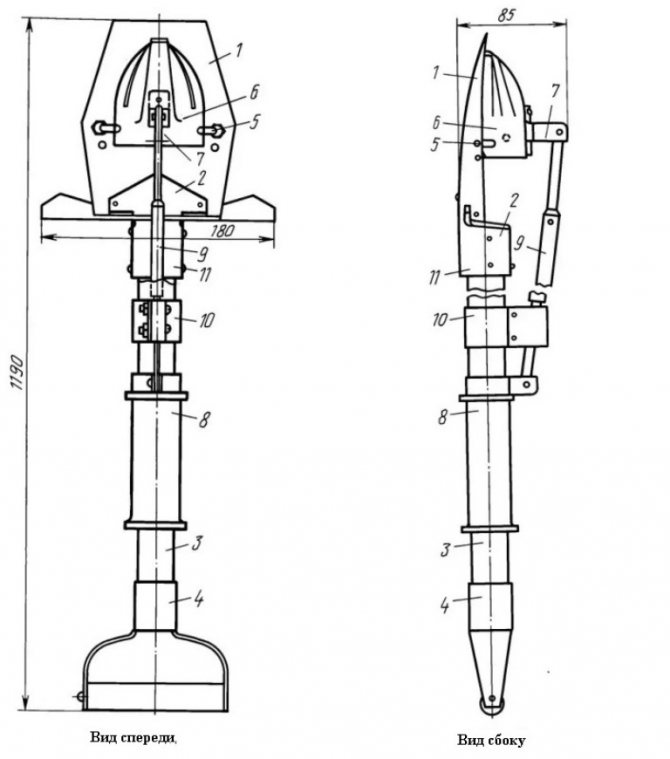
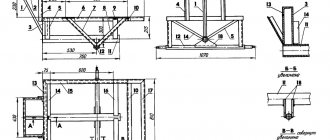
1 – pointed metal sheet.
2 – pads. 3 – pipe as a cutting. 4 – holder. 5 – bolts. 6 – container for potatoes. 7 – bracket. 8 – handle. 9 – pusher-rod. 10 – coupling. 11 – bushing In the drawing, the structure is represented by a handle made of a metal pipe, on which the tip-base and a 20-centimeter limit bar are fixed by welding. The latter also serves as a foot rest. The tip can not be collected separately, but cut at an angle to obtain a pointed edge that easily penetrates the soil.
The container for tubers is fixed on the outside of the tip with two bolts, then a container and a push rod are attached to it. At the upper end of the device, a holder is formed with a movable handle and a coupling, which will control the pusher and bracket, as a result the tuber will fall exactly into the planting location.
How to use
It is recommended to use a manual potato planter on pre-treated soil.
Work algorithm:
- Fill the container with planting material.
- Install the device at the desired location on the soil surface.
- Press the limit bar with your foot and drive the blades into the soil.
- By tilting the handle of the tool towards you and away from you, create free space for the tuber, which falls into the desired place by pressing the handle of the device. Next, remove the tip of the potato planter from the ground.
- Repeat the process again for a new tuber.
We suggest you familiarize yourself with How to prepare canned fish in an autoclave at home?
Automated potato planters use different types of designs. They are:
- Spoon-shaped Peculiar spoons are attached to a conveyor-type belt or belt, which forms a wide row spacing and, simultaneously with planting potatoes, can be used to treat the soil with fertilizers or other means. Thanks to spoons, there are practically no gaps in planting tubers.
- Belt. Tubers are planted using belts with indentations. The main advantage of the flat-belt design is the careful handling of club plants, which, even when sprouted, are practically not damaged.
- Spinning structures are used for sowing chopped potatoes.
Single-row and double-row potato planters work with mini-tractors with a power of 18-25 horsepower. In the classic version, a potato planter for a tractor consists of a hopper for tubers, a frame, a bipod-plow for digging a furrow, conveyor-type fasteners for capturing tubers and discs for sealing the furrow.
Work algorithm:
- The plow bipod forms the furrow.
- The conveyor guides take the tuber out of the hopper and throw it into the furrow.
- The discs fill the grooves.
Depending on the power of the existing tractor and the volume of planting work, the potato planter can be made either single-row or double-row.
Manufacturing
They start by installing a frame made from size 8 channel. Spars with cross members are attached to the frame to form a frame.
Then, in front of the frame, fasteners are installed by welding to connect to the mini-tractor and metal elements are welded to the side members to secure the bunker. A plow coulter and a wheel axle are mounted at the bottom of the frame.
The bunker container for potatoes is cut out of plywood and connected with metal corners. To prevent damage to the potatoes, it is advisable to line the bin with soft material.
In principle, any container can become a hopper, for example, a tank from an old washing machine.
The wheels of the potato planter should be wide so as not to create excessive load on the soil. Some country craftsmen advise making wheels from old gas cylinders, cut crosswise, and with metal strips welded to the outside for better traction with the soil.
The seeder is a metal pipe with a diameter of 10 cm, cut to height.
For a potato planter paired with a mini-tractor, it is advisable to provide a place for an assistant who will control the process.
Author of the article: director and editor-in-chief of the site. Hereditary gardener and agronomist
For production you will need: a container in which the potatoes will be located (you can use an old tank from a washing machine), sprockets that rotate the wheels to the feed mechanism, a chain, a frame made of a metal corner, wheels, wire, tools. Before manufacturing, read the drawings of the potato planter on the Internet.
All elements can be bought in a store or taken from old equipment. If you have the strength and desire, you can also make a fertilizer dispenser, because with them the crop will grow better.
First, weld the frame structure from the channels. You will get 2 spars, fastened together with 3 strips of steel. An arch with forks that are directly directed to the center rod is firmly welded to the front. Then we attach the bracket by welding, there will be a container for potatoes.
For this tank, take thin plywood, approximately 13 mm. Next, we make the walls of the bunker and connect them with corners. We fix our bunker to the bracket.
Take the wheelbase itself from unnecessary equipment, hubs are well welded on them and 2 bearings are put on.
The seeder can be made from a tube with a diameter of up to 9 mm, but the thickness must be at least 3.5 mm. Attach a furrow cutter to the bottom of the pipe.
Insert the seat into the finished frame, be sure to cover it with warm and soft fabric.
As we see, you can make or buy a potato planter, but it will definitely make life easier for the farmer. Since the landing time will be reduced, and physical, hard work will not be needed.
Creating a unit begins with collecting all the necessary materials, spare parts and tools. As well as preparing the site where welding and other work will be carried out.
Building a potato planter is not an easy task. But it will not be difficult for home craftsmen to make such a technique. To do this you will need to collect the following parts:
- metal corner or profile square pipe for the frame;
- axle with bearings for lugs;
- two gears and a chain for the conveyor;
- steel wire 5-6 mm;
- any conical bunker or make it yourself from tin;
- lugs (they are made from a small gas cylinder).
And you will also need tools:
- grinder with a set of cutting discs;
- DC welding machine with electrodes;
- drill, metal drills;
- other set of metalwork tools.
Now you can start assembling, following the instructions and advice of skilled craftsmen.
To make a potato planter with your own hands, drawings, necessary diagrams and detailed dimensions must be prepared in advance. It is important to know the order of work:
- Construct the frame. It is welded to a size of 60 x 30 cm from a profile pipe. Then an axle with a sprocket is mounted on it. This will be the main drive of the planter.
- Grousers are made. They are often made from a gas cylinder. It is cut in a circle and two rings 8-10 cm wide are obtained. Then hubs are welded onto them and attached to the axle using studs. The wheels must be removable.
- They are making a bunker. It is made from sheet metal 1 mm thick or taken ready-made from an old washing machine. The container should hold approximately 30-40 kg of potatoes.
- They are making a conveyor. It is a chain with welded cells with a diameter of 5-6 cm.
They are made of steel wire and welded every 8-9 links, which allows the tubers to be laid at a distance of 30-40 cm from each other in one row. Then an unloading pipe with a diameter of approximately 100-120 mm is attached. Through it, the root crops flow directly into the furrow, so the lower edge of the pipe should be in contact with the furrow maker. Now it works like this:
- Install the mount to the walk-behind tractor. It is made from channel bars or corners. This unit must be adjustable vertically for ease of coupling with the walk-behind tractor.
- Attaching the hiller for filling holes. Two discs are installed behind the frame, with the help of which the potatoes are covered with soil. This device resembles an ordinary hiller with adjustable angles of rotation.
- A plow is installed to create a furrow. It is attached to the conveyor pipe. It works on the principle of a ral, that is, a soil loosener. They make it themselves or use a plow from agricultural cultivators. The purpose of the plow is to make a furrow for laying potatoes.
We suggest you read What needs to be done on the site in the fall
Thus, all potato planting is done automatically and only due to the rotation of the planter wheels. Sometimes individual craftsmen add a fertilizer hopper, which meters the supply of the substance into the hole.
In the same way, they make a potato planter for a mini tractor with their own hands. Drawings of it are widely presented on homemade websites. As a rule, it is double-row, and therefore has two bunkers and two conveyors. The operating principle is absolutely similar to a single-row planter. It is made both mounted and trailed.
After production, the potato planter must be tested and adjusted for normal planting. The unit must meet the following parameters:
- the depth of the tuber is 12-15 cm. This is regulated by the height of the furrow plow;
- the distance between potatoes in a row is 30-40 cm. This depends on the diameter of the lugs and the number of conveyor cells. This calculation is made at the stage of manufacturing the unit;
- the distance between potato rows is 60-70 cm.
These are optimal conditions for good germination and, therefore, a large harvest.
Potato planter for mini tractor - fast, convenient, high quality
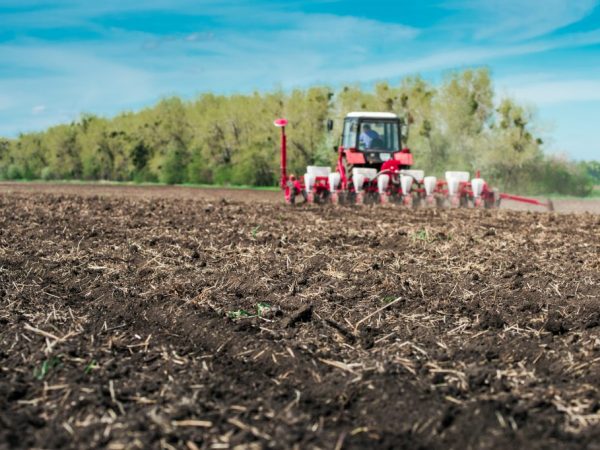
Planting potatoes is a labor-intensive and tedious process.
Today, many types of agricultural machinery have appeared on sale that are capable of taking on this work completely. We are talking about mini tractors, as well as attachments for them, in particular, a potato planter. Potato planters for mini tractors come in different types, each of which differs in design, method of planting tubers, and also in price. Not everyone can afford to purchase quite expensive tools, so in this article we will consider the option of creating a potato planter for a motorized tractor or mini tractor with your own hands.
Choosing the right potato planter for a motorcycle tractor

To plant tubers, you need to spend a lot of effort and time, since they must be located at a depth of about 20 centimeters. Today this process can be automated by planting potatoes with a motor tractor. The equipment itself will prepare the soil, and the potato planter will cope with its task in the best possible way.
There is a huge selection of potato planters for sale for all types of mini tractors. To find a suitable tool model, you first need to decide on some nuances:
- Price. You must immediately determine for yourself the amount you are willing to spend, since the price range is almost limitless. You can buy either a very budget model or a very expensive one, which will have additional functions;
- Performance. You must know the size of the field that will be planted;
- Duration of work also plays an important role;
- You should also know the model of your mini tractor, since the mount is different for all machines. Consequently, not all potato planters will fit one mini tractor.
Types of potato planters for mini tractors
There are many different types of potato planters designed to work with mini tractors. Depending on the number of rows processed, they are:
- single row. These planters are easy to use. Suitable for mini tractors with a power of about 18 horsepower, and for medium-sized fields;
- double row. They perform well on equipment with a power of more than 25 horsepower, in large fields.
According to the type of planting of plant tubers, potato planters are divided into the following types:
- spoon The design is a system consisting of spoons that are attached to a belt. Has a lot of advantages. So, in parallel with planting potatoes, a ridge is formed and the soil is treated with special insecticidal compounds. The row spacing turns out to be quite large, which is very useful for future plants, and the design also prevents gaps during planting by feeding the tubers with spoons;
- flat belt Sowing of tubers is carried out using belts. This also includes another type, such as feeding with shaped belts, in which there are recesses in the form of spoons. This unit has one undeniable advantage - even already sprouted tubers are not damaged;
- piercing. With this method, already cut tubers are sown;
- There is another unusual type of potato planter called French. This planter is designed for planting sprouted tubers. A conveyor belt delivers the potatoes to the hopper. After this, he leads the tubers into the working chute, where the potatoes are arranged linearly. And only then the plants fall into the ground with the help of spoons.
Potato planters are also divided into types according to the need for human participation in the planting process:
- automatic. Designed for use by one person. You will only need to operate the equipment and add potatoes to the hopper as needed;
- semi-automatic. During work, the participation of at least two people is necessary - one operates the equipment, and the second throws the potatoes into the ground.
Based on all of the above, we can conclude that choosing a potato planter for a mini tractor is a rather complex process, and it will be difficult to do without the help of a specialist. To make the right choice, carefully study the instructions for your equipment, as well as the planter itself.
Purpose and types of potato planters
The very name of the unit suggests that it is intended for planting potatoes.
When working together with a walk-behind tractor, this happens automatically. You just need to load the tubers into the hopper. All potato planters are divided according to the number of planting rows. This:
- Single row units. They can be mounted or trailed. They are most often installed on a walk-behind tractor and cultivate 20-30 acres of arable land. They have one conveyor for feeding tubers and a hopper that can hold 100-120 kg of potatoes.
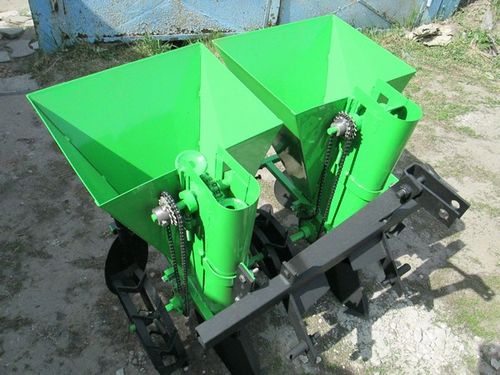
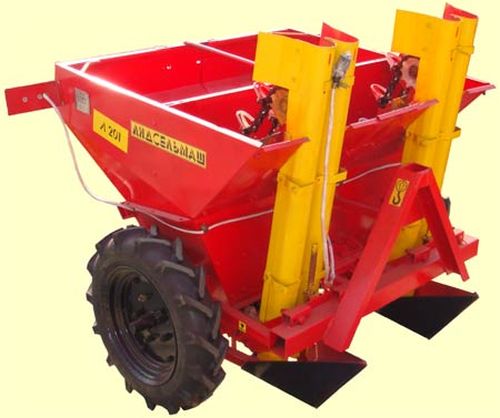
- Double row. Such units can already be attached to a mini-tractor, which weighs more than a walk-behind tractor and is capable of pulling a larger potato planter. This device has two feed conveyors, and the bunker can hold up to 250 kg of tubers.
- Four-row potato planters. These devices are industrially manufactured and DIYers do not make them. The units have two large containers and each of them has a pair of conveyors. Using this equipment, potatoes are planted on 2-3 hectares within an hour. The bunkers can hold up to 250-300 kg of potatoes. These potato planters are usually equipped with dispensers for treating tubers and simultaneously applying fertilizer.
DIY potato planter
Any factory-made attachments, including a potato planter, are quite expensive. Not everyone is ready to spend an impressive amount of money on such a tool. But there is a way out - you can make a planter at home.
The entire production process must begin with the creation of a drawing. It is thanks to the diagram that you can accurately calculate the size and type of structure. This will guarantee that the end result is suitable for your mini tractor and in the future, potato planting will be carried out efficiently.
You will need to make the following items:
- Frame. The remaining elements will be located on it;
- Container. It is in this that you will pour the potato tubers;
- Mechanism for feeding tubers into holes;
- Rippers for creating holes;
- Wheels;
- A mechanism that will bury the holes in which the tubers are located.
In principle, this is the simplest version of the planter. You can additionally add a reservoir for fertilizer, which will be supplied to the holes along with the tubers. You can also add an additional element for feeding potatoes, that is, making the potato planter double-row.
The process of creating a homemade potato planter for a mini tractor:
- The first step is to make a frame, which consists of channels and spars welded together, which are located longitudinally;
- At the front of the structure there is an arch and a fork, and at the side there are elements for planting and digging holes;
- Wheels must have lugs. Between the wheels you need to attach a disk of wood about 6 centimeters thick, which will have four semicircular grooves. This disc is necessary to grab the potatoes and throw them into the holes;
- The potato bin is made of a sheet of metal about 3 millimeters thick. You can take simple plywood, but the structure will not be as strong and durable. The walls of the bunker are welded, and rubber is placed on the bottom so that the tubers are not damaged during operation;
- After this, you can make a seat and attach it to the wheel axle, on which two wheels are located. All this is mounted on the frame;
- Furrow cutters are located at the rear. They are necessary for digging holes.
We also bring to your attention some tips that will help make attachments more practical and convenient:
- The potato planter is quite large in size, so additional weighting can be installed on the minitractor so that the machine does not tip over during operation;
- The landing speed should not be high - about 1 kilometer per hour;
- You can adjust the inter-row space and the distance between tubers using stepladders, which you need to either loosen or tighten.
As you can see, making a potato planter is quite simple. It is only important to have the tools and necessary materials, as well as the desire. In this case, the planter will have characteristics that are not inferior to factory models.
Semi-automatic agricultural implements
Semi-automatic systems are used for planting standard and germinated seeds, and the tubers can be cut or whole.
The unit is equipped with a revolving planting apparatus, which consists of a cellular drum.
The seed material is supplied manually by the operator. The design also includes a coulter necessary for opening the furrows. A disk is mounted behind the unit, which is necessary for forming the ridge.
How to make a potato planter for a mini tractor with your own hands
When mass planting potato tubers, it is important that this process occurs quickly and easily. It is difficult to produce “Russell” potatoes in holes with your own hands, especially on large areas. Therefore, you should look for a faster way to do this. One option is a potato planter for a mini tractor.
Do-it-yourself potato planter for a mini tractor
The main advantage of using such a device is the uniform distribution of planting material. This increases not only the volume of the harvest in the future, but also its quality.
Purpose of potato planter
The main purpose of a potato planter for a tractor is to plant tubers of unsprouted potatoes. In addition, with the help of such a device you can fertilize soil of all types in any area (mountainous is an exception). In addition, such a device is universal. In one pass, in addition to the planting process itself, he can form furrows using a plow and create beds with a special disk.
The main purpose of mini potato planters is to simplify the process of agricultural work.
When we dig with such equipment, a person completely relaxes. In addition, proper use of the device allows you to plant potatoes evenly in a single-row or double-row method. But the main problem is that not many farmers can afford a potato planter for a mini tractor because of its high price.
A product from domestic manufacturers will cost the buyer from $200 to $500. The price may vary depending on the functional features of the device. The most famous planters are KS -1 and 2, 2 MBS, L - 201, Scout T-25, etc. Foreign ones are even more expensive. A used device is cheaper – from $80. But, given the wear and tear of individual parts of the potato planter for a mini tractor, the price for such a device is still too high.
How the device works
Not a complicated operating principle
A do-it-yourself potato planter for a mini tractor will not be inferior to purchased options if all the features are taken into account, from the choice of materials to the operating principle of all mechanisms. The operation of such a device is based on the simple interaction of two stars and a chain with blades:
- While the device is moving, the wheel axle rotates.
- A star is installed on the wheel axle (as on old domestic combines), which also rotates.
- Vertically, above one star there is another. Between them there is a chain with blades, which during movement captures and scatters the tubers.
You can also make discs that will dig ditches along a certain track width. In addition, the container itself where potatoes are transported can be made in any volume that its owner wants. Limitations are present only in the availability of material and human desires.
Types of potato planters
The main advantage of a do-it-yourself potato planter for a mini tractor is its ease of design. Unlike purchased models, which work only with certain brands of large and small tractors (MTZ 80/82 (Belarus), 132n, etc.), a homemade device is suitable for any vehicle.
There are 2 types of potato planters for mini tractors. They make single-row and double-row devices.
A single-row machine is simpler and less efficient. Double-row devices are more powerful, simplify and speed up the planting process. In addition, if the farmer has correctly calculated drawings with the dimensions of all structural elements, then such a device can be attached to a monoblock.
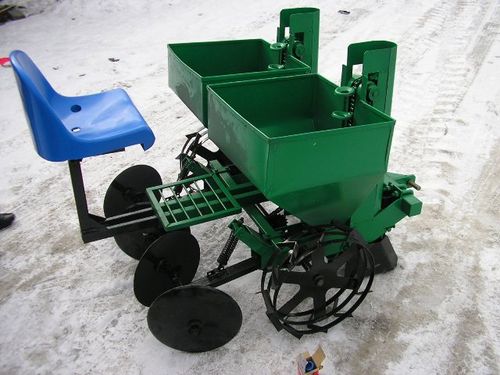
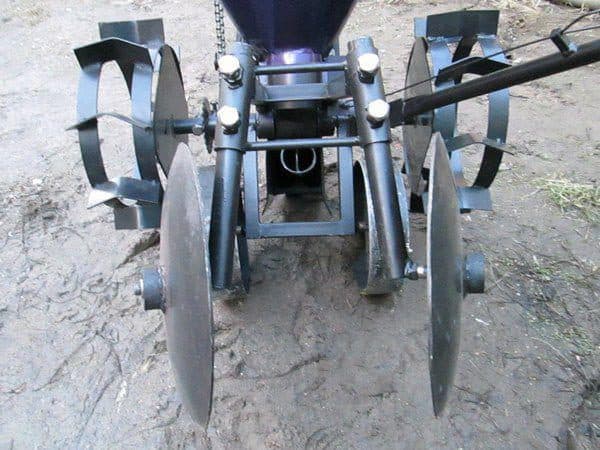
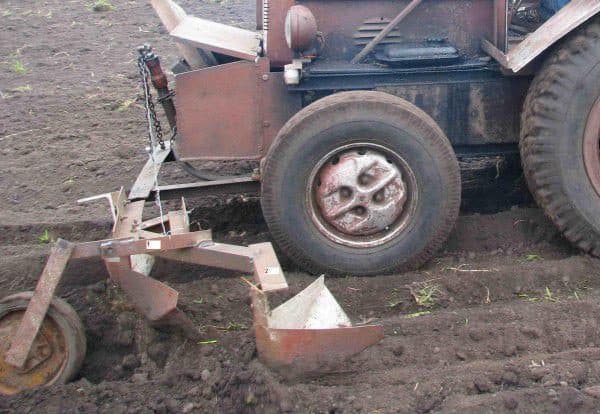
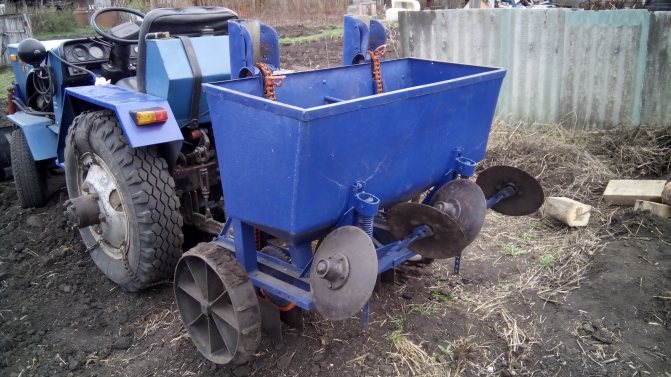
A two-row potato planter for a mini tractor consists of the following structural elements:
- Bunker for planting material.
- Frame with wheels.
- Bipod for earthworks.
- Mounts with bowls for planting tubers.
- Discs for backfilling soil.
The only difficulty that distinguishes a home-made device from a purchased Chinese or domestic model is the lack of a mechanism for adjusting the volume of fertilizers. But, if a person wishes and has his skills, it is also possible to build such a mechanism. It may also be difficult to adjust the row width. A two-row machine will have the characteristics that a person will set for it during manufacture.
Necessary materials
A potato planter can be made at home, because it does not require any rare components or special tools. Homemade potato planters, drawings of which can be freely found on the Internet, are made from the following materials:
- a frame consisting of steel pipes and angles for attaching other structural parts to it;
- reservoir (hopper) for potato tubers;
- gears that will power the entire landing mechanism;
- steel parts that form the holes in which the potatoes will be planted, as well as burying them after that;
- wheelbase.
These are all the components of the design of a homemade potato planter that need to be made or taken from old agricultural equipment. Naturally, the work cannot be done without a welding machine, an angle grinder, as well as the presence of various channels, spars and other related materials.
You can also make a fertilizer dispenser for a potato planter with your own hands, with the help of which you will simultaneously plant and fertilize the holes. This is a fairly common phenomenon, because when planting by hand, they often use a mixture of ash and chicken droppings, or manure, with the addition of phosphate fertilizers.
This, of course, is not necessary, but additional fertilizer will contribute to the rapid ripening of the crop, which is important in our regions where the summer is quite short.
Design Rules
It is best to design the device using ready-made drawings, which already have all the necessary dimensions and a sketch of the device itself. The fact is that most of the devices that can be seen in the video taken by the farmers are suitable for any vehicle. Potato planter for tractor T 40, T80 (82), Neva, Salyut and other brands and models, is assembled taking into account the same features. Most often, the device is assembled like this (single-row or double-row type of device does not matter):
- 2 spars are welded to the frame of the device, which is channel No. 8. The structure is strengthened with transverse ribs.
- Fastenings are welded to the front part of the side members, with the help of which the device will be connected to the T 40, T 80, MTZ tractor, etc. (despite the multifunctionality of the device, it is better to review/modify the possibility of connecting it to the tractor).
- 2 metal strips 25-30 mm wide are welded to the side members. The length is taken from the dimensions in the drawing. Place them at an angle.
- A hopper for planting material is welded to the other end of the metal strips.
- A plow or discs are welded to the bottom of the frame.
Potato containers can be made from either metal sheets or plywood.
The main thing is that the structure is strong, but not heavy. It is easier to work with wood whose thickness is no more than 1.2 cm. According to the available drawings and the dimensions indicated in them, it is necessary to cut out the walls of the tank and connect them into one structure, securing them at the corners with a metal corner. To avoid damage to the potatoes, foam rubber or other softening material can be placed on the inside of the tank.
The wheels of the device can be taken from a gas cylinder by cutting off 2 transverse rings from it. The main problem is the stars. A two-row machine must have a certain number of teeth. On the stars, their number should be 40 and 15. It is better to find ready-made parts from old combines. So, installing the chain will not be difficult. The blades are attached directly to the chain. They can be made from thin sheet metal or wire. The second option is simpler. The landing pitch is adjusted by the distance of the blades from each other. It is most advisable to install them at a distance of 25-27 cm.
Some tips
You can use a homemade device for planting potatoes even if you install a washing machine tank instead of a plywood or metal tank. Although its capacity will not be large, you can save effort and time for the manufacture of this part of the device.
It is also important to pay attention to the wheels. They should be wide. Thus, the device will not “trample” loose soil. The seeder can be made of a simple pipe, the diameter of which is 10-25 cm. All fastenings must be calculated according to the brand of the tractor (MTZ, Salyut, etc.). Although most of these home-made devices, single-row or double-row, can be attached to any type of vehicle, a device designed for a separate tractor is still better.
The single-row machine is easier to use. The device makes 1 furrow in the soil, and with a certain step (which is set by the width of the blades), throws out the tubers. It is necessary to collect potatoes of the same size so that the planting material does not get stuck in the seeder or any other part. Another option is to install additional space for an assistant who will supervise the boarding process. You can make it from a simple car seat by attaching it to the frame of the device. If you have a two-row seeder in your design plans, you won’t be able to do without additional space.