How to make hydraulics for a mini tractor
The need to assemble a hydraulic motor for a mini tractor yourself is due to saving money, as well as increasing the productivity of such a unit. This process is not very difficult, so even an amateur can construct a good hydraulic drive with his own hands.
How to make hydraulics
Using a similar mechanism on a mini tractor allows you to get a number of advantages. But the most important thing is that it ensures the stable functioning of additional elements.
Self-assembly of such a structure is very simple; it is important to have a sufficient level of technical knowledge, as well as strictly adhere to the diagram or drawings. To assemble such a device, you need to prepare a number of tools and parts. The sequence of work itself in this case looks like this:
- First, drawings of the future structure are created.
- All required parts are being purchased.
- Their installation is carried out, as well as the installation of the hydraulics themselves.
- After this, the parts are calibrated, and the functionality of the structure along with the transmission is checked.
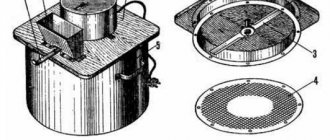
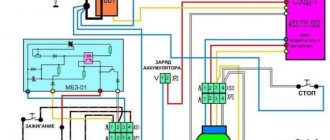
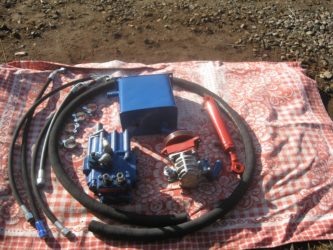
According to its diagram, the hydraulics for a mini tractor with your own hands consists of the following elements:
- Hydraulic tank where oil is poured.
- Power point.
- Hydraulic pump, as well as distributor.
- Connecting hoses.
- Special hydraulic motors, as well as pistons.
Sometimes, to supplement this, various filters are installed that change pressure indicators and other data. This prevents possible contamination of the pump as well as the power plant from contamination. In the process of drawing up a diagram of the future design, it is important to consider:
- The hydraulic pump must be placed under the tank. This will allow the oil to flow to it by gravity, which reduces problems for the hydraulic system during the starting process.
- For the correct functioning of the mechanism for a long time, it is important to first calculate the power of all combined elements in the unit. It is taking these data into account that the hydraulic pump itself should be selected. When the power of one is not enough, additional installation of an auxiliary element is required. The latter will begin to work when the maximum load in the system is reached.
- To ensure long-term and trouble-free operation of the unit, sensors must be installed to measure the pressure level in the system, as well as filters designed to clean the oil.
In order for the fluid to fulfill its role in the system, it is important that it is constantly in motion. A similar function is performed by a hydraulic pump that transports oil throughout the entire system. The power unit connected to it transmits torque, thereby activating the fluid exchange mechanism. The pump itself is connected to the distributor. Based on the position in which the lever is located, the oil returns to the tank or it goes in a different direction to the hydraulic motor or pistons.
As a result, due to the high density of such a liquid, it allows for heavy traction movements. In the form of an engine for such a unit, different options are used, from electric to diesel.
An important condition is the need to provide sufficient power for the operation of the hydraulic pump for the mini tractor.
Selection and procurement of parts
The need for such a system is due to the simplification of the functioning of the pistons, as well as easier movement of the unit. To avoid problems during soil cultivation, a hydraulic system is used, since the minitractor itself has insignificant traction properties.
As a result, you need to purchase the necessary elements, modify the design, and then assemble the device. You can buy structural elements separately or as a set. It is important that each group of pistons has its own lever.
For small units, 3 levers are sufficient:
- For braking.
- For frame control.
- To start hydraulic motors.
Hydraulic motor installation diagram
Advanced models use distributors equipped with additional functionality. However, the price of such options is significantly higher than classic products. The selection of the purchased hydraulic pump is carried out based on the following parameters:
- The level of pressure required to start the power plant. If this is insufficient, the hydraulic motor simply will not start working.
- Pumping speed measured in l/min. Determines at what speed the pistons and motors will operate.
How to install
When all the components have been purchased, all that remains is to assemble the minitractor, in the process connecting all the elements. To do this, the engine must be connected to a purchased hydraulic pump. Further from it, the tubes are connected to the distributor, after which directly to equipment in the form of pistons, motors, as well as a hydraulic tank connected to the pump. In this case, it is necessary to install filters between the tank and the pump, which are necessary to clean the oil.
Upon completion of installation, all systems must be checked. If problems are identified in operation, all hoses are examined for integrity, as well as tightness of connections. When everything is good, the unit is tested during a test drive. At this time, correction is made to the functioning of the steering hydraulics, as well as movement, if there are deviations. The floating steering system should be eliminated.
Advantages
Having figured out how to make hydraulics for a mini tractor with your own hands, it is worth considering the main advantages that such home-made devices bring. Positive properties include:
- Possibility to use attachments.
- In the process of creating a diagram of the future unit, it can be supplemented with other devices.
- Controllability increases, as well as the ability to customize it “to suit you.”
The main disadvantage is the waste of time required to create such a structure. By assembling the hydraulics for a small mini tractor yourself, you can significantly increase its performance and also simplify its management. It is important to strictly adhere to the drawings, purchase high-quality parts and avoid inaccuracies.
, please select a piece of text and press Ctrl+Enter.
Source: https://traktoramira.ru/dopolnitelnoe-oborudovanie/kak-sdelat-gidravliku-na-minitraktor.html
Trailers
Trailers are an integral part of any Belarus and allow you to transport goods over distances.
From the manufacturer
The Smorgon plant offers to buy such a vehicle from them.
The PM-00.000 trailer is a standard type of trailer that is attached to the walk-behind tractor using a hitch. On the front side there is a seat for comfortable movement with cargo and control of the Belarusian steering wheel.
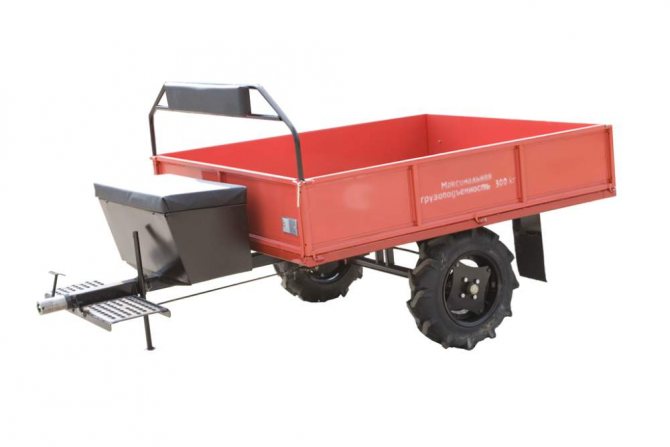
Features of the PM-00.000 trailer
- Its maximum load capacity is 300 kg. And the weight of the trailer itself is 200 kg.
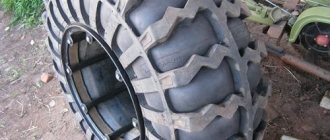
- The trailer is equipped with pneumatic wheels. Ground clearance is 27 cm. And the track size is 120 cm.
- The body is made of high quality steel. Its total area is 2.36 m2, or 0.705 m3 in volume.
- Overall dimensions of the trailer: 308 cm in length, 151 cm in width and 92 cm in height.
This cart has a slight drawback. Its platform is welded to the frame. And you have to unload the cargo yourself.
If you transport bulk substances (for example, grain crops), dump truck options are much more convenient.
Analogs
Other manufacturers have a more advanced model - the MP-480 trailer.
Its load capacity is 500 kg. The frame is further strengthened to give the trailer more stable performance properties and prevent it from tipping over during operation.
Features of the MP-480 trailer
- It has a folding side, thanks to which you can easily empty the cargo from the trailer.
- If the body height is not enough, then you can further increase it using special shields that come with the cart.
- Under the seat there is a convenient box for transporting various tools, which allows you to always keep them at hand and, if necessary, carry out repair work on the cart.
There are a large number of trailers for different tastes and colors, for example: TM-360 and 350 produced by Belarusmash, TM 500-700 from the Akimov Metallurgical Plant, etc. But their designs are similar to each other.
The only difference is whether it is a dump truck or not. When choosing a trailer, be sure to take this point into account.
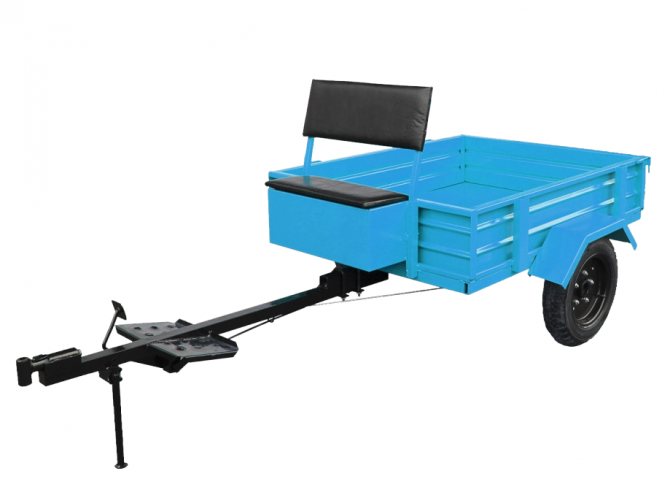
Homemade option
In fact, there is nothing better than something made by yourself. And there are no problems with the trailer. And you don't need to have any special skills. If you have a chassis, metal, an angle grinder and a welding machine on hand, you can make a trailer yourself.

Trailer device
- First you need to make a frame. It is best to use a square tube for the frame.
- Then we move on to the body. During body assembly, it is necessary to provide for the possibility of folding the sides; this greatly facilitates loading and unloading operations. And if you wish, you can even make a tipper version so that you don’t need to unload.
- Then just put it all together and install a comfortable seat in front, since without it driving an MTZ walk-behind tractor with a trailer will be impossible. The seat distance must be calculated depending on the position of the steering wheel so that control is comfortable.
If you are interested in the issue of making a homemade cart for Belarus, then you can look at the forums, there is a large amount of information there that concerns drawings, diagrams, dimensions of trailers, explains the nuances of assembling dump trucks and conventional carts, and much more.
Video review
Overview of the operation of a dump trailer on the MTZ-08MT
Overview of transportation of long cargo (firewood) on a MTZ walk-behind tractor
Reviews
Sedox:
“I haven’t even considered making it myself; I can handle tools and metal. But there is no time. I work every day and even on weekends. It may not be the best option to buy a new trailer, but in my situation I didn’t see any other option. I chose TS-350. I'm completely satisfied with it. He is able to go up and down a small hill (you just have to drive on a hill). Plus, its small dimensions make it easy to control. A small carrying capacity is not a problem, I don’t need more.”
Valerich:
“I transported potatoes in 10 bags up the mountain. And I want to say that in this case the road must be hard; if the soil is soft, you cannot pass. The walk-behind tractor simply rises up and cannot withstand the load. At least take it and go backwards. I tried that too, but in this case there was not enough grip on the ground and Belarus was slipping. I had to reduce the load and carry five bags at a time. Longer, but still easier than carrying by hand"
How to make hydraulics for a mini tractor with your own hands?
Making a device such as hydraulics for a mini tractor with your own hands is a good solution for saving money and getting more performance from the device. Mounting and creating a new system is not something particularly difficult, and for those who like to do something with their own hands, this will be a great opportunity to get creative and make their own version of hydraulics.
How to make hydraulics on a walk-behind tractor with your own hands - we describe in detail

Making a device such as hydraulics for a mini tractor with your own hands is a good solution for saving money and getting more performance from the device. Mounting and creating a new system is not something particularly difficult, and for those who like to do something with their own hands, this will be a great opportunity to get creative and make their own version of hydraulics.
Hydraulics for a DIY mini-tractor
If you decide to make a mini-tractor yourself, then without a hydraulic system such a design will not be considered a full-fledged agricultural machine. You can assemble the hydraulic unit yourself. The necessary elements can be removed from any old equipment.
How to make hydraulics for a walk-behind tractor - Special equipment
Making a device such as hydraulics for a mini tractor with your own hands is a good solution for saving money and getting more performance from the device.
Mounting and creating a new system is not something particularly difficult, and for those who like to do something with their own hands, this will be a great opportunity to get creative and make their own version of hydraulics.
How to install hydraulics on a mini-tractor yourself
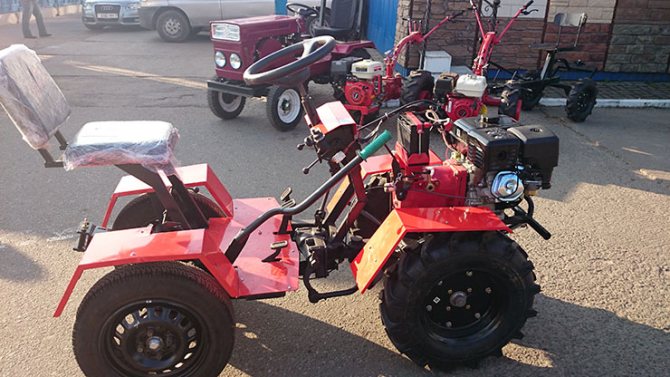
Do-it-yourself hydraulics are installed on a mini-tractor so that the equipment can work with mounted units. Any mini-tractor is designed to perform a wide range of tasks.
These machines can plow the ground, mow grass, level the ground, and perform the functions of a front loader and excavator.
To perform the above work, the mini-tractor uses appropriate attachments.
The hydraulic system is responsible for the operation of additional units and mechanisms. If you assemble a mini-tractor with your own hands, hydraulics must be installed on the homemade product.
Factory models are equipped with a hydraulic system at the factory. However, there are times when the basic hydraulic circuit is not enough to complete the required work.
In this case, an additional hydraulic distributor is installed. Let's consider both options.
Adapters overview
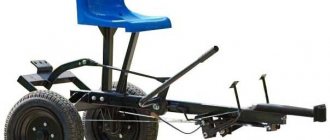
According to their design, they are divided into simple and complex (universal). The former can only cultivate the soil, and the latter can, in addition, transport various small-sized cargo. The device is a metal frame with two wheels installed. The adapters are equipped with a short or long drawbar, depending on the power of the walk-behind tractor, as well as devices for increasing the width of the wheelbase and the mounting height of additional attachments.
According to the method of connection to the walk-behind tractor, the modules are:
- Strong grip. Such designs provide a separate steering wheel, while the wheelset can be placed both in front and behind the mini-car.
- Movable mount. In this case, when you turn the steering wheel, the angle of rotation between the trailing mechanism and the walk-behind tractor changes. The operator's seat rotates. The moving joint requires significant driver effort when performing a maneuver.
In either embodiment, the drive wheels may be located at the front of the structure or at the rear of the structure.
In this video you will learn the pros and cons of the adapter for MTZ:
Currently, the following types of adapters for MTZ walk-behind tractors are successfully used to cultivate fields and small plots of land:
- Tselina arable adapter for Belarus walk-behind tractor is the most popular in agriculture. When creating the device, only high-quality materials are used, and it is convenient to operate. The seat in the module is quite comfortable and does not allow the driver to get tired for a long time. Pneumatic wheels provide stability to the structure when working in any soil. Thanks to the band brake, braking of the model is facilitated. Connecting the adapter increases the speed of the machine to 10 kilometers per hour, which is quite enough for agricultural operations. The weight of the arable module does not exceed 50 kilograms.
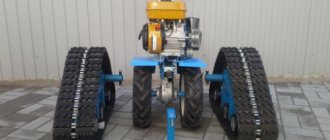
- The Horsesam IS-2 adapter for the MTZ walk-behind tractor turns the structure into a small tractor. It has a steering wheel and a seat, and a driving pair of wheels is installed at the rear. This mini-tractor perfectly performs its tasks in a small area of gardens and vegetable gardens. The driver's seating position resembles that of a motorcycle, which creates comfortable conditions during agricultural work. The control system (gas, brake, power unit activation) is located on the steering wheel, which is important for the installation operator. The device can be connected to the MTZ 09N walk-behind tractor from the Minsk plant. Additional equipment is easily attached to it, such as plows, various cutters and a tractor cultivator 06, mowers and diggers, as well as a snow removal mechanism.
There are many types of adapters for MTZ.
There are a number of adapters from other manufacturers. These include:
- APM module for the Neva walk-behind tractor. Allows you to attach hillers, plows, harrows, potato diggers and much other equipment. It pulls a trailer cart with ease. The adapter is available in two types: for one axis and for two. It is for this purpose that a special type of towbar is provided. Under the driver's seat, the structure is equipped with a spring, which cushions when working on uneven ground surfaces. A brake pedal is installed near the driver, by pressing which you can easily stop the movement of the walk-behind tractor. The pneumatic tires with which the device is equipped ensure smooth movement over rough terrain. Assembling the structure is not a problem; it is quite simple and straightforward. If you have any questions, you can look at the instructions, which show the design diagram of the adapter.
- AMPK-500 manufactured by Kadvi, used in combination with heavy types of walk-behind tractors. The drive is installed on the rear pair of wheels. The towbar body lifts with ease and is capable of moving loads weighing 500 kilograms.
- EMK is designed for connecting small attachments. The module includes a driver's seat.
- PMG 300 is a walk-behind cargo unit that allows you to place cargo in the back of a trailer up to 350 kilograms.
Advice. If you have a walk-behind tractor on your farm, don’t be lazy and buy an adapter. Its installation increases the traction force at least twice. All work related to cultivating the land will take place in an instant.
Hydraulics for a mini tractor - manufacturing, installation, design
Homemade hydraulics are a good way to expand the functionality of a mini tractor and save a significant amount. The assembly and installation of such a structure cannot be called something very complicated. If you have the necessary parts and tools, every farmer who wants to can make this mechanism.
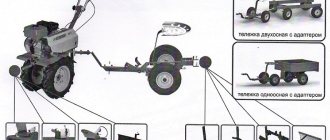
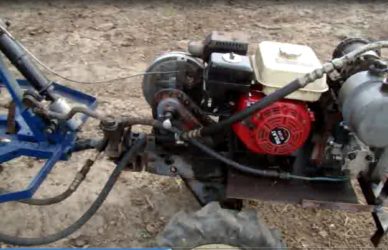
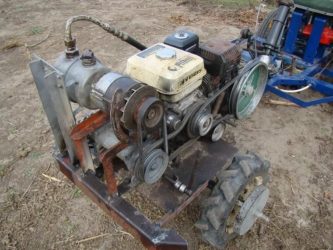
The main element of any hydraulic system is the pump, which is responsible for circulating fluid through the hoses. Oil flows to the pump from the reservoir. The pumping mechanism itself operates from the energy generated by the diesel engine of the mini tractor. Under the action of the pump, the oil flows through flexible tubes to the distributor. To make hydraulics for an agricultural machine, you can use an NSh-10 pump.
Making a hydraulic distributor with your own hands is quite difficult, so the best solution would be to dismantle a ready-made unit from any old tractor. A distributor of the P-80 brand, which is equipped with MTZ tractors, will be suitable for installation on a homemade machine.
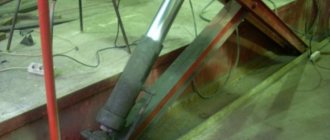
Through the distributor, the oil enters the cylinder, the main function of which is to raise and lower attachments. Ready-made homemade hydraulics should be installed on the frame of a homemade machine, closer to its drive axle.
The system can also be supplemented with motors that must be connected to the wheels. Thus, hydraulics will not only lift the attachments, but also participate in braking the mini tractor.
When such hydraulics operate, oil will flow into the cylinders. Due to the drop in its level, the wheels of the minitractor will slow down. When the lever is moved to neutral, the drive wheels will be completely locked.
Assembling hydraulics with your own hands - what are the advantages of making them?
Among modern farmers, homemade mini tractors are far from uncommon. The agricultural machine is capable of performing many jobs: plowing the land, mowing and collecting grass, as well as towing heavy large luggage using a mini tractor trailer. The list of these procedures can be significantly expanded, but this requires hydraulics for a homemade mini tractor.
DIY adapter for walk-behind tractor
A trailer for a walk-behind tractor, which has a simple design, can be made on your own.
As practice shows, self-made adapters are not much inferior in quality to factory models, having a significantly lower cost.
In addition, self-made mechanisms are more responsive to the specifics of specific operating conditions than purchased ones, which sometimes have to be modified.
The main stages of self-production of an adapter mechanism for a walk-behind tractor:
- Preparation of device drawings. In the absence of practice and design skills, it is best to use ready-made diagrams and technical drawings.
- Procurement, which includes the acquisition of the necessary materials and the selection of equipment necessary for manufacturing - profile, steel sheet, welding machine, fasteners, etc.;
- Manufacturing of parts and installation of the device;
- Equipping the adapter with working equipment and testing its operation in real conditions.
The simplest model of an adapter device for a walk-behind tractor
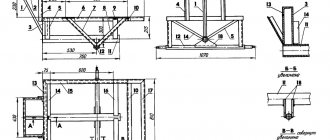
The simplest model of a walk-behind trailer is a metal profile of a rectangular section 1.7 meters long, perpendicular to one of the ends of which a half-meter pipe is welded, which serves as the basis for securing the wheel stands.
The base for the operator’s seat, footrests, a brake device and a factory or homemade hitch are welded to the same profile.
The role of a hitch for securing attached working equipment is performed by channel No. 10, 0.4 meters long, welded to the rear part of the adapter frame.
The adapter is equipped with a three-part adjustment lever with elbow lengths of 0.2, 0.3 and 0.5 meters, to which a force-increasing handle 0.75 meters long is welded.
As the wheels of the device, you can use wheels from a garden wheelbarrow mounted on self-machined bushings.
You can use old motorcycle or scooter seats in the design. The use of a seat with a built-in shock absorber eliminates the need to install springs.
Multifunctional adapter for walk-behind tractor
The manufacture of a multifunctional adapter with a more complex design at home begins with the preparation of its kinematic diagram.
You can prepare a drawing of the device used to perform soil cultivation operations and transport goods and clear snow from the ground yourself or take one of the ready-made options.
When preparing the diagram, special attention is paid to the stability of the structure and the prevention of overloading of mechanisms during movement and performance of work operations.
The frame frame is equipped with a fork connected to a bushing, which ensures unimpeded rotation of the trailer.
The body transport platform is made of steel sheet and equipped with sides with a height of at least 0.3 meters.
A purchased or homemade hitch is used as a coupling mechanism. One of the simplest options for manufacturing a coupling module is a fifteen-centimeter metal pin stuck into the holes of the U-shaped frame of the walk-behind tractor and the drawbar. The disadvantage of this method is the rapid wear of the fastening when exposed to friction during turns.
The remaining parts and devices are manufactured and installed similarly to the elements of a simple adapter.